Quick Links
Final Cut Pro X is a huge step up from iMovie, which is the video editor most macOS users probably started out with. Final Cut Pro X functions similarly but packs in a whole lot more power while sticking to iMovie's simple design.
Final Cut Pro X offers a lot of advanced features missing from iMovie, including support for UHD 4K media, team collaboration, multicamera editing and syncing, and a lot more. Here, we'll cover the basics of how to get started and how to navigate the interface.
Import Your Files to a New Project

When you open up the File > New menu, you'll see a few things you can create:
- Library: Libraries are where you import files. They can contain multiple projects, events, and imported videos.
- Event: These function as containers for projects and video files.
- Project: This is where you do all your editing.
- Folders: These help you organizing materials within events.
Final Cut Pro manages most of these for you automatically when you create a new Project.
You can start importing by hitting Command+I to bring up the Import window, which lets you configure some options before importing.

An important option to consider is whether or not to copy files over or leave them in place. If you have large files and a small hard drive, it's best to keep them in place. Select a video, hit the "Import" button, and the video will appear in the Library sidebar.
Working With Clips
Once you've imported your clips, you can drag them onto the timeline.

Manipulating clips in the timeline is pretty simple. You can see here the different actions Final Cut supports, which you can select by pressing the corresponding key.

For trimming, it's easy to drag one end of the clip towards the other or cut out parts of the clip with Command+B (which automatically blades the video at the playhead position).
If you want to change the speed of the clips, Final Cut has an intuitive way to do it, press Shift+B where you want the speed change to start and stop.

This will "blade speed" and allow you to drag that part of the clip closer together to shrink it down to a smaller space (or drag it apart for slow-mo).
You may notice that if you slow the video down, it becomes choppy. Final Cut has a solution to this: Under the retiming menu, select Video Quality > Frame Blending / Optical Flow.

This command runs some analysis on the video to try to improve the smoothness of slowed-down footage. Frame blending creates transitions between frames (so it doesn't cut so abruptly) but doesn't add any detail to the footage. Optical Flow is a really powerful tool that can predict what was there between frames. It doesn't work so well on fast moving footage though and can create some weird artifacts.
Both of these commands run in the background and take a bit of processing, so you may want to hold off on using them while editing unless you have a fairly powerful computer.
Navigating the UI
Command and the number keys 1-8 will show different parts of the editor. Command+5 brings up the effects pane.

From here you can choose from all of Final Cut's supported effects, as well as third-party ones you've installed with plugins. The audio effects are in this tab as well. You can use them by dragging them out of the effects panel onto the clip you want to set the effect on, or by double-clicking the effect while the clip is selected. Command+Shift+5 will bring up the transitions panel directly next to it, which you can place in between clips.
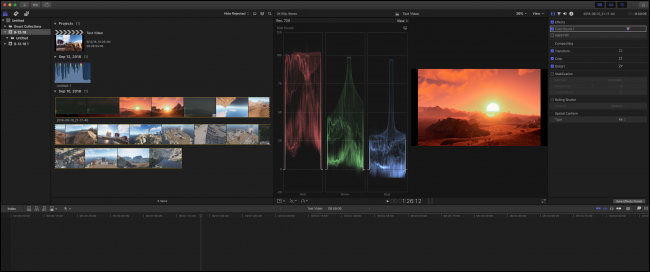
Command+6 and Command+7 bring up the waveform and color correction tools, which you can use to properly color correct your videos.

This pane also has a histogram and vectorscope in all different channels, which are very powerful tools.
Recording Voiceovers

The voiceover recorder lets you record audio over a clip. Open it with Option+Command+8 and then press the record button to start recording.
By default, Final Cut save every voiceover you make into a new event categorized by date. You can save these manually into their own event under the "Advanced" tab. It's best to give your voiceover a quick name, so you won't forget what it is.
Sharing Your Video
Final Cut does a lot of rendering in the background to improve performance on lower-end hardware, so when it comes time to render, it should go pretty fast. You can export your video to a master file with File > Share > Master File. You can also share directly to many video hosting sites like YouTube, Vimeo, and Facebook, though it should be noted that if it fails during upload, you'll have to render again.