Quick Links
Windows 10 automatically creates a network profile when you connect to a network. Ethernet networks are named something like "Network," while wireless networks are named after the SSID of the hotspot. But you can rename them with a simple Registry hack or local security policy setting.
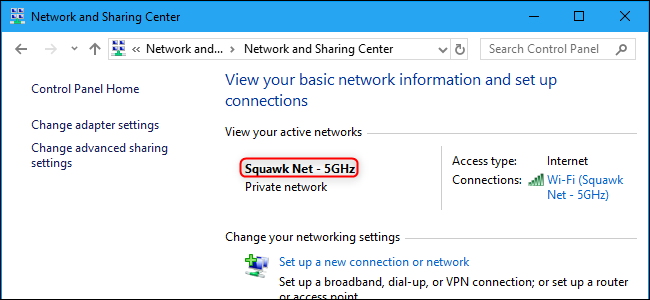
This name appears under "View your active networks" in the Network and Sharing Center. Renaming networks is particularly useful when you have multiple wired network profiles named "Network" and "Network 2," since it makes it easier to tell which is your active network profile.
Windows Home Users: Rename the Network Profile by Editing the Registry
If you have Windows 10 Home, you must edit the Registry to rename a network profile. You can also do it this way if you have Windows 10 Professional or Enterprise and would rather rename your profiles by editing the Registry. (However, if you have Windows Pro or Enterprise, we recommend using the easier Local Security Policy editor method in the next section.)
Here's our standard warning: The Registry Editor is a powerful system tool, and misusing it can render your Windows system unstable or even inoperable. This is a pretty simple registry hack and you shouldn't have any problems as long as you follow our instructions. However, if you've never worked with the Registry Editor before, consider reading about how to use it before you get started. We also recommend backing up the registry (and your computer!) before making any changes, just in case.
First, launch the Registry Editor. To do so, click the Start button and type
regedit
into the search box. Press Enter and permit it to make changes to your computer.

In the Registry Editor window, browse to the following key in the left sidebar. You can also copy-paste the address into the Registry Editor's address bar and press Enter.
HKEY_LOCAL_MACHINE\SOFTWARE\Microsoft\Windows NT\CurrentVersion\NetworkList\Profiles
Click the little arrow to the left of the "Profiles" subkey to expand it and view its contents.

Each of the keys (folders) under Profiles represents one of your network profiles. These have long names, which are the GUIDs (globally unique identifiers) representing the profiles.
Click each key under Profiles and examine the "ProfileName" field to see the profile to which the key corresponds. For example, if you want to rename a network named "Network1," click each key until you see the one with "Network1" to the right of ProfileName.
Double-click the "ProfileName" value for the network you want to rename.

Type a new name for the network profile into the "Value data" box and click "OK."

The network profile now has a new name. You can repeat this process to rename other profiles. When you're done, you can close the Registry Editor window.
We had to sign out and sign back in before our active network profile name changed in the Control Panel. If the name doesn't change immediately, restart your computer or sign out and back in.
To change the network's name in the future, return here, double-click the appropriate "ProfileName" value once again, and enter a new name.
Windows Pro and Enterprise Users: Rename the Network Profile with the Local Security Policy Editor
If you have Windows 10 Professional, Enterprise, or Education, you can skip the registry editor and use the Local Security Policy Editor to rename networks. You may not have access to this tool if you're on a company network and your computer is part of a domain.
To open this utility, click Start, type secpol.msc into the search box in the Start menu, and press Enter.
(If you can't find this tool on your system, you're using Windows 10 Home. You have to use the Registry Editor method instead.)

Select "Network List Manager Policies" in the left pane. You'll see a list of all the network profiles on your system.
To rename a profile, double-click it.

Select the "Name" box, type a new name for the network, and then click "OK."

To rename additional profiles, double-click each one you want to rename and change its name in the same way.
The active network's name changed immediately in the Network and Sharing Center on our system. If the name doesn't change immediately on your PC, try signing out and signing back in---or restarting your PC.
If you change your mind in the future, return here. Select "Not Configured" in the name section and then click "OK" to restore the default name.