Photoshop is already a powerful and versatile app, but you can make it even more powerful, more versatile, and easier to use with Photoshop Add-Ons.
Photoshop Add-Ons theoretically come in two flavors, Extensions and Plug-ins, although the differences are mainly behind the scenes. Both do much the same thing: they either add new functionality to Photoshop---like better HDR processing or the ability to export layers to CSS---or make it simpler to use Photoshop’s existing feature set---like panels that group together a load of retouching actions or create lots of specific layers or masks at once.
Photoshop add-ons vary hugely in scale. Some are simple, one button panels that get added to your interface. Others are stand-alone, fully featured editing apps that hook into Photoshop. Let’s have a quick look at the two ends of the spectrum.
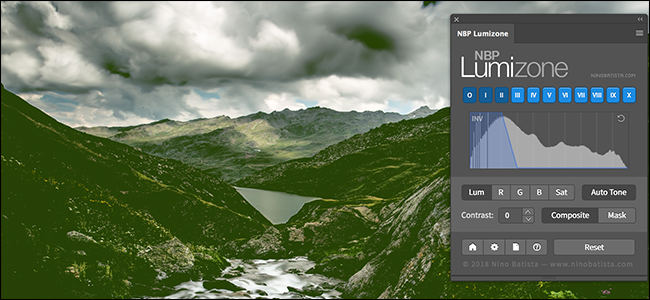
Lumizone is a plug-in panel that makes it easy to select and mask different areas of your images based on how light or dark they are. In the image below, I’ve turned all the darkest shadow areas green. You can see how the highlights—even in the shadow areas—are left untouched. While it’s possible to do this in Photoshop without Lumizone or a similar plug-in, it’s a lot more work.

At the other end of the scale, Luminar is a full photo editor in its own right, but you can use it as a Photoshop plugin. When you edit an image in Photoshop, you can send it to Luminar, make some changes, and then send it back to Photoshop with those changes applied. Here, we're editing an image in Luminar’s plugin.

And here’s the same image back in Photoshop ready for further edits.

If we're being a little general in describing add-ons, it’s because there’re thousands of them available. Adobe lets developers integrate deeply with Photoshop using a variety of different scripting languages and methods so there are almost no limits to what they can do.
Getting Started With Photoshop Add-Ons
You’re most likely to run into Photoshop add-ons when you search Google for a way to do something quickly or more efficiently. For example, Adobe kind of missed the boat (or more like, totally ignored the boat) on the filter-editing movement inspired by Instagram. Photoshop’s built-in Filter Gallery is, honestly, a throwback to the 90s.
Other developers have stepped up to add this functionality to Photoshop. Luminar, Color Effex Pro, Filter Forge, and dozens of other apps add intuitive filter based editing. If you need the power of Photoshop but want certain kinds of adjustments to be more straightforward and more repeatable, they’re a great place to start. And as soon as you begin Googling ways to get Instagram filters in Photoshop, you’ll find them.
Similarly, if you’re looking for how to add your photo to a mock book or magazine cover, you’ll probably encounter PSD Covers and their plug-in. If you’re having difficulty doing something in Photoshop, start searching for “[my problem] Photoshop plug-in" and see where that gets you.
Adobe also maintains an (incomplete) list of third-party plug-ins and an (also incomplete) marketplace. You’ll find a mix of free and paid add-ons there. Have a look through and see what catches your eye.
Once you’ve found an add-on, you want to try, download it and work through its specific installation instructions. You usually just have to double-click on an installer, follow a wizard, and restart Photoshop.
Using Photoshop Add-Ons
In general, you access Photoshop add-ons in one of two ways: from a new panel or through the Filter menu. Let’s take them one at a time.
Photoshop Panels
Before you can use a Photoshop panel based add-on, you need to add it to the interface, since Photoshop does not show all panels by default. With the add-on installed, go to Windows > Extensions and select the panel from the list. You can see I’ve got four add-on panels installed.

And just like that, the panel appears, ready for you to use.

Photoshop Filters
Filters work a bit differently. Open the image you plan to send to a plug-in in Photoshop and make any edits you want. You then have two options:
- If you haven’t used any layers, duplicate the background to a new layer with the keyboard shortcut Control+J (on Windows) or Command+J (on macOS).
- If you have used some layers or adjustment layers, merge everything to a new top layer with the keyboard shortcut Control+Alt+Shift+E (on Windows) or Command+Option+Shift+E (on macOS).
Either way, you’ll end up with a new layer on top of everything, ready to be sent to the plug-in.

Select the layer and then open the "Filter" menu. At the bottom of the list, you’ll see each filter manufacturer whose filters you've installed. I have NBP, Nik, and Skylum plug-ins.

Select the plug-in you want to use from the list and Photoshop sends the selected layer to the filter.

Make any edits you want, and when you’re done, click the button that says something like Apply, Done, or Okay---it's different from filter to filter. All the edits you’ve made are applied, and the merged layer is sent back to Photoshop.
Photoshop is the king for a reason. With add-ons, third-party developers have probably added anything you think is missing.