Quick Links
Whether you use Microsoft Word for personal or professional writing, sometimes you may want to add supplemental notes to sections of your work. Maybe you want to make a side comment on one of your arguments, or you need to cite another author's work without distracting from the main text. Luckily, Word has useful tools for adding footnotes and endnotes to your writing.
We're using Microsoft Word 2016, but Word has supported footnotes and endnotes since at least Word 2007. Depending on the version of Word you're using, the menus we walk through in this guide may look a little different. But don't worry---the features and functions are the same.
What Are Footnotes and Endnotes?
Footnotes and endnotes are both ways of adding extra bits of information to your writing outside of the main text. Think of them like verbal asides, only in writing. You can use footnotes and endnotes to add side comments to your work or to cite other publications like books, articles, or websites. The only difference between footnotes and endnotes is where they appear in your document.
As the name suggests, footnotes are attached to the bottom of the page containing the sentence they correspond to. Endnotes, on the other hand, are added to the end of a section or document. Which one you should use in your writing depends on your personal preference or---if you're writing for school or work---your organization's publication standards.
How to Insert Footnotes and Endnotes
Fire up Microsoft Word, and then open the document to which you'd like to add footnotes (or create a new document if you're just getting started). Switch to the "References" tab on Word's Ribbon.

Here, you'll find a bunch of useful features for annotating your text, including tools for inserting a table of contents, adding citations, and generating a bibliography. The second group on this tab contains the footnote and endnote features we want.

To add a footnote, place your insertion point in your text where you want the footnote to appear, and then click the "Insert Footnote" button.

Word adds a small superscript number where you placed the insertion point.

And then immediately shifts focus to the footnote pane and places the insertion point at your new footnote, so you can start typing it right away.

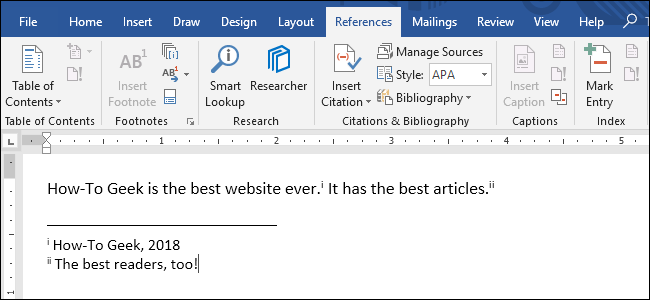
Footnotes appear at the bottom of the page beneath a short horizontal line. Each time you add a footnote on this page, another number will be added to the list.

Once you've added your footnotes, you can hover your cursor over each sentence's reference marker to see a preview of the footnote within the text.

You can also quickly tab between footnotes in both the main text and the footnote list at the bottom of the page by clicking the "Next Footnote" button in the navigation bar.

Or, click the dropdown menu arrow on the "Next Footnote" button to select a different navigation option. You can choose to go to the previous footnote or navigate to the next or previous endnote.

The steps for inserting endnotes are essentially the same. Place your insertion point where you'd to annotate, and then click the "Insert Endnote" button on the "References" tab of Word's Ribbon.

Just like with footnotes, Word attaches a superscript number containing an endnote. But this time, the list of notes it generates appears at the end of the current section or the end of the document (you can customize where they appear, and we'll talk more about that in a bit).

How to Configure Footnotes and Endnotes in Word 2016
Word has basic default settings for footnotes and endnotes, but you can adjust these settings at any time from the menu on the References tab.
Click the arrow in the lower right corner of the "Footnotes" menu.
This brings up a Footnote and Endnote window where you can customize the location, appearance, and format of all your footnotes and endnotes.
Change the Location of Footnotes and Endnotes
By default, Word puts footnotes at the bottom of the page and endnotes at the end of the document, but you can change where these notes appear.
Under "Location" in the Footnote and Endnote menu, find the "Footnotes" option (it should be selected by default when you first open the menu). Open the dropdown menu to the right of that option and you can change your footnote location to either the bottom of the page or below the text. If you choose the latter option, Word places your footnotes immediately after the main body of text instead of at the bottom of the page.
To change the default location of endnotes, select the "Endnotes" option, and then open the dropdown menu to its right. There, you can change endnote placement to the end of the current section or the end of the document.
Convert Footnotes to Endnotes (and Vice Versa)
Another option is to convert all of your footnotes to endnotes or vice versa. Instead of changing each one individually, this option lets you change them all at once. If you're working on a document with a lot of notes, this option can come in handy.
Under the "Location" section of the Footnote and Endnote menu, click the "Convert" button.

The Convert Notes dialog box pops up, giving you three options: 1) Convert All Footnotes to Endnotes, 2) Convert All Endnotes to Footnotes, and 3) Swap Footnotes and Endnotes. Select the option you want, and then click the "OK" button.
Change the Layout of Footnotes and Endnotes
By default, Word creates footnote and endnote lists with the same layout as the page on which they appear. However, you can adjust this from the Footnote and Endnote window by clicking the "Columns" dropdown menu and selecting the number of columns you'd like to use.

You can set your footnotes and endnotes to display in up to four different columns on the page.
Customize the Format of Footnotes and Endnotes
Word also lets you choose from several options for formatting how your footnotes and endnotes are numbered. It's generally a good idea to choose a different numbering system for each note type, especially if you're using a combination of footnotes and endnotes in the same document. This helps you and your reader quickly distinguish between the two at a glance.
In the Format section, click the dropdown arrow to the right of the "Number Format" option. Select your desired number format.
You can also label your notes with a custom symbol instead of a standard numbering system. Next to the Custom Mark option, click the "Symbol" button.
The Symbol menu will open. Select the symbol you'd like to use to label your notes, and then click the "OK" button.

Your selected icon should appear in the "Custom Mark" box, and Word will now use this symbol to label your notes.

By default, Word numbers footnotes and endnotes in individual series starting at "1" (or a, i, I, etc.) and continuing throughout the document. However, you can customize both the starting point and continuity of your notes.
If you want your footnotes or endnotes to start somewhere other than the first number in the series (for example, 2 instead of 1), click the arrows in the "Start At" dropdown box to increase or decrease the beginning value. One example of where this might be useful is if you're writing a book that contains endnotes and you're saving each chapter as a separate Word document. You could configure each chapter's document to start numbering endnotes where the last chapter left off.
To change the continuity of your numbering series, click the dropdown menu arrow next to the "Numbering" option.

You'll see three options for numbering your footnotes and endnotes: Continuous, Restart Each Section, and Restart Each Page. If you want your footnotes and endnotes to be numbered continuously from the beginning of your document to the end, select the "Continuous" option. If you'd prefer to have your notes numbered by chapter or section, select the "Restart Each Section" option. Or select "Restart Each Page" to number your notes by page.
Apply Your Changes to the Document
After configuring the above options, you'll need to select how you want your changes applied to your document. At the bottom of the menu, click the dropdown menu arrow next to the "Apply Changes To" option.

If you want your changes to apply to every page and section of your document, select the "Whole Document" option. Or select "This Section" to apply changes only to the section of the document you're currently in. (Note that this option will not appear if you have no section breaks in your document.)
Once you're satisfied with your settings, click the "Apply" button in the bottom right of the menu.

You can also insert a new footnote using your selected settings by clicking the "Insert" button in the lower left corner of the menu.
How to Cross-Reference Footnotes and Endnotes in Word 2016
If you want to use the same footnote or endnote more than once throughout your text, there's an easy way to do it without having to insert the same thing over and over again.
Place your insertion point where you want a reference inserted into the text. On the References tab, click the "Cross-Reference" button.
In the Cross-Reference window, choose either "Footnote" or "Endnote" from the "Reference Type" dropdown menu.

Next, click the "Insert Reference To" dropdown menu.
The "Footnote Number" option inserts the number of the footnote in regular text, while the "Footnote Number (Formatted)" option inserts the number of the footnote in superscript. The "Page Number" option inserts the number of the referenced page instead of the footnote number. The "Above/Below" option inserts either the word "Above" or "Below" depending on where the original footnote appears in relation to the cross-reference. Select your desired option.
Word lets you create hyperlinks between cross-references so you can easily find the same footnote everywhere it appears in your document. The "Insert as Hyperlink" option is checked by default, so you can click any cross-reference and automatically be taken to the part of the document containing the original footnote. We recommend leaving this option checked, but you can uncheck it if you prefer.

Under the "For Which Footnote" option, select the footnote you'd like to cross-reference, and then click the "Insert" button at the bottom of the menu.