Quick Links
Windows 10's "Windows Defender Application Guard" feature runs the Microsoft Edge browser in an isolated, virtualized container. Even if a malicious website exploited a flaw in Edge, it couldn't compromise your PC. Application Guard is disabled by default.
Starting with the April 2018 Update, anyone using Windows 10 Professional can now enable Application Guard. Previously, this feature was only available in Windows 10 Enterprise. If you have Windows 10 Home and want Application Guard, you'll have to upgrade to Pro.
System Requirements
Windows Defender Application Guard, also known as Application Guard or WDAG, only works with the Microsoft Edge browser. When you enable this feature, Windows can run Edge in a protected, isolated container.
Specifically, Windows is using Microsoft's Hyper-V virtualization technology. That's why Application Guard requires you have a PC with either Intel VT-X or AMD-V virtualization hardware. Microsoft also lists other system requirements, including a 64-bit CPU with at least 4 cores, 8 GB of RAM, and 5 GB of free space.
How to Enable Windows Defender Application Guard
To enable this feature, head to Control Panel > Programs > Turn Windows Features On or Off.

Check the "Windows Defender Application Guard" option in the list here, and then click the "OK" button.
If you don't see the option in this list, you're either using a Home version of Windows 10 or you haven't upgraded to the April 2018 Update yet.
If you see the option, but it's grayed out, your PC doesn't support this feature. You may not have a PC with Intel VT-x or AMD-V hardware, or you may need to enable Intel VT-X in your computer's BIOS. The option will also be grayed out if you have less than 8 GB of RAM.

Windows will install the Windows Defender Application Guard feature. When it's done, you'll be prompted to restart your PC. You must restart your PC before you can use this feature.

How to Launch Edge in Application Guard
Edge still runs in normal browsing mode by default, but you can now now open a secure browsing window protected with the Application Guard feature.
To do so, first launch Microsoft Edge normally. In Edge, click Menu > New Application Guard Window.

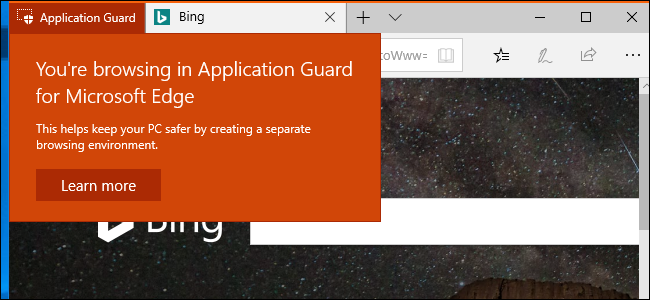
A new, separate Microsoft Edge browser window opens. The orange "Application Guard" text at the top left corner of the window informs you that the browser window is secured with Application Guard.
You can open additional browser windows from here---even additional InPrivate windows for private browsing---and they'll also have the orange "Application Guard" text.

The Application Guard window also has a separate taskbar icon from the normal Microsoft Edge browser icon. It features a blue Edge "e" logo with a gray shield icon over it.
When you download and open some types of files, Edge may launch document viewers or other types of applications in Application Guard mode. If an application is running in Application Guard mode, you'll see the same gray shield icon over its taskbar icon.

In Application Guard mode, you can't use Edge's Favorites or Reading list features. Any browser history you create will also be deleted when you sign out of your PC. All cookies from the current session will be cleared when you sing out of your PC, too. This means you'll have to sign back into your websites every time you start using Application Guard mode.
Downloads are also limited. The isolated Edge browser can't access your normal file system, so you can't download files to your system or upload files from your normal folders to websites in Application Guard mode. You can't download and open most types of files in Application Guard mode, including .exe files, although you can view PDFs and other types of documents. Files you download are stored in a special Application Guard file system, and are erased after you sign out of your PC.
Other features, including copy and paste and printing, are also disabled for Application Guard windows.
Microsoft added some options to remove these limitations, if you like, but these are the default settings.

How to Configure Windows Defender Application Guard
You can configure Windows Defender Application Guard and its limitations via Group Policy. If you're using Application Guard on your own standalone Windows 10 Professional PC, you can launch the Local Group Policy Editor by pressing clicking Start, typing "gpedit.msc," and then pressing Enter.
(The Group Policy Editor isn't available on Home editions of Windows 10, but neither is the Windows Defender Application Guard feature.)

Navigate to Computer Configuration > Administrative Templates > Windows Components > Windows Defender Application Guard.

To enable "data persistence" and let Application Guard save your favorites, browser history, and cookies, double-click the "Allow data persistence for Windows Defender Application Guard" setting here, select "Enabled," and click "OK." Application Guard won't erase its data after you sign out of your PC.

To let Edge download files to your normal system folders, double-click the "Allow files to download and save to the host operating system from Windows Defender Application Guard" setting, set it to "Enabled," and click "OK."
Files you download in Application Guard mode will be saved to an "Untrusted Files" folder inside your Windows user account's normal Downloads folder.

To give Edge access to your normal system clipboard, double-click the "Configure Windows Defender Application Guard clipboard settings" option. Click "Enabled" and customize your clipboard settings using the instructions here. For example, you can enable clipboard operations from the Application Guard browser to the normal operating system, from the normal operating system to the Application Guard browser, or in both ways. You can also choose whether you want to allow text copying, image copying, or both. Click "OK" when you're done.
Microsoft recommends you don't allow copying from your host operating system to the Application Guard session. If you do, a compromised Application Guard browser session could read data from your computer's clipboard.

To enable printing, double-click the "Configure Windows Defender Application Guard print settings" option. Click "Enabled" and customize your printer settings using the options here. For example, you could enter "4" to enable printing only to local printers, "2" to enable printing only to PDF files, or "6" to allow printing only to local printers and PDF files. Click "OK" when you're done.
If you enable printing to PDF or XPS files, Application Guard will allow you to save those files on the host operating system's normal file system.

You must restart your PC after changing these settings. They won't take effect until you do.

Despite the Group Policy editor saying these settings require Windows 10 Enterprise, we found they worked perfectly fine on Windows 10 Professional with the April 2018 Update. Someone at Microsoft probably forgot to update the documentation.
If you do need more information about what these group policy settings do, consult Microsoft's Windows Defender Application Guard group policy documentation.
And, if you're interested in Windows 10 security features, be sure to take a look at Controlled Folder Access, which helps protect your files from ransomware. This feature is also disabled by default.