If you have a spare Nintendo Wii remote with the Motion Plus add-on, you can use it to control your Windows PC from across the room. Here’s how to get it working in a couple of easy steps. Using the Wii’s Motion Plus add-on and some software, you can easily control presentations or your home theater PC. You will need:
The Software
The WIDCOMM Bluetooth stack allows you to pair your computer with the Wii remote without using a code. That’s the key piece to getting it working, and although the BlueSoleil stack can do this as well if not better, it’s not free. After the pairing is complete, the GlovePIE application will run a script that takes your controller input and translate that into mouse emulation. With some tweaking, you can extend the functionality of your makeshift mouse and even use it as a joystick/gamepad.
The Hardware
You need a compatible Bluetooth dongle to communicate with your Wii remote, and they can be found cheaply online if your computer doesn’t have one built-in already. Using an alternative Bluetooth stack actually allows a wider compatibility with adapters, a very useful side-effect. You can even use one that’s meant for wireless headphones or the like, as long as it uses Bluetooth. Strictly speaking, you don’t need the Motion Plus add-on. GlovePIE can take Wii remote input and use the pitch and yaw to move the cursor, but this doesn’t work very fluidly. The controller can also use two IR light sources as an absolute reference point, which is how it works with the Wii itself, and get a more fluid movement. You can even use two candles to get the same effect. What makes the Motion Plus approach worthwhile is that you get a more fluid movement than using just the controller, while simultaneously not having to rely on the IR sources. This makes it ideal for a quick setup for presentations, or when you’ve got daylight streaming in on your home theater setup.
Installing the Software
First, get your Bluetooth dongle plugged in and enabled. This will vary from computer to computer and dongle to dongle, but you can skip installing drivers and extra software if you only want to use it for this, as the WIDCOMM stack includes its own drivers. Next, download the WIDCOMM Bluetooth stack and double-click to install it. Accept the license agreement and agree when it prompts you to install software.


After the installation is finished, you should see a Bluetooth icon in your system tray, like so:

That takes care of half of the software. Next, download GlovePIE (with Emotiv support) and unzip the file. Inside the folder you’ve just created, you’ll see a file called GlovePIE, which is what we’ll use to script the inputs.

Connecting the Wii Remote
Right-click on the system tray icon, and go to “Add a Device.”

Next up, you’ll see a screen that says it’s searching for Bluetooth-enabled devices. Hit the 1 + 2 buttons on your Wii remote now.

You’ll see an input device named “Nintendo RVL-CNT-01” pop up in the window. Select it and hit Next.

In the next pane, you’ll be asked how you’d like to pair with the device. Choose “Pair without using a code.”

You should then see a screen that says it’s been paired and Windows is installing the necessary drivers for the device.

GlovePIE Setup
Open up GlovePIE with a quick double-click, and hit “Yes” at the security prompt. You’ll see a complicated looking window like this:

Don’t let that intimidate you! Just go to File > Open, navigate into your GlovePIE folder, and head into the “WiimoteScripts” folder.

Choose the “lednerg WiiMotion Plus Mouse.PIE” script, and click Open. You’ll see the main GlovePIE window displaying the script.

Click on the “Run” button to execute the script. You should see your Wii remote’s LEDs change configuration, from 1 and 4 being lit, to 2 and 3 being lit, and finally, only 1 will be lit.

If you see a little sign next to the “Run” button that says “Motion Plus not detected!” just click “Stop,” make sure it’s inserted properly into the Wii remote, and try again. It may take one or two tries but soon it’ll be properly interfacing with GlovePIE.
Using Your Gyroscopic Mouse
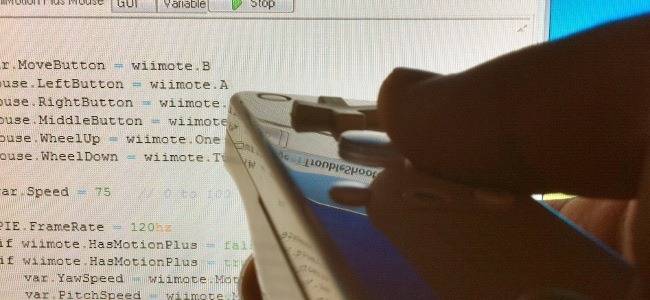
The “B” button on the bottom of the controller enables the cursor to move. If you let go of it and reposition the controller, when you hit B next, it will continue holding the cursor from that position. The movement sort of like using a touchpad on a laptop, where holding “B” is like having your finger touch the pad. Sometimes, you’ve moved too far on the pad and need to lift your finger and move it to continue pushing the cursor. The “A” button acts as a left-click, the “Plus” button acts as a right-click, and “Down” on the directional pad acts as a middle-click. The buttons work just like mouse buttons; they click when you push down on the button and unclick when you let go. Almost happy with the script, I’ve ended up tweaking it to my favor. After the first block of text, you can insert the following lines:
mouse.WheelUp = wiimote.One
mouse.WheelDown = wiimote.Two
It should look like this:

When this is run, you’ll get the added benefit of being able to use the 1 and 2 buttons to scroll up and down, respectively. If you want to disconnect your controller, hold the power button until the LEDs turn off, and to reconnect, just hold down the 1 + 2 buttons to auto-pair with your PC. Come up with clever uses of your own, or have a favorite GlovePIE script? Be sure to share with us in the comments.