Quick Links
Digital cameras struggle when you have a scene with both very bright and very dark things in it—in photography terms, a wide dynamic range. One option is to use flashes to try and brighten up the dark areas; the other, and often better option, is just to embrace it and shoot a silhouette. Let’s look at how.
How to Take a Silhouette Photo
Silhouette photos aren’t hard to take, but they’re only possible in certain circumstances. You need a subject that is backlit by a bright light source, and that source must also be in the image.
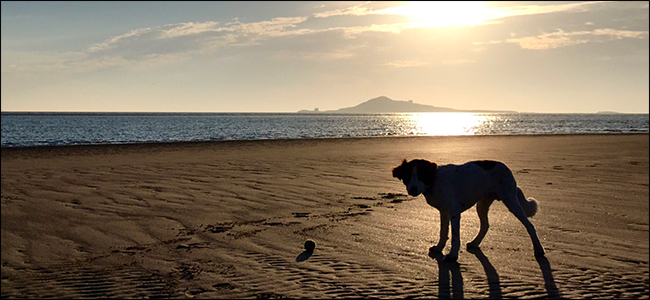
The simplest time to take silhouette photos is in the hour or two after sunrise or before sunset on a clear day. With the sun sitting low in the sky, it’s easy to position your subject so it’s silhouetted. It doesn’t even need to be directly in front of the sun since that whole horizon will also be very bright---like it is in this photo I took of my dog on the beach this morning an hour after sunrise. I’m going to use it as my example for this article.

One quick note. While I’m going to focus on using the sun as your light source, you can take silhouettes with any bright light. The sun is just the brightest thing available to most people.
When you’re shooting a silhouette, you’ll find it easier if you use manual or aperture priority mode. Underexpose the photo by a stop or two from what your camera’s meter recommends. You need to be careful not to blow out the highlights as you want a lot of color in the sky but it’s also a good idea to leave some texture in your subject; you can always turn it completely black in post production.
I’ve possibly overexposed this image a little. You can see in the histogram that I’ve got some pure white in the center of the sun, however, I have the texture I want in my dog so I’m pretty happy with it.

If you leave your camera in automatic mode, it will most likely swap between underexposing and overexposing the scene. If you’re lucky, you’ll get a good shot, but you won’t have a lot of control and it will take a few tries. Even if you’re using your phone, you should use an app that lets you have some control over the exposure.
While the autofocus on a modern camera or smartphone shouldn’t have too much difficulty with a silhouette, if it’s kicking up up a fuss, swap to manual focus mode and focus on your subject. As long as you use an aperture of f/8 or narrower, you will have no problem keeping everything acceptably in focus.
How to Edit a Silhouette Photo
Silhouette photos—like almost all photos—are greatly improved with a couple of simple edits. I’m going to work through the changes you normally need to make using the Photos app on my iPhone, but you’ll find similar tools in any editing app. If you have Photoshop, my normal photo workflow will also work perfectly.
The first thing to do is fix any problems. In my image, there’s the small lens flare in the bottom left (which is a common problem with silhouettes) and the horizon isn’t straight (you can see that in the picture above), so I’m going to fix them both at once with the Crop Tool. Here's the result.

Next, it’s time to tweak the brightness and contrast. Play around with the sliders until you get something that looks good, but in general you’ll want to add as much contrast as you can without losing detail. If you’ve underexposed or overexposed your image slightly like me, you should fix that now too.

The final step is to intensify the colors that are already in the image. Add as much saturation as you can without making your image look ridiculous. You can also play around with the white balance to push the image more towards yellow or blue.

With that done, you should have a pretty epic looking silhouette photo.

Tips for Great Silhouette Photos
Taking simple silhouette photos is pretty easy, but if you want to take things a bit further, here are some tips:
At the times you can take silhouette photos, you also get long shadows. You can combine the two and use shadows to create interesting compositions. I’ve done that with this shot of Santa Monica pier.

The color of the sky tends to be a big part of good silhouette photos. Don’t just settle for a mildly interesting sunrise or sunset. If you can, visit the same spot a few days in a row until you get a truly spectacular one.

A huge number of silhouette images are portraits. When they’re done right, they can be really cool, but they can also be pretty generic. Mix up your subjects and play around with different things like landscape images.
One big thing that can change how your silhouette photographs look is how much texture you leave in the shadow areas. Experiment and see what happens when you leave them totally black versus when you still leave a bit of detail.
Beginner photographers are often told to avoid situations with a high dynamic range but, if you approach it in the right way and know what to expect, you can take some really great silhouette photographs.