Quick Links
Upgrading and replacing PC components can be a little tricky, but it's something anyone can learn to do. Let's take a look at how to choose and install those upgrades.
We've spent the last few weeks systematically going through our How-To Geek test PC and swapping out every single part you might want to upgrade, replace, or improve. Most of it's simple, if somewhat tedious, but beginners might have a little trouble getting oriented. No worries! Follow the steps in the guides below, and you'll be cruising along with your upgraded PC in no time.
What Kind of Tools Do You Need?
You can disassemble almost all modern desktop hardware with just a standard Phillips-head screwdriver. Some parts don't even need that---modern case and component designs use a lot of thumbscrews and plastic tabs to keep things as simple as possible.
That said, you might want to have a few different sizes of screwdriver handy, just to make it easier to get to smaller or hard-to-reach screws. A cheap kit with interchangeable driver heads should have you covered. If you're working on a laptop, you might need a set of hex drivers and a set of spudgers (small prying tools) as well.

Anytime you're working with electronics, you'll want a well-lit, dry area to spread out. Any clean desk, kitchen table, card table, or work bench will do the trick, but if you're low on space in your home, tile or wood floor will work in a pinch. Don't work on carpet if you can avoid it, even if you're using a table or desk: walking around on the carpet can build up static charges and damage components. If you don't have a non-carpeted area to work, consider investing in an anti-static bracelet.

If you keep your old component boxes around, or you have a fresh new one, hang on to the anti-static bag. It's a handy place to set down components, especially those with exposed circuit boards, without damaging them.
When you're disassembling PCs you're going to have a lot of loose screws. Before starting, grab a few bowls or cups from your kitchen and keep them handy. It's a great way to make sure your screws don't roll around, and to keep the screws with different sizes and threads separate. And speaking of keeping those screws straight: a telescoping magnet grabber can be very handy for those times when you drop a screw in your PC case and can't reach it with your fingers.
If you're planning on replacing a CPU or CPU cooler, make sure you have some thermal paste handy for re-applying it. (A small amount is sometimes included with an aftermarket cooler for free.) Cleaning the stuff off of one? Grab some Q-Tips.

The inside of your PC gets dusty quickly thanks to constant airflow and positively-charged components. If you're opening it up, you might as well clean out the filters and blast it with a little canned air to clean things up a bit. You're best off doing that outside if you've got a particularly dusty rig. If you're forced to work inside, another trick is to turn on your vacuum cleaner, place the hose near the PC, and blow the dust toward it. Just never, ever try vacuuming out your PC or even touching the vacuum hose to it. Those things generate a lot of static.
If you don't have any canned air, a dry cloth will work, just be careful of fibers snagging on sharp bits of the case or circuit boards.
Last but not least, keep your phone handy and snap some photos as you're removing components and unplugging cables. Having something to refer back to will make upgrading or reinstalling much easier, especially your first time around.
How To Upgrade Or Replace Your PC's RAM

The easiest way to improve the performance of your PC is to upgrade its RAM. More memory gives the operating system some "breathing room," enabling better multitasking for applications like Chrome and Photoshop. Swapping out RAM on desktops is fairly simple, you only need to make sure you have memory modules compatible with your motherboard. On laptops, it's harder, if your laptop even allows access to its memory at all.
Basically, you just need to figure out what type of (and how much) RAM your PC can handle, how much you want, and what you're willing to pay for it.
Installing RAM takes just a few minutes. If you've never done it before, set aside 15 minutes or so.
How To Upgrade and Install a New Hard Drive or SSD in Your PC

One great upgrade is moving to a bigger hard drive or solid state drive. A bigger hard drive obviously gives you more storage capacity. Moving from a traditional hard drive to a solid state drive can also give you a speed boost across your whole system. You PC will start faster, load apps and large files faster, and decrease load times in most games. It's really one of the best upgrades you can make.
Physically, replacing a hard drive is pretty simple. Desktops have dedicated bays for storage drives, and they connect to the motherboard and power supply with standardized SATA cables. If your laptop allows access to the drive bay, it's even easier: just pull the old one out and plug the new one in. You'll probably spend more time re-installing the operating system, if you're replacing the primary storage drive.
If it's your first time installing a hard drive, plan on it taking 20-30 minutes. It's not hard. However, if you're replacing your only drive (or just the one on which your OS is installed), you'll also need to account for the time you need to reinstall or transfer your operating system.
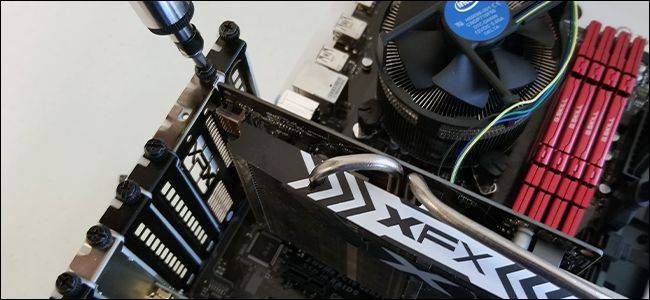
How To Upgrade and Install a New Graphics Card in Your PC

Upgrading your graphics card (or moving to a discrete graphics card if you're using your PC's built-in graphics right now) can give your gaming a serious boost. Choosing the right card---based on cost, size, and compatibility---is the hard part. The physical installation is pretty simple.
After you've chosen the card, installing it is easy. You just need to insert the card, secure it, and plug it into the power supply.
Replacing or installing a graphics card should go pretty quickly. If it's your first time, set aside half an hour or so.
How To Upgrade Or Replace Your PC's Wireless Card

If you want to add Wi-Fi capability to a desktop (or if your desktop's built-in Wi-Fi has failed), the easiest way to do so is with a USB adapter. But for more powerful Wi-Fi (due usually to bigger antennae that you can sometimes remove and place elsewhere in the room), you can also use a PCI-based expansion card.
Laptops use semi-standardized wireless cards as well, but they're harder to get at if you want to upgrade or replace one. For laptops, it's almost always better to use a USB adapter.
This is a pretty quick upgrade. If you're using a USB adapter, you really just have to plug it in. If you're installing a PCI card, figure on it taking half an hour if it's your first time.
How To Upgrade and Install a New CPU or Motherboard

Now we're getting to the harder stuff.
Replacing a failed CPU with the same model is pretty straightforward, but you'll have to remove the CPU cooler first and work with thermal paste, both of which can be intimidating for a beginner.
If you want to upgrade to a faster CPU, you'll often have to swap out the motherboard, too (and maybe even upgrade your RAM). And replacing the motherboard can be a pain. You'll need to unplug almost every component and make enough space to get the highly-integrated part out and a new one in. You also might need to perform an OS re-installation.
You should set aside a few hours for this type of upgrade, if you've never done it before.
How To Upgrade and Install a New Power Supply for Your PC

If your power supply has failed, or if you just need more power because you're installing something like a more powerful graphics card, you'll need to replace the unit. It can be tricky because your power supply is connected to everything in your PC that needs power. And, sometimes you might need to remove other components before you can get the bulky power supply out of the case.
Your computer's power supply is directly connected to the motherboard, the CPU, every storage drive and disc drive, sometimes a discrete graphics card, and often the case's cooling fans. Replacing requires you to disassemble a good bit of the PC (at the least, you'll have to unplug the power cables to all components). Still, don't be too intimidated if you've never done it before.
Plan on this one taking at least an hour.
How To Upgrade To A New PC Case

Upgrading to a new PC case is a pretty big deal because you're basically talking about disassembling your PC and then rebuilding it in its new home. It's not particularly difficult, though. It just takes a fair bit of time and patience.
The good news is that unless you're also replacing other components at the same time, you won't have to do anything software-wise. To your operating system, it will look like the same computer it was before.
Plan on a few hours for this one, if you've never done it before. If you're experienced at it, you can probably do it in less than an hour, but then you probably wouldn't need this guide, either.