Quick Links
Timeline is part of Windows 10's Task View. It shows a history of activities you've performed and can even synchronize activities across your PCs. You can then easily pick up where you left off.
This feature is part of Windows 10's April 2018 Update. It can also work with mobile apps if you sign into them with your Microsoft account, so you might see a Word document you opened on your iPhone or Android phone appear in the Timeline on your PC.
How to Access the Timeline
To open Task View, click the "Task View" icon to the right of the Cortana box on your taskbar. If you don't see the icon, you've probably hidden it in the past. You can right-click your taskbar and click "Show Task View Button" to re-enable it.
You can also open Task View by pressing Windows+Tab on your keyboard.

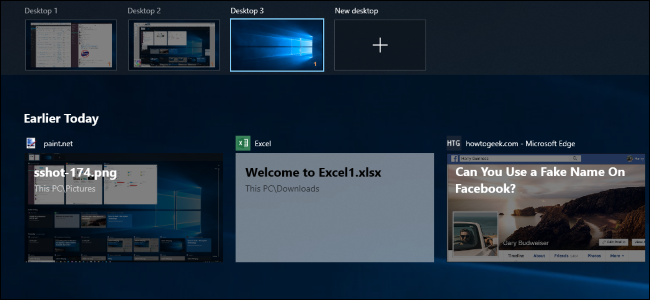
The Timeline appears below your currently open windows in the Task View interface. You may need to scroll down to see it. The scroll bar at the right side of the screen lets you to scroll back through previous days.
Scroll down through the timeline to view activities you've performed recently. You'll also see activities associated with modern Universal Windows Platform (UWP) Store apps, including web pages you've viewed in Microsoft Edge and articles you've looked at in applications like the News app included with Windows 10. Application developers will have to add support for the Microsoft Graph API to make their apps appear in the Timeline, so you won't see every app you use in this list.
The list of activities does include every file you've opened via File Explorer, so you may see many documents, spreadsheets, images, videos, and music files here.

Click or tap an activity to resume it. Windows opens the file or returns to the web page, article, or whatever else you were looking at.
Activities you've performed on previous days are grouped to make this interface easier to skim. Click "See All Activities" to see them all.
If you want to remove an activity (or group of activities), right-click or long-press it, and then select "Remove" or "Clear all from [Date]."

How to Synchronize Your Timeline Across Your PCs
The Timeline is on by default, but it doesn't sync anything to the cloud unless you let it. If you tell Windows to sync your data from a PC to the cloud, you'll see those activities on any other PCs you sign into with the same Microsoft account.
You don't have to enable this feature on each PC to do this. For example, you could enable syncing on your desktop and leave it disabled on your laptop. You'd see your desktop's activities in the Timeline on your laptop, but you wouldn't see your laptop's activities in the Timeline on your desktop---not unless you also enabled syncing from your laptop.
To enable syncing, scroll to the bottom of the Timeline and click the "Turn On" button under the "See More Days in Timeline" section.

You can also head to Settings > Privacy > Activity History and enable the "Let Windows sync my activities from this PC to the cloud" option.

How to Disable the Timeline
If you don't want to use the Timeline feature, you can head to Settings > Privacy > Activity History and disable the "Let Windows collect my activities from this PC" option.
To erase the contents of your Timeline, set any Microsoft accounts that appear under "Show activities from accounts" to "Off" and then click the "Clear" button.

To really make Timeline useful, the apps you use will have to add support for it. It's unclear how many applications will support the Microsoft Graph API, and thus Timeline, in the future.