Photoshop has a huge menu system with options even advanced users may ignore. For today's lesson we'll take a quick tour through them and learn which of them will help you increase your mastery of photo editing.
This is Part 4 of a multipart series on learning Photoshop. Part 1, the Toolbox and Part 2, Photoshop Panels, and Part 3, Layers, are also still available.
The Top Menu

Your menus are laid out as illustrated above. Let's take a quick look through these and explain the less obvious menu items.
The File Menu
While this is home to obvious things like "Open" and "Close," there are less obvious items here to look over. Here are some highlights.

Browse in Bridge: Bridge is a program that comes bundled with Photoshop for visual browsing. It allows users to look through their library of pictures rather than looking at empty filenames, similar to Google Picasa. Bridge is a decent program, but it can be annoying to accidentally open it, as it takes longer than you might want to load.
Browse in Mini Bridge: Mini Bridge is a version of Bridge that lives in Photoshop. Easy to use, but loads slowly. Part 2, Panels touched briefly on Mini Bridge.

Open As: A problematic menu item, Open As seems broken and glitchy. The idea is to be able to open one filetype as another, i.e., to open a layered PSD file as a flattened JPG. Any readers that care to comment on this, let me know of your successes or failures. I think it is broken in CS5 as of yet.
Open as Smart Object: Create a smart object from any file simply by opening it. Smart Objects resize and warp from the original file, so if you plan to resize a JPG or other image multiple times, you may want to open it as a smart object. You may want to learn a bit about Smart Objects first, however.
Share my Screen and Create New Review: Adobe CS Live features only available to Photoshop users that choose to register their copy of Photoshop and create an account on Adobe.com.

Device Central: Launches a separate program for developing applications for mobile smartphones and other similar devices. Not terribly useful for beginner users.

Save for Web and Devices: A wizard-type program launches that helps you compress your files into web-ready JPG, GIF, PNG, or WBMP file formats. In this case, "Devices" refers to the same mobile smartphones, etc, that "Device Central" refers to.
Revert: Reloads your file from the point it was last saved. You'll lose all changes and your history. However, this is still often useful.
Place: Insert a separate file into the one currently open. Allows you to resize temporarily as a smart object.
Automate and Scripts: Helpful options for advanced users that have to do lots of repetitive graphic work. Scripts, in particular are quite exciting, and are worth a look, even for basic users. They are both deserve articles of their own, on another day.
The Edit Menu
Another fairly obvious menu, the Edit menu is home to some of PS's most useful features.

Undo, Step Forward, Step Backward: Undo is a single level of revert you are likely familiar with.

is a common shortcut, and you'll find it will undo your last action as well as redo it. Step Forward and Backward move through your history palette, also covered in Part 2, Panels. This is an another simple way to use the history besides the History Panel.
Cut, Copy, and Copy Merged: You are likely also familiar with Cut, Copy, and Paste, which exist in the edit menu of nearly every program going back to MS Word for DOS. "Copy Merged" is extremely helpful, in that it can copy a multi-layer document as if it those layers were merged.
Fill: Often ignored, Fill is an excellent tool. "Fill" will fill a selection, layer, or channel with your foreground or background color, black, white, or texture, regardless of its content, unlike the bucket or flood fill. CS5 also has Content aware fill, which, given the right file, can attempt to recreate part of your image covered by foreground objects.


Stroke: Creates a linear stroke (read: a line) around your selection with whatever color you care to use. You can adjust line thickness or where in or around your selection you want to draw it. Like fill, it ignores existing content and simply strokes around your selection.


Content Aware Scale: Uses the same technology in "Content Aware Fill" to scale part of an image. Photoshop will make it's best guess how you want your image to look when you resize with this.
Puppet Warp: New CS5 feature is a very complicated warp that allows users to distort images in complex ways.


Transform and Free Transform: Very useful tools for resizing an image, correcting and creating perspective, and distorting images.
Keyboard shortcuts: A menu for editing and assigning a custom keyboard shortcut for every menu item in Photoshop. Absolutely invaluable for any user.
Menus: Allows users to edit existing menus, hiding features they hate or never use, and highlighting the ones they have trouble seeing, but use frequently. Also incredibly helpful.

Preferences: Many of the quirky problems you have with Photoshop have their controllable settings here. More on the preferences menu and making PS behave better in a later article.
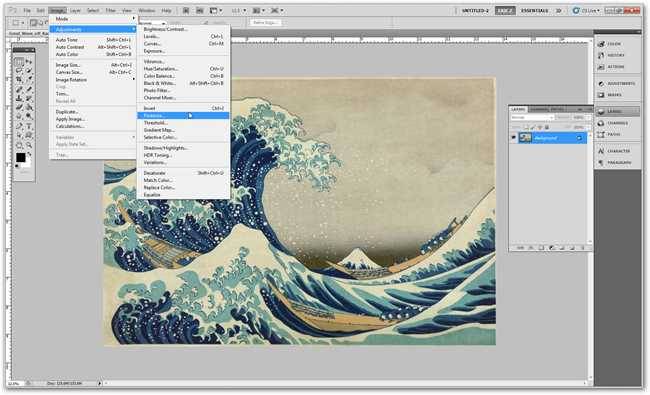
The Image Menu
The image menu allows you to change your color depth and do various other things. What are the most useful options here?

Mode: The color mode is where you set your image to RGB or CMYK, as well as various other types like Lab color or Indexed color, an 8-bit color table based file format. You should never use anything but RGB, unless you care to learn more about image formats and digital imaging.
Adjustments: A sub-menu with areas to adjust Brightness and Contrast, Levels, Curves, as well as Hue/Saturation. There are a host of other options here, all worth exploring. Here are a few of the most important:

|
Brightness/Contrast: A basic way to adjust lights, darks, and contrast in photographs. Good for beginners and easy to understand.Levels: A more sophisticated way to adjust your value range in photos.Curves: An even more complex way to adjust values and channels, allowing users to adjust targeted values with greater accuracy. For experts.Exposure: Yet another menu for adjusting lights, darks and contrast, this one largely for digital photographers.Hue/Saturation: Adjust the colors of your image, as well as how bright and vibrant they are.Invert: Black is white, white is black. All of your colors are now their opposite value.Posterize: A filter that reduces your image to a limited number of colors.Threshold: Another filter that reduces your image to black and white, completely without gray. |
Auto Tone, Auto Contrast, Auto Color: Photoshop will attempt to improve your image automatically by adjusting Tones, Contrast or Color. They are likely inspired by Photoshop Elements (and similar basic photo editors); good tools for beginners.
Image Size: Not to be confused with Canvas Size, Image size will enlarge or shrink your entire image file.

Canvas Size: Will increase the size of the file's "space" without changing any of your image information.

Image Rotation: Turn your image at 90° or 180° angles, or on "Arbitrary" ones like 21° or -5°.
Duplicate: Create a second open file identical to your file's current state. Your new file does not retain its history.
The Layer Menu
The homebase for editing your layers, the Layer menu has lots of sub-menus and complex options. Beginner users may wish to look over Part 3 of the How-To Geek Guide to Learning Photoshop, and get a basic primer on using Layers.

New: The sub menu here allows creation of new layers, as well as options for turning your existing layers into your "Background" layer, if you need or want one. You can also "group" layers---similar to putting files in a folder in your OS. This option creates the "folder" for layers to be stored in.
Duplicate Layer: Allows users to make a copy of an existing layer, either in the current document, to a new one, or to another open file.
New Fill Layer/New Adjustment Layer: Two alternate types of layers that are dynamic, and can be edited with numerical values over and over again. See Part 3 of the How-To Geek Guide to Learning Photoshop to learn more about Adjustment layers.
Layer Mask/Vector Mask: Tools for "masking" or hiding part or all of active layers. Do you know the difference between Vectors and Pixels? They are the basic difference between these two types of masks.
Clipping Masks: This "clips" a layer or layers to the layer transparency below it. Difficult to understand without experimentation. Expect later articles on Clipping Masks, Layer Masks, and Vector Masks here at How-To Geek.
Group Layers/Hide Layers: Multiple layers can be selected in the layers panel, and grouped or hidden here. This instance of "Group" bundles selected layers, rather than creating an empty group.\

Align/Distribute: Tools for arranging layers within your working space, i.e., centering an layer to your entire image, or spacing seven buttonlike objects out evenly on a page.
Merge Down: Combine the current layer or group with the layer below it.
Merge Visible/Flatten Image: Combine all layers in your document. "Merge Visible" will ignore all layers hidden in your Layers Panel, while "Flatten Image" will throw them away entirely. Merge Visible will also leave any transparency you have, while Flatten Image will create a non-transparent "Background Layer" out of all your layered information. See the illustration below for an example.


Above: Original file with Layers Panel, showing the existing layers. |


Above: File after "Merge Visible." Note the the layer transparency. |


Above: File after "Flatten Image." Note the white background added where the image was transparent. |
Other Important Menus
The remainder of the menus in Photoshop are nowhere near as complex as these first ones.

The Select Menu: Menus that work with the Marquee, Lasso, and Wand tools, as well as the layers panel. Select All, Deselect, and Reselect work directly with these. When you have an active selection, Invert will select the part of your image you do not currently have selected. You can also select layers in your layers panel here, as well as adjust your selections with the "Modify" sub-menu. You can also enter the "Quick Mask" mode here, described briefly in Part 1 of the How-To Geek Guide to Learning Photoshop.

The Filters Menu: The toybox for Photoshop users, Filters allow for all kinds of strange and wonderful distortions of images. Some are useful, many are not. Filters are a big topic, and will require at least an entire article to themselves. Until then, experiment with filters to find some that you enjoy.

The View Menu: The View menu is home to a lot of the more unusual parts of Photoshop, like the ability to change the size and shape of your pixels, as well as basic things like "Zoom In." Here, you can preview your Print Size (roughly) or quickly zoom to 100% zoom with "Actual Pixels." You can also turn off annoying things like Snap, Rulers (if you dislike them) as well as clearing your Guides or Slices.

The Window Menu: This is where nearly all of your panels disappear to when they are deleted, including the options panel at the top of your screen and your toolbox, by default on your left. You can also cycle through your open images at the bottom of the Window menu.

The Help Menu: Last but not least, the Help menu is the basic informational menu every good application should have. Check through it to learn about the tools that elude you, or simply come back to How-To Geek for the next installment of the Guide to Learning Photoshop!
Photoshop tips left you confused? Start at the Beginning! Check out the previous installments of the How-To Geek Guide to Learning Photoshop.