Quick Links
Key Takeaways
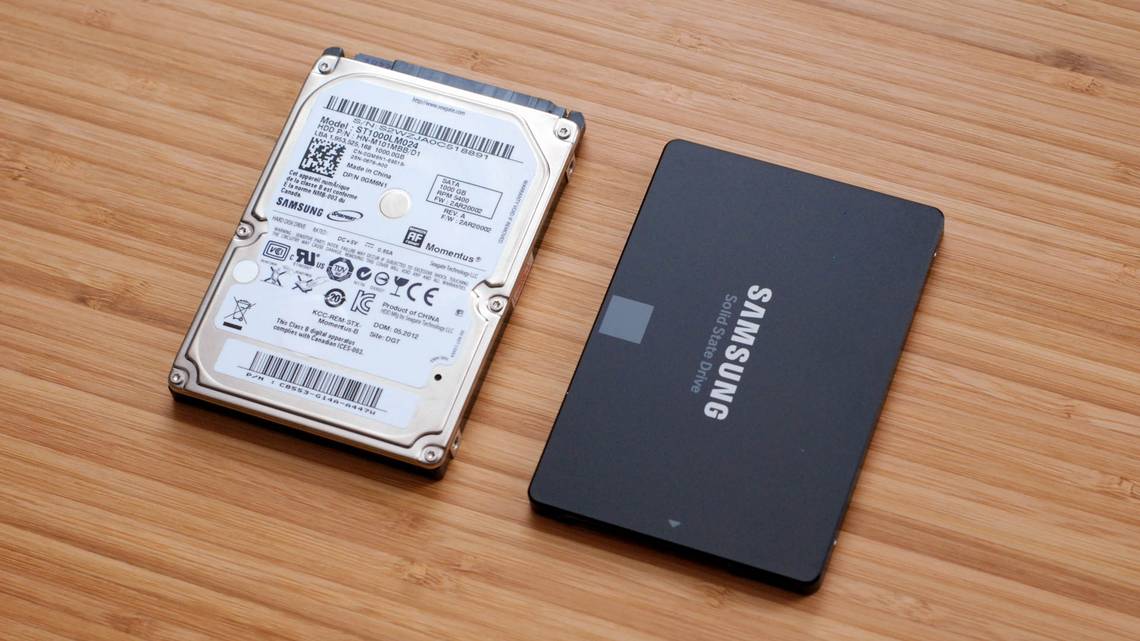
- Choosing between a regular hard drive and an SSD depends on whether you want more speed or more storage for your PC. SSDs are faster but more expensive per gigabyte than regular hard drives.
- Hard drives come in two sizes: 2.5" for laptops and 3.5" for desktops. M.2 drives are another form factor to consider, but you need to check if your PC supports them.
- M.2 drives are the fastest SSDs available, and use the PCIe bus to transfer data.
A hard drive upgrade is one of the easiest ways to improve your PC, whether you're looking for more storage or the speed boost an SSD provides. Here's how to choose and install your new drive.
Step One: Choosing Your New Drive

Choosing a drive that fits your budgets and does what you need is the first step. These days, your most important choice is between a traditional hard drive or a solid state drive (SSD). But there are few other things to think about, too.
Should You Get Regular Drive, an SSD, or Both?
Here's the question to ask yourself: do you want more speed or more storage?
Modern SSDs are amazing, and are a worthy upgrade to just about any system. Moving from a regular drive to an SSD improves speed across your system. You PC will start faster, load apps and large files faster, and decrease load times in most games. The trouble is, once you get past a terabyte of storage space, SSDs start to get prohibitively expensive.
Alternately, conventional hard drives are slower, but offer huge amounts of storage relatively cheaply. You can find desktop drives that hold four terabytes — enough to satisfy all but the most demanding of media hoarders — for under $100 USD.
You can also combine the strengths of SSDs and hard drives. If your desktop can handle more than one drive (and most of them can), you can install your operating system on the main SSD for speedy access to programs and essential files, and use a large capacity traditional drive for storing files. This makes an SSD an especially attractive upgrade if you already have a hard drive, since you can move the operating system over and "demote" the hard drive to storage duties.

If money is no object — or if you're limited to a single drive connection in your laptop — you can spend quite a lot to get a multi-terabyte SSD. But for most people, a smaller SSD combined with a larger hard drive is a great compromise.
What Physical Size Should the Drive Be?

Hard drives typically come in two sizes: 2.5" and 3.5". The 3.5" drives are also known as "full size" or "desktop drives." Pretty much every desktop PC out there has room for at least one (and sometimes many) 3.5" drives. The possible exception to this are the super-small form factor PCs that can only handle a 2.5" drive.
2.5" drives are traditionally meant for laptops, but will also fit just fine in a desktop PC. Some desktop PCs have built in mounting points for 2.5" drives. If yours doesn't, you'll need a mounting bracket like this one. Note that these are usually labelled as "SSD mounting brackets." This is because all SSDs in the traditional hard drive form are 2.5" drives. That's what size you'll use whether you're mounting it in a desktop or laptop.
And speaking of SSDs, there is one more form factor to talk about: the M.2 standard. These drives actually look more like a stick of RAM than a hard drive. They come in a handful of different lengths, ranging from about 30 millimeters (1.2 inches) to 110 millimeters (4.3) long. Instead of connecting to your motherboard via a SATA cable the way regular drives do, M.2 drives get plugged into a specialized slot. If you're interested in the M.2 drives, you'll have to determine whether your PC supports them.

One other note about laptops. As they've gotten smaller and sleeker, laptops have also gotten harder to upgrade. Most laptops that aren't super-tiny still use 2.5" drives, but they may or may not have a user-accessible drive bay for upgrades. Cheaper, bulkier laptops, and few business-class designs like Lenovo's ThinkPads or Dell's Latitudes, still allow access fairly easily. Other models might need some extensive work to get to the drive bay, or may not have access at all, especially if they've moved to the expensive M.2 standard. Upgrading those drives will probably void your warranty, and you'll need to look for a model-specific guide, like this one on iFixIt.
What Connection Do I Need?

All modern 3.5" and 2.5" drives use a SATA connection for power and data.
If you're installing the drive into a desktop PC, the SATA power cable is a 15-pin cable that runs from your PC's power supply. If your PC only offers the older 4-pin Molex cables, you can buy adapters that work just fine.
The SATA data cable requires that your motherboard support a SATA connection (all modern PCs do). You'll find them in slightly different configurations. Some (like the one pictured below) have a straight plug on one end and an L-shaped plug on the other end. The L-shaped plug makes it easier to fit into jacks that are closer to other components. Some SATA cables have straight plugs or L-shaped plugs on both ends. You should get SATA cables with your hard drive, but if you're working in a particularly tight space, be aware that these other options exist.
If you're installing into a laptop that allows user access, things are easier. You'll usually be able to plug the drive right into a slot that already has the power and data connections ready — no cables to connect.
One other word on SATA drives. The latest revision to the SATA standard is SATA 3.3, and drives and cables are backwards compatible with older versions. On desktops, you'll want to make sure that the drive you're buying is as fast or faster than the connection that your motherboard accepts — most motherboard SATA connections from the last five years have at least 3.0 support. The same goes for the SATA cable you buy. Laptops don't use SATA cables, so just make sure that the drive you're upgrading to uses the same SATA revision or newer than the drive it's replacing.
How Much Storage Do I Need?
This one's easy: whatever fits your budget. More storage costs more money, no matter what type of drive you're looking at.
How Fast Does My Drive Need To Be?
The default answer here is "as fast as you can afford." That said, if you're upgrading from a hard drive to an SSD, you're going to be blown away by the speed increase no matter what. So you might not want to splurge on the fastest SSD you can get. Getting more storage on an SSD will be more important to most people than getting more speed.
If you're buying a regular drive, speed is generally expressed in RPM — the revolutions per minute of the spinning data platters. 5400 RPM is a typical speed for inexpensive drives (especially in 2.5" form factors), with 7200 RPM drives also being quite common. Some high-performance hard drives are offered at 10,000 RPM, but these have been mostly superseded by faster SSDs.

There's another option here, if your choice is limited to a conventional hard drive. "Hybrid" drives combine a large, standard hard drive with a small cache of flash storage. This won't magically make your hard drive as fast as an SSD, but the file caching can make a considerable improvement if you're constantly accessing mostly the same programs and files. It might be worth the small price premium versus a standard hard drive.
Step Two: Decide Whether to Transfer Your Operating System or Perform a Clean Installation
You've purchased your new drive, and you're ready to install it. Your next step is to decide whether you want to transfer your operating system to the new drive or just do a clean installation and start fresh. There are pros and cons for each.
Transferring Your Operating System

Transferring your operating system (and all your data and installed apps) means not having to worry about reinstalling Windows, setting it up the way you like it again, and then reinstalling each of your apps. The downside is that it's a pretty slow and tedious process.
If you're upgrading from only one drive to another (as opposed to simply installing an additional drive in a desktop), you'll probably want to transfer your operating system to the new drive instead of installing fresh. The bad news is that this is a slow and tedious process. The good news is that it isn't too hard to do. Most new drives come with tools to make it happen. And if you didn't get a free tool, there are other ways to upgrade to a larger hard drive without reinstalling Windows.
If you use a laptop, you'll need to use a USB-based SATA adapter or enclosure so that you can have both drives hooked up at once. You can go that way with a desktop, too, but it may be easier just to install the new drive, do the transfer, and then decide whether to leave the old drive in place for extra storage or uninstall it.
Performing a Clean Installation
There are also advantages to just performing a clean installation of your operating system on your new drive. The big one is that you get to start fresh. No old program installations hanging around; it's a fresh copy of your OS without the clutter. You get to set it the way you want, and only install what you want.
The downside, of course, is that you have to do all that. While it typically goes faster than transferring your OS to the new drive, doing a clean installation does mean that you'll have reinstall the apps and games you want, and restore your personal files from backup (or copy them from the new drive). You'll also need make sure you have access to your applications for reinstallation. If you installed them from DVD or downloaded the installation files, you'll need to find those — along with any necessary activation keys.
Step Three: Install Your New Drive
The steps for installing (or replacing) a drive differ a bit, depending on whether you're installing the drive in a laptop or desktop PC.
Installing Your New Drive In a Laptop
Different laptops have different methods for accessing the storage drive compartment, if they allow easy access at all. Some business-class designs let you swap out a drive by removing a single screw, others might need you to completely remove the bottom of the machine or even take out the keyboard. You can usually find specific instructions by searching the web for your laptop manufacturer and model.
For this example, we're swapping the drive in a ThinkPad T450s. The design is a few years old now, but it's small enough that it requires the entire bottom to be removed, which is fairly typical among designs that allow a hard drive upgrade.
To access the drive, I have to remove the battery, and then take out eight different screws.

That loosens the metal body plate enough to let me pull it off the computer. You can see the hard drive in the lower-left corner.

To pull the drive itself out, I need to remove another screw, pull the drive up a bit, and then slide it off of the integrated SATA connection.

For this model, the drive caddy is just a thin piece of aluminum with a rubber bumper. I pulled it off, and then placed it on the new drive.

Then, I reverse the process, slipping the new drive onto the SATA connection in the laptop, screwing the caddy back down to the frame, and replacing the body panel.


Again, this process is going to vary quite a lot depending upon which laptop you have. If you need a step-by-step breakdown for your model, Google is your friend — you'll generally find at least a few users who want to do the same thing, and maybe an article or video if you're lucky.
Installing Your New Drive in a Desktop PC
This process is a bit more involved than on a laptop, but the good news is that getting the case off and accessing the drive is typically a lot easier than on most laptops.
You'll need a standard Philips-head screwdriver and a SATA cable. If you're completely replacing a single drive, you can use the SATA cable that's already in place. Your power supply probably has a free SATA power connection — multiple plugs are often available — but if not, you'll need an adapter cable. If you're working in an area that's particularly prone to static electricity, you'll want to use an anti-static bracelet as well. If you built your own PC, the screws needed to install your new drive should have come with the case — I hope you kept the box of accessories. If not, you'll need to get some replacement screws. Finally, you'll want a bowl or a cup to hold screws.

Power down your machine and remove all cables, then move it to your work area. This should be a cool, dry spot that's easy to access, preferably without carpet below you. If you know the configuration of your computer's internal parts, feel free to place it at the most accessible angle. If you don't, just leave it upright — you may have to take multiple panels off for a full installation.

Remove the access panel from the primary side of the case — that's the one on your left if you're looking at your computer from the front. Most designs require you to remove two to three screws from the back side before it will slide or swing out. Set the access panel aside. Some desktops require that you take the whole case cover off rather than just an access panel. If you're unsure, look up your desktop model or case on the web. Instructions should be easy to find.
Take a moment to orient yourself. If you're working on a conventional desktop you're probably looking at the motherboard, with the boxy power supply either at the top or the bottom of the case. You should be able to see your computer's storage drive or drives mounted towards the front of the case. A SATA data cable should be running from the motherboard to the drive. A SATA power cable should be running from the power supply to the drive.

Note: If you can't see either a larger 3.5-inch drive or a smaller 2.5-inch drive, it might be mounted in an alternate spot. In newer designs this is often behind the motherboard itself — remove the opposite access panel to check.
If you're not keeping your old drive in your system for extra storage, now's the time to take it out. You can also leave the cables attached to the motherboard and power supply and then just connect them to the new drive after installing it.
First, unplug the data and power cables from the back of the old drive. There's nothing too complex about this: just pull it out. Some cables have a little tab locking mechanism you'll have to squeeze first.

If the drive is on a sliding caddy, remove it (and note that some sliding caddies are screwed into place). Now, just use your screwdriver to remove the screws from the drive, whether it's in a caddy or affixed directly to the case. The screws come in many sizes and lengths — some including silicone spacers for sound damping — and might be mounted to the bottom of the drive or the side, depending on your case's design. It doesn't really matter: just remove them, set them aside in a spot where you won't lose them.

Your old drive is now free! Set it aside. Be careful with it, but don't worry too much — they're pretty sturdy.
To install the new drive in place of the old one, you'll just reverse the process. Put the new drive into the caddie, and then slide it into place on the case (and secure it if necessary).

Now, plug the cables into the new drive. It's easy to figure out — they only fit one way.

If you're adding a new hard drive and leaving the old one in place, it's a bit more complicated. You'll need to mount the new drive to the case (sliding it into an extra caddy that should have come with your case, if necessary). And, you'll need to plug in additional cables.
Plug one end of the SATA data cable into the back of the new hard drive and the other end into your motherboard. The motherboard slots are generally on the side closest to the front of the PC, usually in a cluster of two to six. It doesn't particularly matter which plug you use, though you might want to plug it into the top-left one (which is the "0" drive) or the closest one in sequence, just for the sake of organization.

Now plug the SATA power connection from the power supply into the new drive. If you already had a drive installed, check the power cablecoming out of it, because they generally have more than one plug and can be used for multiple drives. If your power supply doesn't have any free SATA power connections, you'll need to use an adapter or a splitter.

After that, your drive should be ready to go! Double check your connections, make sure the cables aren't touching any heatsinks or bumping up against cooling fan blades, and then replace the access panel on the case. Move your PC back to its original position, reconnect all your accessories and power cables, and fire it up!