Quick Links
Photography can be very technical, especially in the digital age. But photography is, at it’s core, art. You can take a technically perfect photo that’s utterly boring and a technically imperfect photo that’s a lot more interesting.
Let’s compare two shots. This is a technically perfect exposure. Everything is in focus, the highlights and shadows both have detail, and...it’s completely dull.

This, on the other hand, isn’t as technical a photo. I took it with my iPhone through a plane window as we flew over the Alps. It’s grainy, over-exposed in places, and not totally sharp because of the window in the way. But it’s much more interesting.

Now, I’m not going to start going all abstract and artsy with you, but here are some techniques that will help you create better, more interesting photos. I’ve already covered how to use limited color palettes to tie everything together, so let’s talk about creating images with foregrounds, midgrounds, and backgrounds.
Foreground, Midground, and Background
Almost every photo has a foreground and a background; most also have some sort of midground. The foreground is simply the parts of the image that are closest to the camera, the background is the parts that are further away, and the midground falls somewhere in the middle. Here are a few examples.
In this photo, the model is the foreground, the out of focus trees are the background. There’s not much midground to speak of.

In this photo, the sea and shadows are the foreground, the Santa Monica pier is the midground, and the setting sun and sky are the background.

In this one, the big Joshua tree is the foreground, the ones towards the back the midground, and the starry sky the background.

There are obviously some grey areas to this. The foreground often transitions into the midground into the background. The foreground can also be out of focus, with the subject in the midground such as in this shot below.

Filling the Frame
One photography tip you might have heard is to “fill the frame”. What this means is that there shouldn’t be dead space in your image. The simplest way to fill the frame, is to make sure there is something interesting in the foreground, midground, and background of every shot you take.
Here’s a sunset photo I took quickly at the beach. The light is beautiful, but it’s all a bit…meh. The colors are cool but there is nothing else going on here. It’s literally just a photo of the light.

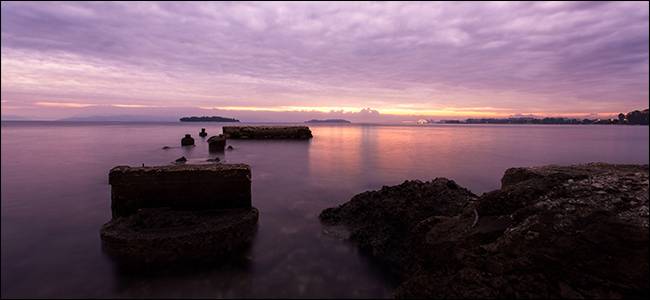
Compare that to this photo I put some time and thought into. It was shot at sunrise instead of sunset, but it still has beautiful light. The biggest difference is that there’s something interesting going on in the foreground. Rather than the image being 80% dead space, it’s 80% interesting things.

How to Start Using the Foreground, Midground, and Background
There’s one simple trick to start composing stronger images by filling the foreground, midground, and background of your images: think before you press the shutter button. When I took the bad sunset photo above, I’m sure there was something near by that could have made for a more interesting foreground if I’d just looked for it. Instead, I just hit the shutter button as fast as possible.
For the good photo, I just took a few minutes to play around with different compositions until I found something I liked. Then I pressed the shutter button. Once you start thinking deliberately, you’ll automatically start taking stronger photos.
One of the easiest ways to start using the foreground is to get close to something with a wide angle lens. In the photo below, I was just a few feet away from the rocks which make up the foreground, the midground and background then just happen naturally.

If you’re taking portraits, you probably won’t have much of a midground, but the background is even more important. A bad background can distract from an otherwise great portrait. Use a wide aperture and a good portrait lens to make the subject the foreground and isolate them from the background like I’ve done below.

An isolated, blurry background doesn’t have to be boring. It’s still part of the image so play around with different textures and objects behind the subject.
As with any photography “rule”, play around with it and feel free to break it if you’ve got a good reason to. Sometimes your best photos will fly in the face of every convention.
While saying “make sure your photos have a foreground, a background, and, if possible, a midground” might seem like super obvious advice, you’d be surprised at how many photographers fail to heed it. Start thinking about what elements are in each -ground when you take your photos and I guarantee you’ll become a better photographer.