Quick Links
If you want a little extra oomph out of your PC's graphics card without spending tons of cash on a new model, overclocking the GPU is a surprisingly simple way to go about it. And it has indeed become simple, on Windows-based PCs at least---while the process is time consuming, it doesn't require any particular knowledge or advanced skills. Here's how you go about it.
Warning: while the risk is pretty low, there's still a chance that overclocking your GPU could damage it or other components in your computer. Proceed with caution, and don't sue us if you tower catches fire or steals your car.
What You'll Need
Before we get started, you'll need a couple things:
- A Windows-based PC: It's possible to overclock GPUs on macOS and Linux, but Windows is still the home of PC gaming by a huge margin, so that's what we're going to use in this guide.
- A discrete graphics card: PCI-Express-based desktop cards are still the primary means of playing high-end PC games. This guide should work for AMD and NVIDIA mobile cards in laptops, but we don't really recommend overclocking those, since heat dissipation is much more difficult in laptops. Don't try this on Intel graphics or other integrated systems.
- A benchmarking tool: You'll need something that pushes your card to the absolute maximum of its power to test its stability as you overclock. You can use the built-in benchmark in one of your favorite PC games, or go for a separate program designed for benchmarking. We like Unigine Heaven, since it displays stats like clock speed and GPU temperature during the run---very handy if you only have one monitor.
- MSI Afterburner: This is the Swiss army knife of Windows-based GPU overclocking. Don't be fooled by the name: though the software is provided free by graphics card maker MSI, you don't need an MSI card---it should work on any NVIDIA or AMD-based GPU.
- GPU-Z: Another staple of PC overclocking. It's best to keep it open while you're working to watch your results in real time.
Once you have all your tools installed and ready to go, let's get started.
Step One: Google Your Card
Every graphics card is different: in its basic design from NVIDIA or AMD, in the customizations added by manufacturers like ASUS or Sapphire, and of course, in the tiny variations and imperfections from the manufacturing process itself. GPUs are highly complex machines---we're not playing with Happy Meal toys here.
The point is that your results from overclocking will be specific to your machine and your card. Just because someone else with an ASUS GTX 970 STRIX got one result doesn't mean you'll get that same result---you need to go through the (lengthy) process yourself to see what your card can handle.
That said, it's best to know as much as possible about your hardware before diving in. Do a Google search with your card model and "overclock" to see the results that others are getting just to get a ballpark estimate, and to learn the particular foibles of your card.

For example, my card, an NVIDIA GeForce GTX 970, has a rather famous memory issue that makes the last half-gig of video RAM perform much poorer than the other 3.5GB. That doesn't really affect my efforts to overclock the GPU itself, so I'll go ahead and proceed. A generic search for "GTX 970 overclock" reveals plenty of threads on Tom's Hardware and NVIDIA's official forums, a full specific guide on ExtremeTech and even a few YouTube videos. Perusing the results before continuing can only be helpful.
Oh, and while you're preparing, it's a good time to check and see if you're running the latest version of your graphics card's video driver.
Step Two: Benchmark Your Stock Configuration
In order to see the results of your work, you'll first need to see where you're starting from. So before you do any overclocking, run your benchmark tool to get a baseline reading. Make sure you crank the graphics settings up high---you want each of these benchmarks to be pushing your GPU to 100% of its power. (Check GPU-Z while running the benchmark or afterward to make sure it pushed your card to 100%---if it didn't, crank the graphics settings up in your benchmark program).

I used three different benchmarks for my tests, so on my stock GTX 970 before any changes in the Afterburner app, the results were thus:
- Shadow of War benchmark: 40.9 average FPS, 79.9 maximum, 24.2 minimum
- 3D Mark Sky Diver: 33683 graphics score, 7814 physics score, 16826 combined score
- Heaven: 1381 overall score, 54.8 average FPS, 123.6 maximum, 24.5 minimum
Save your results in whatever format's available. (Some in-game benchmarks don't have a save option, but you can just write them down.) If you're using Heaven, note that in order to actually record a run you need to click the "Benchmark" button in the upper left corner.
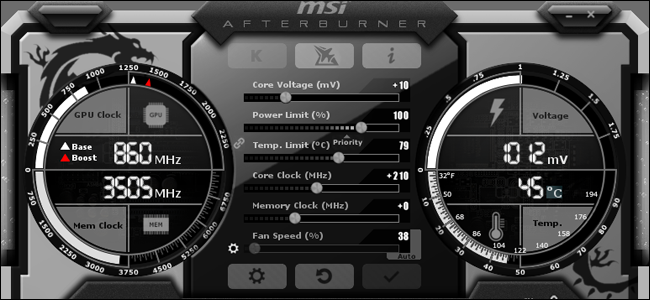
Step Three: Use Afterburner to Boost Your GPU Clock and Voltage
The Afterburner overclocking tool suffers a bit from the "gamer aesthetic," the unfortunate tendency for companies to design gaming-specific tools to look like something out of an alien mothership. But there are two variables we're going to focus on: the GPU clock speed and the voltage. The former is the internal speed at which your GPU's core processor has set itself to run, and the latter is how much power in volts the card overall is set to take from the PC's power supply.
Changing either of these values can make your GPU, and your computer at a whole, unstable. The goal is to gently raise the clock speed and voltage until you run into stability issues, then pull back and settle on a stable maximum. Note that in the latest version of Afterburner, you may need to click the Settings button (the gear icon) and enable the "unlock voltage control" option before the slider becomes available to you.

Make a note of the stock settings here (a screenshot can be handy). You'll want it in case you decide to return to your original configuration.
Change the clock speed first. Raise it by 10 to 20 MHz, then apply the setting with the check mark button. Resist the urge to bump up the clock by larger chunks---it's a great way to crash your PC completely and bring this process to a screeching halt.

Check GPU-Z to make sure that your GPU is using the new core clock value. After applying the changes in Afterburner, GPU-Z should show the default "active" clock and the newly-applied overclock in the "Default Clock" and "GPU Clock" fields, respectively.

Now run one of your benchmark tools. You should notice slightly better FPS values and scores.
If everything went smoothly, bump the clock up again and re-run the benchmark. Repeat this process until either 1) the benchmark program crashes, 2) your GPU driver crashes, or 3) you begin to see strange visual artifacts in the benchmark's graphics, like little black blocks or colored static. This is the result of an unstable overclock.
When this happens, you can do one of two things: you can settle back to the last MHz rating where your computer wasn't affected, and go for a mild overclock...or you can boost the GPU voltage to allow it to go even higher. Boost it by 5mV and run the benchmark again---hopefully, you should find that those artifacts and crashes go away, and things are stable again.

Keep repeating this process, bumping 10MHz to the core clock until you see spots or crashing benchmarks, bump up 5mV (milivolts) to the processor, run the benchmark again and see if it becomes stable. Rinse and repeat.
Note that if you do decide to raise the voltage, this can also raise your GPU's temperature. Keep an eye on your temperatures---Heaven is particularly useful for this, since it displays the GPU clock speed and temperature by default. Your GPU will automatically run its fans for necessary cooling, but there's a pre-set maximum that will trigger a shutdown if it's breached. Even with overclocking, you don't want to go past that point, and running hot at the border of the limit is probably a bad idea, too. Try to keep your GPU at least a few degrees under the limit, displayed as the "Temp. Limit" value in Afterburner, even after extended use. Adjusting this maximum beyond the manufacturer's limit is possible, but heightens the danger of damage to your card.
Once you've arrived at a clock speed and voltage that can no longer be sustained---either because temperatures are too high, or because you can't seem to eliminate crashes and artifacting---back off to your last stable clock and voltage values. This is your final overclock.
Step Four: Stress Test Your Final Overclock
After several hours of tinkering on my main PC, I arrived at +210MHz on the clock speed with a +5mV voltage boost. My benchmark values ended up at:
- Shadow of War benchmark: 44.3 average FPS, 72.2 maximum, 24.1 minimum
- 3DMark Sky Diver: 33797 graphics score, 7808 physics score, 16692 combined score
- Heaven: 1512 overall score, 60.0 average FPS, 134.3 maximum, 27.3 minimum
As you can see, it's approximately a ten percent bump for the scores, except for 3DMark, which was much more modest. I probably could have boosted things even further with a little more tinkering, or a better cooling hardware setup and a willingness to bump up the heat tolerances. I'm not particularly interested in that---it's a good way to melt your card.
Once you find your "final" settings, we recommend cranking up Heaven and letting it run for an hour or two. This is testing your card's stability for longer gaming sessions---it's not uncommon for extended use to have a cumulative strain on your card, especially in terms of heat buildup. If the benchmark runs for an extended period of time, you're good to go, but you might need to scale back your overclock once more if it crashes or shows artifacts with extended running.

Once you've successfully run Heaven for a couple hours without any issues, you can pretty confidently say you've reached a stable overclock. Congratulations!
Finishing It Off: Memory Clock, Fan Management, and Profiles
With Afterburner, it's possible to boost the clock speed of your GPU's memory as well. This can have benefits, but they're much more subtle than the processor clock and voltage boosts, so unless you're willing to spend several hours tinkering for a 1-2% boost in performance, I'd just skip it. The same general process applies, though: small bumps, test, repeat, fall back when you lose stability.
In addition, Afterburner can manipulate the fan speed on your GPU, but it's in "auto" mode by default, and it's probably best to leave it there. Your GPU will automatically increase or decrease the speed of its cooling fans its temperature sensors detect the need to do so.
Once you're done tweaking everything in Afterburner, look at the lower-right corner of the interface. Make sure the lock icon is "unlocked" (just click it if it isn't), then click the floppy disk "save" option.

When the numbered profile icons flash red, click "2." Reset your settings to default, then click the save button again, then "1." This way you can easily apply and remove your overclock settings for when you're playing and when you're finished.
This is also useful if you run into any issues further down the line. Once you start playing actual games, make a note of any crashes---different games will react differently to the overclock. Most will likely work fine, but it's possible that one game may just dislike your overclock and experience crashes or other glitches.
Of course, some games might crash all by themselves regardless of any changes you've made to your GPU; one random crash in Fallout 4 isn't really a cause for alarm, since Bethesda's RPGs are well-known to be unstable. A consistent crash, especially when lots of characters and effects are on screen and it's paired with a driver crash or a total system reboot, is more indicative of an overclocking issue.
If you ever run into problems, you can just load up that "1" profile and play without your overclock. But if you've done your stress testing right, you should find that you have a small but noticeable increase in performance in your games! Enjoy those few extra frames per second knowing you worked hard for them.
Image credit: Newegg