Quick Links
Taking photos in the falling snow is hard. It’s cold, your gear gets wet, and everyone ends up grumpy. Why bother going outside at all when you can fake it in Photoshop? Here’s how.
Step One: Pick a Suitable Image
Adding falling snow to a sunny beach photo where everyone’s in a bikini is never going to look realistic. The bright sunlight is pretty much a dead giveaway that it’s not actually snowing. For the effect to work, you need to pick an image where it could plausibly be snowing. If you’ve got some photos from a cloudy day where there’s snow on the ground, perfect. Otherwise, just pick something dark and wintery like my shot below. It’s the kind of photo where it’s totally believable that a big snowfall had just started.

Before continuing, you should also make any other edits you want to the image. If you’re stuck for ideas, check out my article on how to improve pretty much any digital photo. The tips I cover in that are great for taking a kind of wintery photo and turning it into a really wintery photo.
Step Two: Getting Started
Open up the photo you’re using in Photoshop. I’m using Photoshop CC18, but these tools should be available in any recent version. You should also be able to replicate a lot of the steps in most good image editors.

Go to Layer > New Layer, or press Control+Shift+N on your keyboard (Command+Shift+N on a Mac) to create a new layer. Call it something like “Snow” and click OK.

Next, go to Edit > Fill, set the Contents to Black, the Blending Mode to Normal, and the Opacity to 100%, then click OK.

You should now be looking at a pure black layer. Believe it or not, this is what we’re going to make snow from.

Step Three: Bring the Noise
Go to Filter > Noise > Add Noise.

Set the Amount to 200%, the Distribution to Gaussian, and make sure Monochromatic is checked. Then click OK.

Next, go to Filter > Blur > Gaussian Blur.

Enter a Radius of somewhere between 2 and 7. The lower the value, the smaller your snowflakes will be. I’ve gone with 4.

Step Four: Creating the Snowflakes
Go to Image > Adjustments > Threshold.

A Threshold adjustment turns every pixel above a certain value white and every pixel below it black. Drag the small arrow around until you get something that starts to look like snowflakes. I’ve gone with a value of 124; yours will probably be somewhere about the same.

Next, in the Layers Panel, select the Snow layer and change its blend mode to Screen.

This will remove all the black and only leave the white snowflakes.

Step Five: Blending the Snowflakes In
Now we’ve got something that’s starting to look like snowflakes, but they’re kind of sitting on top of the image, rather than looking like part of it. Let’s start blending them in a little better.
Go to Filter > Blur > Motion Blur.

There aren’t really any set Motion Blur settings that will work for every image. Play around with the Angle and Distance until you get something that looks good for yours. I’ve gone with an Angle of -51º and a Distance of 13 Pixels.

Next, go to Layer > Layer Mask > Reveal All or click the Layer Mask icon in the Layers Panel to add a white mask to the Snow layer. For more on layers and masks, check out my full lesson.

Select the Brush tool with the keyboard shortcut B and press D to reset it to the default colors. Press X so that black is the foreground color. From the Brush Tool Options, select a Soft Round Brush. Set the size to something nice and big, I’ve gone with 600. Set the Opacity to 100 and the Flow to 20.

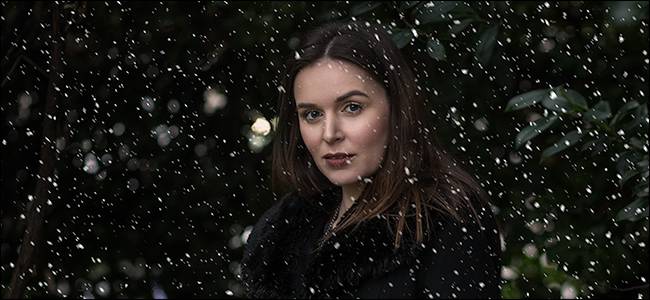
Right now, the snowflakes fall evenly across the image. This isn’t great because they kind of obscure the model, Dani. Take your brush and, with the mask selected, paint a few times over the areas of the image you don’t want the snowflakes to fall so heavily. It’s only a small change but now you can see Dani’s face more clearly.

Step Six: Adding More Snowflakes
And that’s it, you’ve now applied some awesome looking snowflakes to your image. The final (optional) step is to go back and add another layer or two of snowflakes with different values. I’ve added one more with the following values:
- Noise: 200%.
- Gaussian Blur: 7.
- Threshold: 121.
- Motion Blur: -15º and 21 pixels.
I also made sure to mask out Dani’s face again.

Adding snowflakes is one of those simple Photoshop techniques that you can use every year. I always apply it to whatever Christmas card I’m forced to make for my mother.