We all know it's important to back up your Mac with Time Machine, but remembering to plug in your external drive can be a hassle, especially if you're a MacBook user. So networked backups come in handy: you don't have to remember to do anything.
But there aren't many easy ways to back up your Mac over the network. This feature used to be offered by the Airport Time Capsule, a router with a built-in hard drive for Time Machine backups, but Apple isn't planning on making new versions. You can set up a Raspberry Pi as a Time Machine server, but it's not exactly easy and you're bound to run into glitches.
But if you've got multiple Macs, High Sierra brings what was a macOS Server exclusive feature to everyone: the ability to set up any shared folder as a Time Machine destination. You could set up an old Mac Mini to be your backup server, or if you've got two Macs you use regularly, you could back them up to each other. You could even plug an external drive into your desktop Mac and share it over the network---then you can back up your MacBook to it wirelessly.
Whatever your configuration, setup is relatively simple, albeit hidden. Here's how to get started.
Set Up Time Machine Sharing on Host Mac
Open System Preferences on the Mac you want to back up files to, then head to "Sharing."

Make sure "File Sharing" is turned on and selected. Next, share an empty folder by clicking the "+" button.

I've called mine "Time Machine" because I'm boring, but you can use whatever time travel terminology you prefer (88MPH and Tardis are both solid choices.)

You can use your Mac's primary account for this if you like, or you can create a networking-only account if you want to keep things sandboxed.
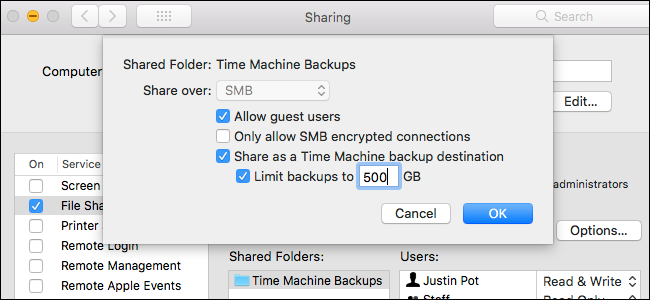
When you're done right-click your folder, then click "Advanced Options."

Make sure "Share as a Time Machine backup destination" is checked. I'd highly recommend "Limit backups to...GB" is also checked.

By default Time Machine will use up all space on a drive to store old files until the drive is full, and you don't want that happening if you use this drive for anything but Time Machine backups.
Connect to Time Machine Share on Client Mac
On your client Mac open the Finder. You should see the server Mac in the sidebar; click it, then click the "Connect As..." button at top-right.

Enter the username and password for your server Mac, the open System Preferences and head to the Time Machine panel and click "Select disk." You'll see your network share as an option.

You can now back up your Mac to this network share. You can repeat this process on as many Macs as you like, just make sure you've got enough storage space for all those backups.