Quick Links
Windows 10's Fall Creators Update includes a new Windows Defender feature designed to protect your files from ransomware. It's named "Controlled Folder Access", and it's disabled by default. You'll need to enable it yourself if you want to try it out.
This feature is no substitute for good backups, which can help you recover your files in case a piece of ransomware makes it past your security software. But it's still good to have enabled as a preventative measure.
How Controlled Folder Access Works
This feature is part of Windows Defender. It provides an additional layer of protection when programs try to make changes to files in your personal data folders, like your Documents, Pictures, and Desktop folders. Normally, any program running on your system could do anything it liked to these folders. With this new feature enabled, only "apps determined by Microsoft as friendly" or applications you specifically allow will be able to make changes to your personal files in these folders.
In other words, this will block ransomware from encrypting or otherwise making any changes to your protected folders.
Controlled folder access won't protect against malware viewing and making copies of your files. It only protects against malware changing these files. So, if malware was running on your PC, it could still make copies of your personal data and send it elsewhere---it just wouldn't be able to overwrite those files or delete them.
How to Enable Controlled Folder Access
To enable this feature, open the Windows Defender Security Center application. To find it, click Start, type "Windows Defender", and launch Windows Defender Security Center.

Click the shield-shaped "Virus & threat protection" icon in Windows Defender's sidebar. After you have, click the "Virus & threat protection settings" link.

Scroll down and set the "Controlled folder access" option to "On" by clicking it. Agree to the User Account Control prompt that appears afterwards to confirm this change.
If you don't see this option, your PC probably hasn't been upgraded to the Fall Creators Update yet.

How to Choose Which Folders Are Protected
Once you've enabled this feature, you can click "Protected folders" under Controlled folder access in Windows Defender's interface to manage which folders are protected.

By default, you'll see that Windows protects system folders and user data folders. These include the Documents, Pictures, Videos, Music, Desktop, and Favorites folders in your user account's folder.
If you store important data in other folders, you'll want to click the "Add a protected folder" button and add other folders with your important personal data.

How to Give a Program Access to Your Files
Here's the good news: Windows tries to be smart about this. Windows Defender will automatically allow known-safe programs to change files in these folders, so you don't have to go through the hassle of allowing all the different programs you use to access your personal files.
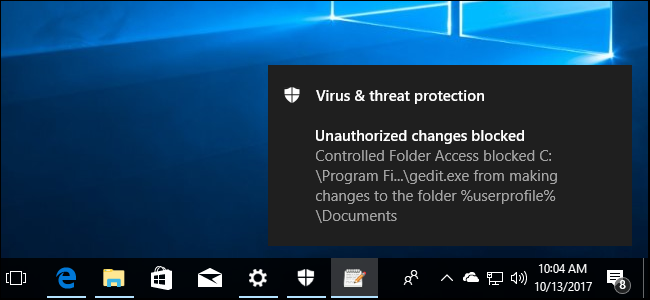
However, when a program that Windows Defender isn't sure about tries to change the files found in these folders, that attempt will be blocked. When this occurs, you'll see an "Unauthorized changes blocked" notification informing you that Controlled Folder Access blocked a specific program from writing to a specific protected folder. The program will likely display an error message.

If you see this notification and you know the program you're using is safe, you can allow it access by heading to Windows Defender > Virus & threat protection > Virus & threat protection settings and clicking the "Allow an app through Controlled folder access" link under Controlled folder access.
You can also simply click the notification, which will be under your Action Center if you haven't yet dismissed it, to go directly to this screen.

Click the "Add an allowed app" button and browse to the program you want to give access to. You'll have to find the .exe file associated with the program, which will likely be somewhere under your Program Files folder.

Whenever you see the notification and want to unblock an app, return here and add it. You shouldn't have to do this for too many apps, as popular apps should be known-safe and automatically allowed through Controlled folder access.

System administrators managing networks of PCs can use Group Policy, PowerShell, or a Mobile Device Management (MDM) server to enable this feature across an entire network of PCs. Consult Microsoft's official documentation for more information about this.