The night sky is breathtaking. If you go somewhere reasonably dark and let your eyes adjust, you can look up and see thousands of pin pricks of light, each one a star or galaxy that's millions of years old. I find it completely humbling.
The night sky also makes a great subject for photography. With long shutter speeds, your camera can capture way more light than your eyes, giving you an even better view. Here's how to take a good photo of a starry night sky.
What Makes a Good Night Sky Photograph
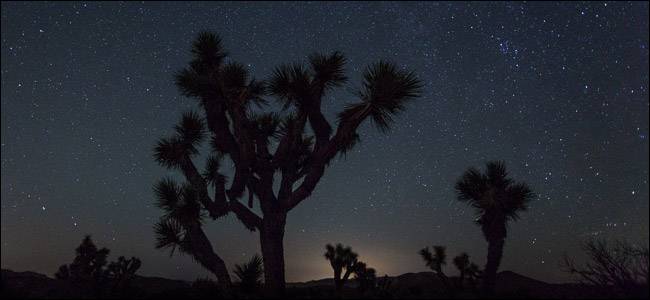
The best photos of the night skies show thousands of tiny stars. They make you feel like you're looking up at an infinite universe.

They're also grounded. An image that's just of stars looks, at best, like one of NASA's scientific photos or a computer generated rendering.

Instead, great photos of the night sky normally feature some landscape as context. The vastness of the stars is contrasted with something that's a lot closer to home.
The Technical Stuff
While you can take a photo of the night sky pretty much anywhere, you need to go somewhere dark to get the best results. A city 30 miles away throws off enough light pollution to affect your images. Professional astrophotographers tend to go far out into the desert or high up into the mountains to get their photos. The best way to find dark skies is with something like Dark Site Finder's light pollution maps. You can see in the screenshot below that most of the Eastern half of the US is pretty bad for nigh photography, but the West and Midwest has plenty of options.

If you can't get somewhere really dark, the best thing to do is photograph the darkest horizon. I live in a pretty light polluted area, but because it's on the coast, I can take some alright night photos, like the one below that shows the aurora borealis, as long as I point my camera out to sea.

For night sky photography, you're balancing a couple of things: you want to let as much light into your camera without image quality suffering because of the stars moving or noise. This means you want to set your aperture to the widest possible value and your ISO to the highest value that gives you clean shots. For most cameras, this will be about 1600. For professional cameras you can go to 3200 or 6400 in a push, while older cameras will probably need to drop to 800.
Shutter speed is a little more complex for astrophotography, and it's tied to what focal length you use. Because the stars move in the sky, if you leave the shutter open too long, they'll smear, and instead of having sharp pin pricks of light, you'll have weird blurs like you can see in the image below.

The 500 Rule serves as a guideline for what the max shutter speed you can use at a given focal length is. Simply divide 500 by the focal length of the lens, and you'll get the answer in seconds. For example, if you take a photo with a 20mm lens, the maximum shutter speed you can use without star trails is 25 seconds.
A couple of caveats about the 500 rule. First, if you're using a crop sensor camera, you need to use the full frame equivalent focal length for the calculation, in other words, multiply the focal length by 1.5 before dividing it into 500. The 500 rule also doesn't work as well with super high resolution cameras. If you're using a camera with a high resolution sensor, you should divide the focal length into 300 or so to get a more realistic number.
A bit of simple algebra (or trial and error) makes it clear then, that the shorter the focal length, the longer the shutter speed can be before you see star trails. At 17mm, you can get away with 30 second exposures, while at 50mm, you will see them after 10 seconds. There's also another reason to lean towards wide angle lenses: you get better landscape photos which means it's easier to get more interesting foregrounds into your star photos.
Since we're talking of shutter speeds measured in the dozens of seconds, it goes without saying that a stable tripod is an essential bit of kit. You won't be able to take any star photos with your camera held in your hands! Similarly, because camera shake can be a problem, you'll want to either use a remote trigger or the two second count down timer on your camera.
Autofocus doesn't really work at night, so it's best to use manual focus. If your camera has a live view mode, use it to zoom in on the stars, then manually focus your lens until they are pin pricks.
Astrophotography is one time when shooting RAW is essential. You need as much information in your images as possible.
Star photography, as you can see, is pretty technical, but that doesn't mean it's difficult. Just go out, follow the instructions above as close as you can and see what you get. Don't expect stunning results first time, just be prepared to learn from your mistakes.
Other Tips and Tricks
One of the big "secrets" to astrophotography is post-processing. Using Lightroom, Photoshop, or your image editor of choice, go in there and use the tools to increase things like shadow detail, highlight detail, contrast, and exposure. You should also fine tune the colors by increasing the saturation and playing around with the white balance. Tweak things until they look good.
Here's the before of one of my photos.

And the after.

As you can see, a bit of post-processing really brings it together.
Here are some other tips to keep in mind:
- The moon is really bright in the sky. If you're just trying to take photos of the stars, try going out on nights with no moon. Otherwise it will just interfere with your shots.
- Even after the sun sets, its light still effects the night sky. Wait until after astronomical twilight ends, which is when the sun has dipped far enough below the horizon that its light rays don't reach the atmosphere in your location. You can find the various twilight times on TimeAndDate.com.
- It should be obvious, but the best time to take photos of the night sky is on a clear night. If there's a lot of cloud cover, you won't see a thing.
- If you want to take a photo of a specific constellation, use an app to help you find it. I like Sky Guide on iOS, and Sky Map seems to be a great Android option.
- Bring a head lamp with you when you go out to shoot star photos. They're much easier to work with than your phone's flashlight.
I love taking photos at night. It's really peaceful and since your subject isn't going anywhere in a hurry, you can take your time.