The moon is a tricky subject to photograph. When you step outside on the night of a full moon, it looks huge, dominating the sky. But then you take a quick photo and…it’s a small indistinct white blob.

There are a few things you need to do to take photos of the moon, so let’s break it down.
What Makes a Good Moon Photo
Before taking a photo of the moon, you need to know two things: the moon is very very bright, and it’s very very far away. These might sound obvious, but they’re at the heart of what makes taking a photo of the moon so awkward.
Because the moon is so bright, and the only objects we have to compare it to are the pinpricks of stars and planets, we remember it as appearing much bigger than it is. In reality, it’s actually quite small in the night sky. This means you can’t get a good close up shot without a telephoto lens.
Second, the moon is much brighter than anything else at night—besides artificial lights. While our eyes have the dynamic range to see both the moon and the surroundings, your camera probably doesn’t. This means that you either have to expose for the moon and have it sit in an empty black photo or expose for the surroundings and get an overexposed white blob.

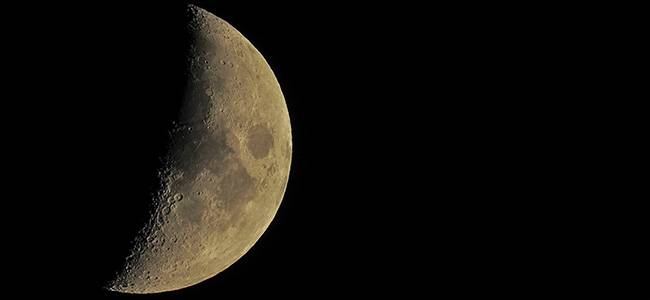
A good moon photo then, solves these problems. Either it’s a close-up of the moon shot with a telephoto lens so that you can see small details, or it finds some way to balance the exposure of the moon so that you can see other details in the image.
The Technical Stuff
When you’re shooting a photo of the moon, you will get the best results if you use a tripod, although one is not strictly necessary.
If you want to shoot a close up of the moon, you’ll need a lens that’s at least 200mm on a full-frame camera (that’s about 130mm on a crop sensor). Even longer is better.

Astrophotographers have a rule for taking photos of the moon (it’s more of a guideline really) called Looney 11. The idea is that if you set your aperture to f/11, the correct shutter speed will be the reciprocal of the ISO. In other words, if your aperture is set to f/11 and your ISO is set to 100, your shutter speed will be 1/100; if your ISO is 400, the shutter speed is 1/400.
The Looney 11 rule is a good starting point, but don’t hold it as gospel. You can always tweak things. If you open your aperture by a stop, you’ll need to adjust your shutter speed by a stop too. The best thing is to put your camera in manual mode, set it to f/11, ISO 100 and a shutter speed of 1/100, and go from there.
Other Tips and Tricks
If you have a telescope but no telephoto lens, you can get an extension tube that lets you mount your camera to the telescope. If you’re interested in serious astrophotography, this is actually an even better solution because you will be able to take photos of things like Saturn’s Rings.
You can also get surprisingly good results with just your smartphone and a pair of binoculars. You'll need an adapter to connect them together and a tripod to keep things stable. The website iAstrophotography is dedicated to using smartphones for astrophotography so is worth checking out if this is something you want to explore.
The Looney 11 rule totally ignores the surroundings of your image. It just exposes for the moon. If you’re trying to capture the moon as part of a landscape, the best way to do is to capture two photos: one exposing for the moon, and one exposing for the landscape. You can see an example of the two different photos below.


Then, in Photoshop or your image editor of choice, you can combine the two images. The techniques in this article on creating double exposure images will work. This way you get the best of both worlds: a visible landscape and moon.

This same trick works regardless of what subject you’re trying to combine the moon with. It will overpower almost everything.
The moon seems like a really obvious subject for a photographer, but it’s surprisingly tricky. Now you should have a better idea on how to tackle it.
Image Credits: Pedro Lastra/Unsplash, Paul Morris/Unsplash.