Quick Links
Android tablets seem to be slumping hard: sales are down and developers aren't interested in supporting them with specific apps...not even Google. But with slumping interest comes depressed secondhand market sales, so tablets are also hard to get rid of. There are a lot of things you can do with a tablet you're not using, but my favorite use is sticking it on an elaborate PC desktop and using it as a dedicated widget pad and notification center. Here's how you go about it.
Step One: Get a Custom Launcher
What we're aiming for here is a large, flexible area to fill up with visual information. Google's default launchers aren't especially well-suited for the task, as they're focusing more and more on individual apps and animations, and the launchers grudgingly made by non-Google Android tablet vendors tend to range from okay to terrible.

For preference, I use Nova Launcher. I've tested dozens and dozens of Android home screen replacements in several years of working for an Android blog, and I have no reservations about recommending it. For the sake of this article I'll be using the free version of the app, but the $4 upgrade is absolutely worth it if you want extra features like custom gestures and notification badges. Nova Launcher also has the option for integrated Google Now, which as far as I know is unique among launchers on the Play Store.
The following setup instructions can be duplicated on other launchers if you prefer. But seriously, Nova Launcher is great.
Step Two: Set Up Your Home Screens
In the Settings menu of the Nova launcher (which you can reach from the app drawer), go to the "Desktop" page. Tap on "Desktop Grid" to open up the spacing tool.

The idea here is to give you a large canvas to fill up with widgets and icons. For my Android tablet, a Pixel C with a sightly wider than 4:3 aspect ratio, roughly square works best, so I've set the grid at eight spaces on each side. But if you have a widescreen tablet with a 16:9 or 16:10 screen, you may want to make it more lopsided favoring the longer edge, like eight spaces by six or twelve spaces by eight.

Since you'll be filling up most of the space with widgets, even numbers on both edges can help with organization. Leave "Subgrid positioning" unchecked---it allows you to place icons or expand widgets by half a space, which is untidy. Tap "Done."
Under "Width Padding" and "Height Padding," choose "Small" or "None." These are the side and top/bottom margins of your home screen, and you want the widgets to have as much vertical or horizontal space as possible.

Disable the option for "Persistent Search Bar." A permanent search bar takes up more vertical space for widgets, and any Android tablet can open a text or voice search immediately by long-pressing the home button.
The rest of the options on this page are entirely cosmetic, so set them up for whatever tickles your fancy. I prefer to keep animations and effects to a minimum.

An easy way to make more space quickly is to disable the dock, the standard bottom- or side-mounted area for semi-permanent icons. To do this, go back to the main Settings page, then tap "Dock." Slide the button at the top right corner to "off" to disable it entirely.

One last tweak: I prefer to make the Android home button double as my icon drawer button, once again, to make more space for shortcuts and widgets. To do this, go back to the main Settings page tap "Gestures and Inputs." Under "Home button" set the action to "App drawer." Set the "Only on default page" as enabled or disabled based on your preference.
Step Three: Set Up Icons and Widgets
Here's where things start to look interesting. For the purpose of making a notification center, the widgets you want to use here are the ones from programs that would otherwise take up a bunch of space on your primary computer screen (or screens), but need to monitor constantly while working. Email is an obvious choice, especially if you use multiple inboxes at once, and I use a Twitter widget and an RSS reader in addition to the Google Now screen in Nova Launcher.

To start things off, long-press on an empty area of the Nova home screen. From this menu you can add extra blank screens by swiping to the right and clicking the big "+" button. Add as many as you want---they can be removed or re-arranged on this screen by tapping and holding them, even if they're full of widgets and shortcuts.

To add a widget, just tap the "Widgets" button on this menu, then select from the list available based on your installed applications. Once a widget is placed, you can long-press it to change the borders based on the desktop grid you created in Step Two. For more standard shortcuts, open the app drawer, then tap and drag them into place.

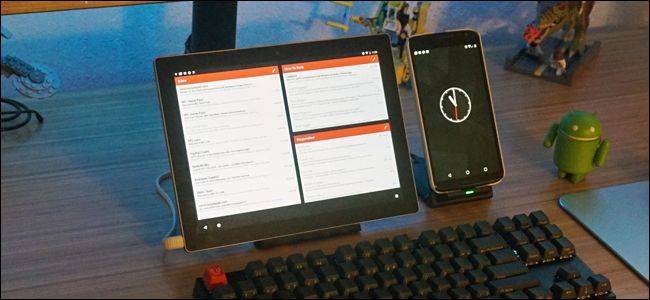
Remember, the idea here is to get the maximum amount of information available to you at once. So I've set my center "home" screen to a Twitter widget from Fenix, flanked by my most-used tablet apps. The right screen is three separate email account widgets with my primary Gmail account taking the largest block. And on the left I keep my RSS reader for comics and podcasts, with Google's handy News and Weather widget beneath it for more general news.
Here's a look at the full thing, from left to right:

A few more tips, which you can apply or ignore at your leisure:
- Only allow notifications from important applications, and set up different notification sounds for each alert that comes in. That way you can distinguish which app wants your attention without even looking.
- Use Google Now's always-on voice detection for "Ok Google." That will allow you to make Google voice searches from your desk hands-free.
- When choosing a wallpaper, pick something that's muted and easy to distinguish from widgets and shortcuts, so your eyes don't get overwhelmed. I like this set of geometric folds from DeviantArt.
- For even faster launching of apps from any screen, I've used and recommended SwipePad for years. It's another Android app that's well worth the premium upgrade.
Step Four: Allow the Screen to Remain On While Charging
To make sure the screen doesn't turn off while the tablet is on your desktop and charging, you'll have to dive into the main Android Settings menu. Activate the Developer options page if you haven't already: Head to Android's Settings, tap "About tablet," then tap "Build number" multiple times rapidly until you see the message that says "congratulations, you're a developer!" (You probably aren't. It's okay, I won't tell anyone.)

Press the back button, then tap on the "Developer options" link that's now visible. Inside, enable the option labelled "Stay awake." This will keep the tablet's screen from turning off when it's charging, allowing you at-a-glance access to all those widgets all day long. But don't forget to turn it off when you leave your desk, and occasionally let the battery drain down to give it a break.
Step Five: Set Up Your Desk
To make your notification center useful, you'll want to place it somewhere on your desk that's highly visible, easily reachable for tapping and swiping, and within reach of a charging cable. A desktop charging dock is ideal here: you can generally find one for generic MicroUSB or USB-C devices on Amazon or other vendors. Full desktop PC users will generally want to set up their tablets between the keyboard and monitor, while laptop users will want it on the side.

Some tablet models have specific docks built for them, but unlike iPads, manufacturers and accessory makers rarely splurge on model-specific docks. If your tablet has an oddly-placed charging port, like my Pixel C and its weird side-mounted USB-C port, a generic tablet stand is more appropriate. I like to pair it with an L-hinge charging cable (also available for cheap from online vendors) to make cable management a little more snazzy.

Set up your stand, make sure you've got power, and you're ready to go: now you can check your email, feeds, news, weather, whatever with a glance, no matter what you're doing on your main PC.