Quick Links
If you ever plan to mount something to the wall that's even remotely heavy, you'll need to use drywall anchors if a stud isn't available. Here are the different types of drywall anchors, and how to use each one.
What Exactly Are Drywall Anchors?
Ideally, you want to hang heavy things from your walls by using the studs as the anchor. However, this isn't always possible, especially if there's an exact location you want something hung and there's not a stud behind it.
Unfortunately, if you were to just drive a screw into drywall, the brittleness of the drywall material wouldn't allow the threads of the screw to fully bite into the drywall, making the holding strength of the screw pretty weak overall.
This is where drywall anchors can save the day. A drywall anchor goes between the screw and the drywall, biting into the drywall much more effectively than a screw would. Then, you screw into the anchor, so everything stays in place.
Depending on what you're hanging or mounting, you may want to use a specific kind of drywall anchor, and there are several to choose from.
What You Need

Before we get started, though, there are a few tools you'll need, most of which you probably already have:
- A hammer
- A power drill and full drill bit set
- Drywall anchors
Make absolutely sure you get a drill bit set and not just one or two drill bits. You need the different sizes since drywall anchors come in all different shapes and sizes.
With that all out of the way, let's get started!
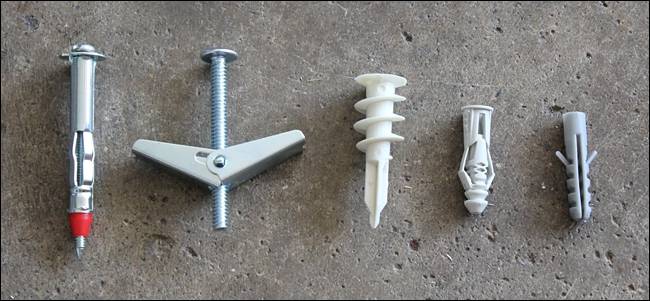
Expansion Anchors

These types of anchors are the most common, and when you think of drywall anchors, you probably think of these. They're small little plastic anchors that are fairly basic, and you'll see them included in most shelf kits that you can buy at the store.
They're called expansion anchors because when you drive in the a screw, they expand and push against the drywall in order to bite into it. They're not the best type to use, since they're not able to hold a whole lot of weight (maybe 10 to 20 pounds at most), but they're great for heavier picture frames and small shelves. Anchors will sometimes list the holding strength maximum on the packaging, but if not, it's best to play it safe and go with a stronger anchor (like the ones discussed below) if you're unsure.
In any case, to use an expansion anchor, start by drilling a hole in the drywall that's roughly the same diameter as the anchor.

After that, gently hammer the anchor into the wall. This is where you'll find out of the hole you drilled is either too big or too small. You want the anchor to go in fairly smoothly with a bit of resistance, but you don't want to be fighting with it to get it to go in.

Hammer the anchor in until it's flush with the wall.

Next, take your screw and begin driving it into the anchor. Make sure to position your shelf (or whatever you're mounting) up to where you want it and then drive in the screw. However, if you're just hanging a mirror or a picture frame, you can drive the screw in by itself and hang the mirror afterward. Stop driving when the screw becomes snug.

This is what the anchor looks like on the other side. As you can see, the anchor expanded quite a bit in order to create a snug fit for the screw.

Threaded Anchors
Sometimes called Zip-Its, threaded anchors are kind of like larger screws. They come with much larger threads than screws do, allowing them to really bite into the drywall and create a pretty nice hold.

However, they only have a little bit more holding power than expansion anchors, so they should still only be used for light duty applications. However, I think they're a bit easier to install.
Start by drilling a hole about the size of the tip of the threaded anchor. Then, take your power drill and drive the threaded anchor into the drywall just like you would with a normal screw.

As with the expansion anchor, drive it in until it sits flush with the drywall.

Next, take your screw and drive it into the anchor, stopping when it feels snug. This is what it looks like on the other side. Sometimes the tip will break off entirely, sometimes not.

Molly Bolts
Now we're getting into the really strong drywall anchors, and these are ones that you can use on pretty much any material---not just drywall. So if you have a concrete wall that you want to mount something on, you can use these to get the job done.

Molly bolts are easy to install, but you also need to make sure that you get the right size for the thickness of your wall. You'll see why in a minute.
To install one of these, drill a hole with the same diameter as the molly bolt. Then hammer it in until it sits flush with the wall. Some molly bolts have teeth on the head that dig into the drywall, so make sure that you hammer it in all the way so that these teeth can do their job.

Next, unscrew the screw that's pre-installed onto the molly bolt until it's completely out.

When you're ready to mount or hang something, re-install the screw by driving it back in. You'll feel a little resistance at first, but that's just the molly bolt mechanism slowly tightening down. Stop when you're met with even more resistance and snugness.

Here's what the other side looks like. As you can see, this molly bolt is too big for my 1/2-inch drywall, as those four little wings should be pressed up against the wall in order to create that strong hold. So make sure you get the right size molly bolts when you're at the store. If you're unsure, just ask an employee for help.

Toggle Bolts
Toggle bolts are pretty much the strongest wall anchors you can buy, but they're vastly different when it comes to installing them.

First, start by drilling a hole that's big enough for the toggle to squeeze through when it's folded down. In most cases, this hole will be large enough for the head of the screw to fall through, so these are really only good for mounting shelves or other items where they can act as a washer of sorts and stop the screw from going all the way through.

You'll also want to make sure that you feed the toggle bolt onto the item you're mounting first by unscrewing the toggle from the screw, feeding the screw through the shelf mounting hole, and then screwing the toggle back on. From there, fold down the toggle and feed it through the hole you drilled in the wall (as pictured above). Once inside the wall, the toggle will spring back open.
From there, begin screwing down the bolt. You'll need to pull gently on the bolt as you're screwing it in to prevent the toggle from spinning around with the bolt. You may need a second pair of hands to help you with this.

Tighten it down until it's snug and you'll be ready to go. Pictured above is what the other side looks like, and you'll notice that the toggle is pressed firmly against the drywall to hold the bolt in place.