If you’ve ever seen one of those super-customized desktops that are sometimes featured on Lifehacker, you might have wondered just how they put them together—so today we’ll take a quick tour through Rainmeter, the desktop customization utility. Note: this guide isn’t really meant for the serious geek, as you'll probably already understand most of what we’re discussing. If you have any advice for new users, however, please feel free to offer your tips in the comments.
Installing and Using Rainmeter
The first thing you’ll need to do is grab a copy of the latest version of the Rainmeter installer, which as of this writing is version 1.3. Running through the setup is as simple as clicking through a couple of screens, deciding whether or not you want Rainmeter to start with Windows, and which them you want as the default theme—Gnometer is now the default choice, and that’s what we’ll talk about today.

Once you’ve installed and launched Rainmeter, you’ll immediately notice the bar at the top of the screen, and a couple of default widgets including the Settings dialog. From here you can customize the placement of the bar and whether it should appear as a bar, floating panel, or transparent.

Under the Skin Settings, you can configure extra settings for some of the available widgets—for instance, if you want to put in your Gmail or Google Calendar details, or configure Facebook, this is where you’d need to go.
![image[21]](https://static1.howtogeekimages.com/wordpress/wp-content/uploads/2010/10/image211.png?q=50&fit=crop&w=750&dpr=1.5)
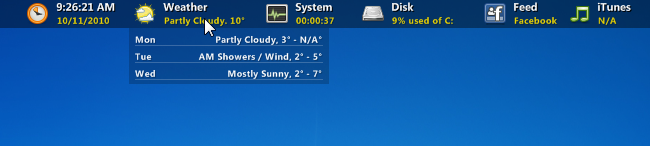
In this example, we want to customize the Weather gadget to show the weather for our location. If you click on the instructions link, it will open up the Gnometer maual—which is oddly enough implemented on a web page and requires Flash. (Hey developers: that’s annoying!)

Since the weather widget uses Weather.com, if you head over there and find your location, you’ll be able to see the 8 character code that you need to paste into the settings dialog. It should look something like this:

Most of the widgets require some type of setup, which is a mostly manual process—you’ll have to figure out the settings for each one and check in the manual. Once you’re done, you might wonder how to close the Settings panel, since there’s no close button anywhere. To close it, you’ll do it the same way you’ll close any Rainmeter widget, by simply right-clicking and choosing “Close Skin” from the menu. You can also edit or refresh the skin from this menu if you choose.

To launch the Settings dialog again, just right-click on any widget or the top bar and choose Gnometer –> Settings.ini from the menu.
![image[15]](https://static1.howtogeekimages.com/wordpress/wp-content/uploads/2010/10/image151.png?q=50&fit=crop&w=750&dpr=1.5)
You can also add new widgets through the right-click menu by simply navigating to one of the items under the Gnometer menu and clicking it.

The one slightly annoying thing about this is that all the widgets show up in the upper-left corner, so if you have a widget there already, they will overlap and you’ll have to move it.

You can also use the included RainBrowser application to find widgets and organize them. They can be added directly to the desktop from this application, or you can refresh all the widgets, edit them, or browse the folder that the skin is stored in.

You can also use the included RainThemes application to save a copy of your theme in case you want to try out something else, or setup multiple themes for different reasons.

There’s a real lot more to Rainmeter than what we’ve covered, but this should at least get you started putting system stats and other widgets on your desktop. In future articles, we’ll talk about some more geeky aspects of using Rainmeter, including editing themes and creating your own widgets. Download Rainmeter from rainmeter.net