Quick Links
Sharing files over the network is convenient, but not without risks. If you leave permissions open, anyone on the network can see all of your files, which isn't ideal on large networks. But if you lock things down you'll have to share your Mac's user account with anyone who needs access to the files. That's not ideal for all sorts of reasons.
This is why you should set up a Sharing Only user account in macOS. This is an account that exists entirely for accessing files on your Mac over the network. You cannot use this account to log into the Mac locally and run software, but you can use it to browse and grab shared folders. It's the perfect way to share files securely over at network, without sharing your primary username and password.
Step One: Create a Sharing Only User Account
To get started, we're going to create a Sharing Only user account. We've shown you how to set up multiple user accounts, and that's basically what we're doing here. Keep in mind that only Administrator accounts can create new user accounts: if you're not an administrator, you'll need to get on an account that is.
First, open System Preferences, then head to "Users."

Click the lock at bottom-left to unlock the seeings.

You'll be asked for your password, or fingerprints if you have Touch ID. After that the "+" and "-" buttons above the lock will stop being greyed out; click "+" to create a new account.

The top field is the most important one for our purposes: you need to create a "Sharing Only" account, so click that drop-down menu and click "Sharing Only."

Once you do that, pick a username and password, then click "Create User."
Unlike other accounts, Sharing Only accounts don't really have any settings in the Users & Groups panel.

So long as it says "Sharing Only," you've properly set up an account.
Step Two: Enable File Sharing
Next we're going to enable file sharing over the network. Head back to the main page of System Preferences, then click "Sharing."

In the left panel, ensure that "File Sharing" is enabled by checking it.

File sharing is now enabled! If you plan on sharing files with Windows computers, make sure you also click "Options" to bring up a few advanced settings.

Recent versions of macOS default to SMB, which is the file sharing format used by Windows. In order to log in from Windows machines, however, you need to enable Windows Files Sharing for the sharing only account you made in step one. Click the checkbox beside its name and you'll be asked for your password.

Not that this is not asking for your administrator password; instead, type the password you gave your sharing only account.
Step Three: Set Up Specific Folders For Sharing
File sharing is turned on, now it's time to share some files. Click the "+" button below the list of shared folders.

You will be asked which folder you want to share. Browse to your chosen directory, then click "Add"

Your folder will now be in the "Shared Folders" panel.

Click it, then click the "+" button below the "Users" panel.

Choose your sharing only account from the list, then click "Select."

By default the account can read, by not modify, files. It's probably best to leave it this way if you're just sharing files, though you do have the option to change things up.
Congratulations: you've now set up a sharing account, and shared a folder with it! Repeat Step Three for any other folders you'd like to share.
Access Your Shared Folder From Another Mac
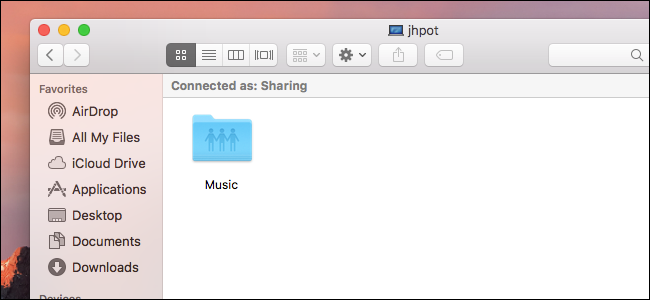
Accessing your shared folder from another Mac isn't hard. Open the Finder, then head to "Network." You should see your computer listed.

Click it, then log in with the Sharing Only account you made earlier.

If everything worked, you should see your shared folders.

You can now grab files from this Mac.
Access Your Shared Folder From Windows
We've shown you how to share files from macOS to Windows, and the steps above should basically work. On a Windows computer, open Windows Explorer, then head to the Network section. You should see your Mac listed.

Double-click your Mac, then enter the Sharing Only password you created.

You should then see your shared folders listed.

You're in! Grab whatever files you need.