Quick Links
If you've ripped your Blu-Ray collection to make your library more convenient, you might also want to burn a back up or use a copy so you don't damage your original. Here's how to burn a copy of your movies—or even your own home videos—to a playable Blu-Ray on Windows or macOS.
What You'll Need
To create your own playable Blu-Ray, you'll need a few things to get started including:
- A Blu-Ray burner drive: By the time Blu-Ray became a common standard, many computers were skipping optical drives altogether. If you don't already have one, you'll need to buy a Blu-Ray burner drive, which usually go for around $40-60, depending on whether you want to get an internal or external drive. If you want to burn Blu-Rays from a Mac, you'll probably need an external burner, as most Macs can't use internals without some kind of enclosure.
- A blank Blu-Ray disc: Naturally, you'll need a blank disc to burn your movie to. Blank Blu-Ray discs are a little more expensive than DVDs, but they're still relatively affordable if you buy them in bulk. The blank discs also come in two flavors: single layer and dual layer. Single layer Blu-Rays can store up to 25GB, while dual layer Blu-Rays can store up to 50GB.
- tsMuxeR (Windows/Mac): Before you burn your video to a disc, you'll need to put it in the proper format. If your video is in MP4, MKV, or other supported common video formats, tsMuxeR is a simple utility that can reorganize these files into something your Blu-Ray player can read. This process is technically "muxing," not encoding, so it won't mess with the quality of your video.
- ImgBurn (Windows): This is a handy tool that can burn files, folder, or disc images onto a Blu-Ray for you. We'll use tsMuxeR to create an ISO file that ImgBurn can easily burn directly onto a disc.
- Finder (Mac): On a Mac, the burning process is even easier. Finder has the built-in ability to burn an ISO image directly as long as you have a disc drive connected.
Install or plug in your Blu-ray drive, install the apps you need, then fire up tsMuxeR to remux your videos into the proper format.
Step One: Convert Video Files to the Blu-Ray Format With tsMuxeR
No matter what OS you're using, you'll need to convert your video files to the Blu-Ray format. More technically, we're going to use a process called multiplexing, or "muxing." In this context, muxing involves combining multiple video or audio tracks into a new format without changing their contents. While we don't actually have to change the video and audio streams of your movie, we do need to rearrange them so they're in the right format for Blu-Ray players to read them. For this, we'll use a tool called tsMuxeR, available for both Windows and Mac.
First, open tsMuxeR and click Add on the right side of the window. Find the video file you want to convert and click Open. You can find a list of compatible video formats and codecs that you can convert on the application's website here.

Under the Output section, choose "Blu-ray ISO." This will create an image of a disc that you can burn directly to a disc from several programs. You can also use "Blu-ray folder" if the app you use to burn doesn't support ISOs. We're using ImgBurn for Windows and Finder on macOS, both of which support burning ISOs, but ImgBurn also supports burning the folders directly.
Then, on the right side of the screen, click the Browse button to find a place to store the converted Blu-Ray files. This location will need to have enough space to store an entire copy of the movie you're planning to burn, at least temporarily, so make sure there's plenty of free space on that drive.

When you're done, click "Start muxing." This will convert (or remux) your video into a folder of files that you can then burn to a Blu-Ray.

Step Two: Burn Your Image To a Disc
Once your video is remuxed into a Blu-Ray-compatible ISO format, you can burn that image to a blank Blu-Ray and it will be playable in any Blu-Ray player. An ISO file is essentially an exact copy of an entire disc, so it won't need to be converted while it's copied. In fact, you can mount an ISO in Windows or macOS and play it as though it were a disc in a drive. Since we want a real disc, though, here's how to burn your ISO to a blank disc.
Windows: Burn Your ISO with ImgBurn
ImgBurn is a free utility that can easily burn files, folders, and images to a disc. Open up ImgBurn and click "Write image file to disc."

Under source, click the yellow folder icon to find and select the ISO of your movie.

Make sure that your target disc drive is selected under Destination, then click the big burn button at the bottom of the window.

ImgBurn will start burning your ISO to the disc. It will take a while, and the tray may pop out and back in once or twice, so make sure your drive is unobstructed. Once it's done, you can play your disc in any Blu-ray player. There won't be a menu, so the movie will play automatically as soon as it's inserted.
macOS: Burn Your ISO with Finder
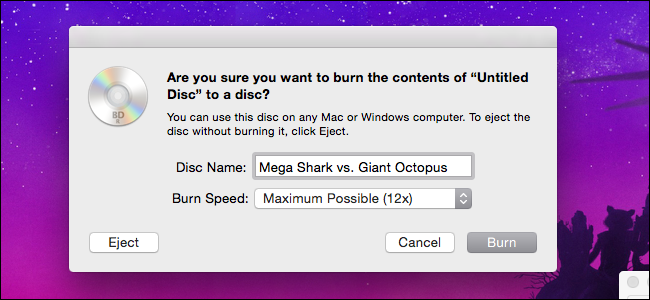
On a Mac, Finder can burn an ISO image directly to a disc. Open up the folder containing your ISO in a Finder window. Then, click File and select the menu item that reads "Burn [IMAGE NAME] to Disc".

In the small window that appears, give your disc a name, then click Burn.

A tiny window with a progress bar will appear. When it's finished, your disc will be finished burning.

Once your disc is done, you can pop it into any Blu-Ray player and it will start playing your movie automatically.