Quick Links
Just like Chrome, Google offers multiple channels of the Chrome OS operating system. In addition to the standard Stable, Beta, and Developer channels you can choose from on the About page, there's a special bleeding-edge Canary channel. The process for switching to Canary, however---or leaving Canary if you're already using it---is more complex.
Warning: Like the Canary build of Google Chrome for desktops, the Canary channel can be very unstable. It's updated every night with the latest code changes, and it can be very buggy and sometimes break completely. If you've already switched to Canary and want to get back to the stable channel, this guide will show you how.
How to Switch to Chrome OS Canary
To switch to Canary, you must first enable Developer Mode on your Chromebook. This will disable the default verified mode and give you the ability to modify your Chrome OS operating system and run commands that are normally not available. Note that switching to Developer Mode will wipe your Chromebook's storage, so you'll have to sign back in with your Google account afterwards.
With Developer Mode enabled, sign into your Chromebook and launch the crosh shell by pressing Ctrl+Alt+T.
Type the following command into the shell that appears and press Enter:
live_in_a_coal_mine
Type "y" and press Enter to switch to the Canary channel (again, only if you know what you're doing!). Your Chromebook will become one of the canaries in the coal mine and, if there's a problem with the Chrome OS development code, it will be one of the first machines to break. That's the point! You're getting the latest Chrome OS development code with all its problems.

(If you see an "unknown command" error message instead, you need to put your Chromebook into Developer Mode first.)
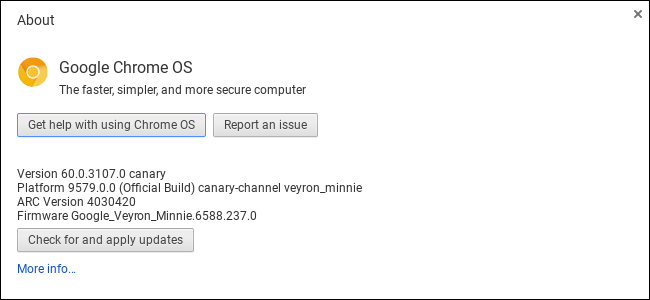
The next time your Chromebook checks for updates, it will download and install the Canary channel version of Chrome OS. To speed this up, you can click menu > Help > About Chrome OS and click the "Check for and apply updates" button. Restart the Chromebook when it finishes the update and you'll be using the Canary channel.

How to Leave Chrome OS Canary with a Command
You can't simply leave Canary by running a Powerwash operation on your Chromebook. A Powerwash normally resets your Chromebook to its factory default state, but you'll just end up with a fresh version of Canary installed if you run a Powerwash.
Don't leave Developer Mode, either. If you switch your Chromebook back to verified mode by re-enabling OS verification, you'll still have Chrome OS Canary---but you won't be able to run the command to leave it, because that command is only available in Developer Mode. So ensure you're in Developer Mode before continuing.
Sign into Chrome OS Canary and press Ctrl+Alt+T to open the crosh shell. Type the following two commands in order:
shell

            update_engine_client --channel=stable-channel -update

Your Chromebook will switch to the Stable channel and immediately begin downloading and installing the update. You can check the download status from menu > Help > About Chrome OS.
Restart the Chromebook after it finishes the update, and you'll be back to the stable channel. You can now leave Developer Mode by turning OS verification on when prompted to do so during the boot process, if you like.

How to Leave Chrome OS Canary with a Recovery Drive
If the update_engine_client command fails for some reason---you are running an unstable version of Chrome OS where anything can break at any time, after all---there's still another way to leave Chrome OS Canary and get back to the Stable build of Chrome OS.
As the recovery process is performed in Recovery Mode, it will work even if Chrome OS Canary isn't functional at all.
The recovery process involves using a USB drive or SD card to recover your Chromebook to its default factory state. You must install the Chromebook Recovery Utility in Chrome on a Windows PC, Mac, or Chrome OS device. Run the utility and it will walk you through the process of inserting a drive, providing your Chromebook's model number, and creating a recovery drive. The USB drive or SD card must be at least 4 GB in size and all the data on it will be erased.

Once you've created the drive, enter Recovery Mode on your Chromebook by holding Esc and Refresh, and then pressing the Power button. On a Chromebox or Chromebit, first turn off the device and then press and hold the physical Recovery button on the device using a paper clip or another narrow object.
If you don't know the model number of your Chromebook, you can enter Recovery Mode on your Chromebook and you'll see the model number displayed on the recovery screen.

Insert the USB drive or SD card while the Chromebook is in Recovery Mode and follow the instructions on your screen. Your Chromebook will automatically reinstall its Chrome OS operating system from the files on the drive, going back to the stable version of Chrome OS. All the data on the Chromebook will be erased, so you'll have to sign back in afterwards.