Quick Links
Do you like the idea of Mail, the default email client in macOS, but find yourself unable to actually use it because of how much you love Gmail's keyboard shortcuts? Me too. I've used Macs for years, but I've never given the default email program a chance, even though it's lightweight, speedy, and nicely integrated into the OS. I want to press "e" to archive an email, or "#" to delete one, and j or k to browse emails.
It turns out I'm not alone, because there's a bundle called Gmailinator that adds exactly this functionality to Mail (sometimes called "Mac Mail" or "Mail.app" by users.) The problem: that bundle is four years old, and doesn't work with macOS Sierra. Even worse: Apple also doesn't really go out of its way to make installing bundles easy. Happily, there's a version that is working, but to set it up, you'll have to compile it using XCode. Don't panic: it's not hard, and the result is worth it.
Step One: Enable Bundles in Mac Mail
Before we can do anything, we need to open the Terminal and enable Mail bundles with this command:
defaults write com.apple.mail EnableBundles -bool true
All we're doing with this command is changing the "Enablebundles" toggle from "false" to "true." Mail will not even check for bundles if this isn't enabled, so make sure you do this.
Step Two: Download Gmailinator and XCode
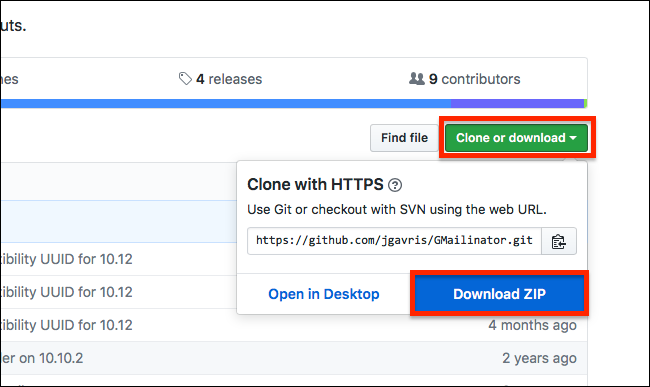
Next we need to head to the working version of Gmailinator, generously forked by Github user jgavris. Click the green "Clone or Download" button, then click the "Download ZIP" button.
Open the ZIP file to unarchive it.
If you haven't already done so, install XCode from the Mac App Store. It's a 4GB download, so this may take a while. Sorry: there's no way around this, at least not until someone provides a working binary---the only binaries we could find aren't working (if this changes please get in touch with us and we'll update the article.)
Step Three: Compile and Install Gmailinator
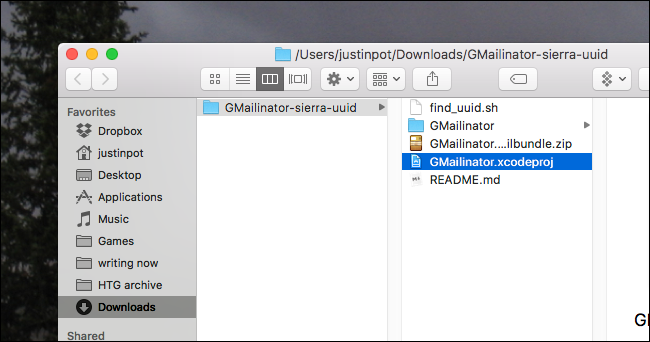
Next, close Mail, then open the file called
GMailinator.xcodeproj
by double-clicking it.
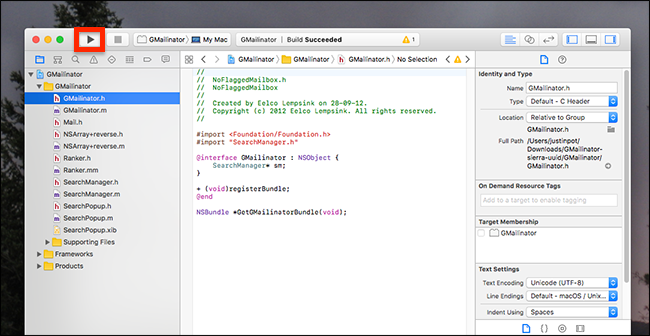
From here you can explore the code, if you like, or you can click Play button at top-left to build and install the bundle.
Launch Mail: if the build didn't work, you'll see an error message. Otherwise you should be able to use the Gmail keyboard shortcuts.
You'll find the bundle you installed in
~Library/Mail/Bundles/
, but you'll need to know how to access the hidden Library folder to get there. To remove the bundle simply delete this folder.
Supported Keyboard Shortcuts
Wondering which of Gmail's keyboard shortcuts are supported by this bundle? Here's a list from the GitHub site for the project.
|
Key |
Action |
|---|---|
|
# |
Delete |
|
/ |
Mailbox search |
|
! |
Toggle message as Junk |
|
a |
Reply All |
|
c |
Compose new message |
|
e, y |
Archive |
|
f |
Forward message |
|
G |
Go to the last message |
|
g |
Go to the first message |
|
j |
Go to next message/thread |
|
k |
Go to previous message/thread |
|
l |
Move to folder (opens dialog) |
|
o |
Open selected message |
|
R |
Get new mail (Refresh) |
|
r |
Reply |
|
s |
Flag |
|
u |
Mark message as read |
|
U |
Mark message as unread |
|
v |
View raw message dialog |
|
z |
Undo |
I tested them on the latest version of Mail as of this writing, 10.3, and all of these shortcuts were working for me.
Enjoy your new Mac Mail setup. If you want to keep configuring Mail to your liking, consider stopping it from wasting gigabytes of space or organizing your email with smart mailboxes.

