You know how to take screenshots on a Mac, but not how to take screenshots of the second display on your new MacBook Pro: the Touch Bar. What if you want to share how you've customized the Touch Bar, or the dumb Touch Bar apps you've found?
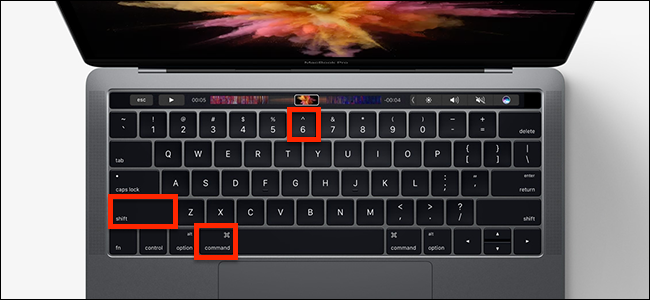
It turns out the keyboard shortcut for taking a screenshot of the Touch Bar is related to the other keyboard shortcuts for taking a screenshot: Command+Shift+6. Press these keys and a screenshot of your Touch Bar will appear on your desktop (or somewhere else, if you've changed where your Mac saves screenshots.)

The screenshot itself is going to be unwieldy: the Touch Bar's resolution is 2170 by 60 pixels, meaning the results are going to be quite wide. You'll have to crop it using Preview, or whatever image editor you prefer.
If you'd rather have the screenshot copied to your clipboard, you can do that with Control+Command+Shift+6.

Now you can paste your screenshot into the image editor or word processor of your choice.

These keyboard shortcuts are somewhat clumsy, but you can customize your macOS keyboard shortcuts by heading to System Preferences > Keyboard > Shortcuts, then clicking the "Screen Shots" category.

From here you can set whatever keyboard shortcut you want for taking screenshots of your Touch Bar.
If none of these methods appeal to you, or you simply don't have a Touch Bar to take screenshots of, you can try a software version of the Touch Bar on any Mac.

With this window open you can take screenshots of the Touch Bar using the cross hairs offered by Command+Shift+4, just like you would with any other application. It's an option worth considering if you want to quickly screenshot a particular region of the Touch Bar without having to crop later.