Quick Links
Straining to see stuff on your MacBook's screen? If you've got a high-resolution Retina display (like the MacBook Pro or the 12" MacBook have) it's easy to adjust everything---text, icons, buttons, etc---on the display to be bigger.
For decades, people with vision problems have adjusted their system resolution to make things like text and interface elements bigger. This is a terrible idea, because it distorts basically everything on your screen. If your Mac offers a Retina display, the System Preferences offers a better way.
Instead of changing the system's resolution, macOS can scale things like interface elements and text, allowing photos and other graphics to still take full advantage of the display's native resolution. It's somewhat akin to the DPI scaling on Windows 10, but a lot less confusing.
How to Adjust Your Mac's Display Scaling
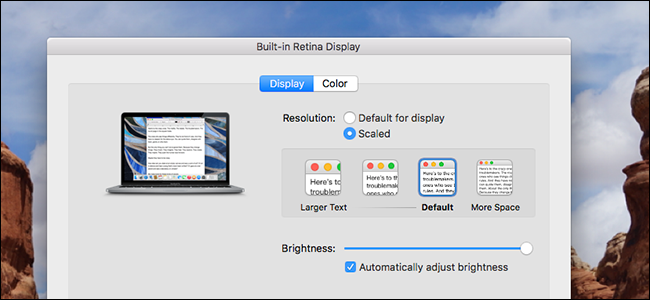
To explore these settings, head to System Preferences > Display.

Under "Resolution," check the "Scaled" option. You'll be presented with four to five choices, depending on the size of your screen.

I'm using a 13-inch MacBook Pro with a resolution of 2560 by 1600 pixels. I'm presented with four options, all of which "look like" a hypothetical resolution on a previous-generation Mac. The default, for example, "looks like" 1440 by 900 pixels, which you can see by hovering your mouse pointer over the option.

The two options below the default "look like" 1280 by 800 and 1024 by 640, as I work my way down. The option above the default "looks like" 1680 by 1050.
These numbers are somewhat arbitrary, in that they are related to how previous-generation Macs looked at particular resolutions. The precise choices offered will vary depending on your specific Mac model. And to be clear, your system resolution doesn't actually change if you choose a different setting: just the scaling of things like text and interface elements will change. The result is similar to changing resolution on older Macs, but without the visual distortions.
Are you wondering what this looks like? Well, here's my desktop set to the default setting, which "looks like" 1440 by 900 pixels.

And here it is when I choose the "More Space" option, which "looks like" 1680 by 1050 pixels:

As you can see, the browser window takes up a lot less space on my desktop now, and the menu bar looks quite a bit smaller. If you have good eyesight, this setting can make your Mac's display feel quite a bit bigger, allowing you to have more things on the screen at once.
Going the other way, here's one size smaller than the default, which "looks like" 1280 by 800:
Everything is a little bit bigger, and the browser window (which I haven't resized) now takes up most of the screen. Let's go one step further, making the display "look like" 1024 by 640 pixels:

The browser now takes up the entire screen, and the menu bar is now freaking huge. I could never work like this, but someone with much worse eyes than me could benefit from it.
Again, none of these settings actually changes the resolution of the display: all they do is change the relative sizes of things.
A Note on External Monitors
I use an external monitor at my desk---one I've had for years. When I head to the Displays panel in System Preferences with that display connected, macOS opens two windows: one for my built-in display, and another for my external display. In my case the external display is not high-density, so I can control the resolution.

So what happens when I drag a window from a high-density display to a low-density one? The window moves, seamlessly, making the adjustment in scaling as you drag it over. This is true regardless of which scaling option you've chosen for your high-density display. It seems like a small thing, but trust me: this is a marvel of engineering.
It's also worth noting that your Mac will "remember" what kind of scaling you want on your Retina display while a particular external display is connected, and when no external display is connected. It's a subtle thing, but can be very helpful.
For example, I like the scaling on my MacBook Pro's display to be set to "More Space" when it's not connected to any external display, so that I have as much room to work with as possible. When I'm at my desk, however, I stand a little further back from the display. This, combined with the lower resolution of my external, means I'd like the the Retina display scaled up a little when the external is connected.
To achieve this, I set the scaling to "More space" while the display was not connected. Then, I connected the display and set the scaling on my built-in display to "Default." Now the scaling switches automatically when I connect or disconnect the external display.
Want More Choices? Check Out Retina Display Menu
Five scaling choices isn't very many, though in my opinion the range offered will probably cover most use cases. If you want to set things more precisely, however, you should download Retina Display Menu, a free menu bar application that lets you set the relative resolution to whatever you want on your Retina display. To install, you'll have to work around Gatekeeper by right-clicking, then clicking "Open." Once it's up and running you'll see a menu bar icon.

Click this and you can choose any resolution---the best matches for your display are marked with a lightning bolt. You can get some truly ridiculous settings doing this---for example, here's how my MacBook Pro looks at full resolution with no scaling:

The browser window here is the same size as before, for reference, and the menu bar can hardly be seen. This isn't practical at all---text is barely readable---but if nothing else it's a good object lesson as to why Retina displays need scaling in the first place.
For most people, the default scaling options will work. But that doesn't mean playing with an application like this isn't fun, so give it a shot.