If you're a fan of movie trailers, pre-rolls, and the build up of anticipation leading up to the cinematic experience, then we've got a treat for you: Plex Media Server makes it dead simple to recreate that theater magic right at home with both trailers from your own movie collection as well as those of upcoming releases.
You may already be aware that Plex supports trailers, but not many people know that you can leverage trailers into something much cooler than something you manually load up now and then. Tucked away in the settings of your Plex Media Server is a neat little bonus feature that can add a little cinema magic and authenticity to your movie night experience. With a little bit of prep work and a few small changes, Plex can do the following things:
- Play trailers for movies from your personal movie collection (including trailers for all movies or just your unwatched films).
- Play trailers for new and upcoming theater releases (Plex Pass premium users only).
- Play trailers for new and upcoming Blu-ray releases (Plex Pass premium users only).
- Play a custom video pre-roll (a video clip that will play right before the feature film starts---like the THX loto or an old-timey "Welcome to the movies!" clip).
By taking advantage of these features, you can get a gentle nudge to check out great movies already in your collection, or see what's new in theaters and about to come out on Blu-ray. Plus it'll feel like you're actually at the movies.
How to Download Your Trailers and Pre-Roll
Of the four potential features we outlined above, there are only two that require you to do any prep work: trailers from your own movie collection and custom movie pre-rolls. Trailers for upcoming theater and Blu-ray releases are downloaded automatically for Plex Pass subscribers and, if that's all your interested in, you can skip this entire section and jump down to "Enable Trailers, Previews, and Pre-Rolls".
Here are the three ways you can add trailers to your movie collection (with their respective benefits and shortcomings):
- Manually: Labor intensive, but you get the exact files you want and they are stored locally with the movie file in your media directory.
- Third Party Media Managers: Automated, and stores trailers with movies. Requires additional software and setup.
- Third Party Plugins: Automated, but stores trailers hidden away in the Plex database, not in your media directory.
If you're a media purist who wants control over which trailers you have and where they are stored, you're stuck with the extra work of the first two options. If you just want trailers and couldn't care less where they're stored, pick option three and let the plugin do the heavy lifting for you.
Adding Movie Trailers Manually
To manually set a trailer for a movie you simply need to download that trailer video from some source and then placing it in the folder where the movie is located, with the filename set to descriptivename-trailer.ext, where "descriptivename" is the a clear description of what the file is and .ext is simply whatever the existing extension of the movie is.
Let's say we wanted to manually add a trailer to the 2012 cinematic masterpiece, Abraham Lincoln: Vampire Hunter. We have the trailer in MP4 format, so we simply browse to the location of Abraham Lincoln: Vampire Hunter in our collection, paste the downloaded trailer into the directory, and rename it to match the file name of the movie file, like so:
Simply repeat this process for as many movie trailers as you wish to add to your collection.
Adding Movie Trailers with a Media Manager
Manually adding a movie trailer here or there is one thing, but if you want to add trailers to hundreds of movies, that'll get old really fast. If you want the trailers stored with your movie files but you don't want to manually download and rename them all, you need to use third party tools like Ember Media Manager or Media Companion.
For our purposes today, we'll be using Media Companion. The interface is cluttered to the point of being almost overwhelming, but if you know which switches to flip, it makes short work of downloading trailers for even a Library of Congress size collection.
Once you've downloaded and installed Media Companion, launch the application. First, make sure "Movies" is selected in the control bar (it should be selected by default) and then click on the "Folders" tab in the GUI, located towards the right hand side of the tab list, as seen below:
Next, look at the bottom of the Folders tab for the entry "Manually Add path to Movie Root Folder". Put the full directory path to your movie collection here (e.g. C:\Media\Movies\, \\homeserver\movies\, or wherever your movies are located). Click "Add".
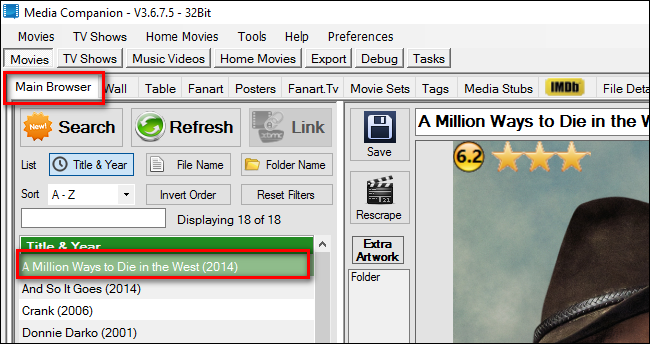
Once you've added the directory, Media Companion will scan the folder and populate the file browser. Go to the file browser now by selecting the first tab "Main Browser". You'll see a list of movies on the left-hand side. Let's download the trailer for a single movie now to demonstrate the process. Select a movie and right click on it.
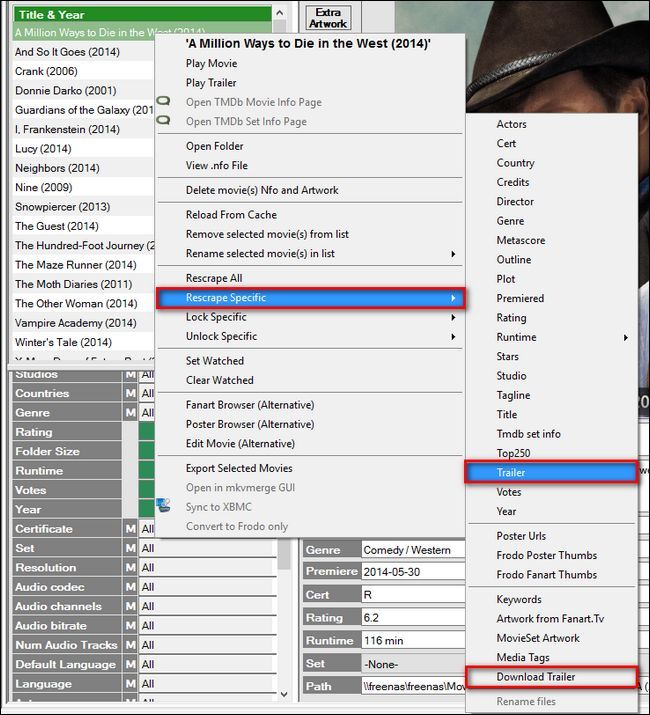
In the right-click context menu, you have two tasks. First, head to Rescrape Specific > Trailer. This will scrape IMDB for the URL of the movie trailer and save it to the Media Companion database. Second, return to that same sub-menu and choose Rescrape Specific > Download Trailer. This will instruct Media Companion to follow that URL and download the trailer to the matching movie directory.
After you select "Download Trailer", you'll see a progress bar and the trailer will be saved to your movie directory in the format moviename-trailer.ext. Confirm, by browsing to the directory, that this has occurred. If everything went smoothly, then all you need to do is return to Media Companion, select all the movies you want to scrape trailers for, and then repeat the same process in bulk with multiple movies selected.
Adding Movie Trailers with a Plugin
If you don't care about where the trailers are stored, using an automatic plugin is definitely the fastest and easiest way to get trailers for your movies. To get started with this method, visit the website for the Trailer Addict Plex plugin (which pulls trailers from the Trailer Addict website) and click the green "Clone or download" button.
Save the resulting .zip file to your computer and open it. Inside you'll find a folder labeled "TrailerAddict.bundle-master". Extract that folder to the plugins directory of your Plex Media Server. The location of the plugin directory varies by operating system:
- Windows: %LOCALAPPDATA%\Plex Media Server\Plug-ins\
- macOS: ~/Library/Application Support/Plex Media Server/Plug-ins
- Linux: $PLEX_HOME/Library/Application Support/Plex Media Server/Plug-ins
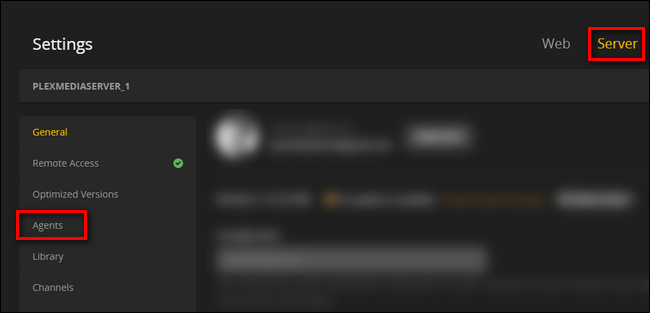
Once you have copied the bundle, rename it to "TrailerAddict.bundle" by removing the "-master" suffix. Restart your Plex Media Server. After you've restarted the server, open up the web interface and navigate to settings by clicking on the and click on the tool icon in the upper right corner.
Select "Server" and then "Agents".
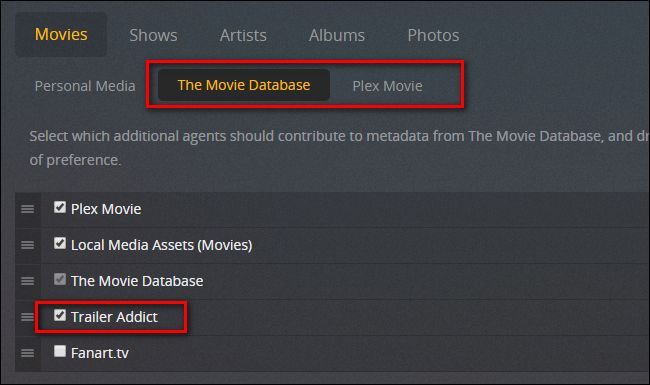
Within the "Movies" tab, select "The Movie Database" and check "Trailer Addict". Repeat this process for "Plex Movie". The location of "Trailer Addict" in the list is not important.
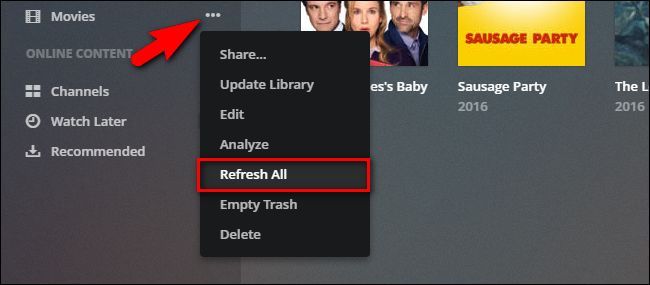
To get the trailers, you need to refresh your movie library. To do so, return to the main menu of the Plex web interface and click on the menu icon beside your movie library. Select "Refresh All". If you have multiple movie libraries you want to add trailers to, repeat this process for each of them.
In the background, the TrailerAddict plugin will download all the trailers for your current movies and, in the future, will automatically add trailers for new movies added to your library. Note that they won't be stored with your movies, like the above two methods---they'll be stored in the Plex database somewhere.
Selecting and Adding a Pre-Roll
With the trailer situation all squared away, we have one final consideration before we jump into setting it all up: selecting a pre-roll video and adding it to our Plex library. What you use as a pre-roll is totally up to you: as long as it can play in Plex it's fair game.
If you want a more traditional pre-roll (like the THX sound check), we highly recommend checking out the extensive collection of pre-roll clips at Demo World. With hundreds of high definition clips to choose from, there's bound to be something that entices you.
If you want something a bit more unique, you can always search the web for old drive-in theater pre-rolls, countdowns, or movie theater public announcements and download those instead.
Once you have the clip in hand, it's time to add it to your Plex Media Server. Rather than dump the file into the same folder where you store your movies, you need to make a separate folder for the pre-roll videos. Where this folder is doesn't matter as long as it is accessible to the Plex Media Server software and not a subdirectory of an existing folder used by one of your existing Plex libraries. The purpose of this is to avoid confusion and clutter in your primary movie library (where "THX Sound Check" doesn't need to be its own unique entry beside real movies).
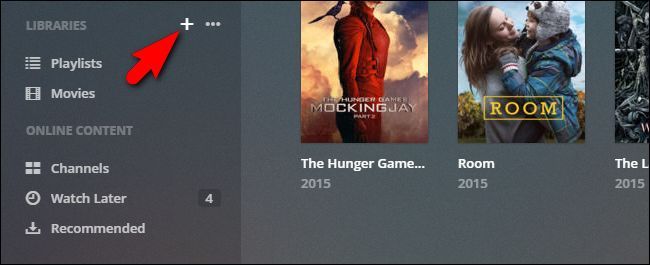
In the web interface, click on the "+" symbol next to "Libraries" in the left-hand navigation column.
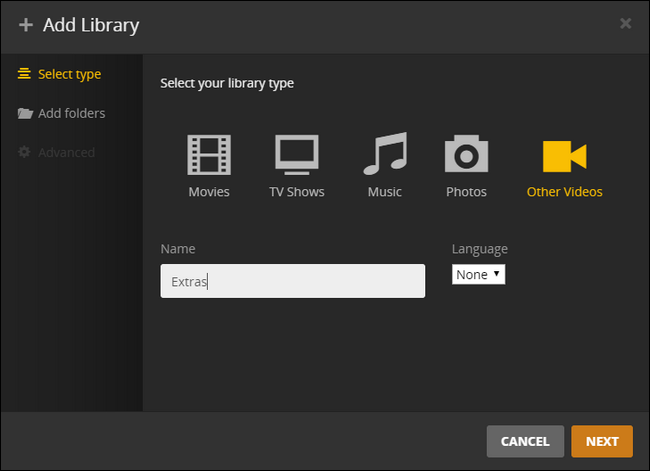
In the library creation wizard, select "Other Videos" and then name the folder "Extras" or something similar. Click "Next".
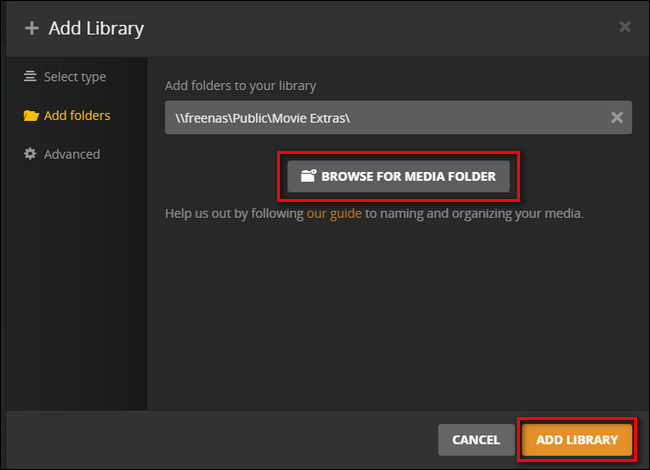
Click "Browse for Media Folder" and select your new media folder with the pre-roll video in it. Click "Add Library".
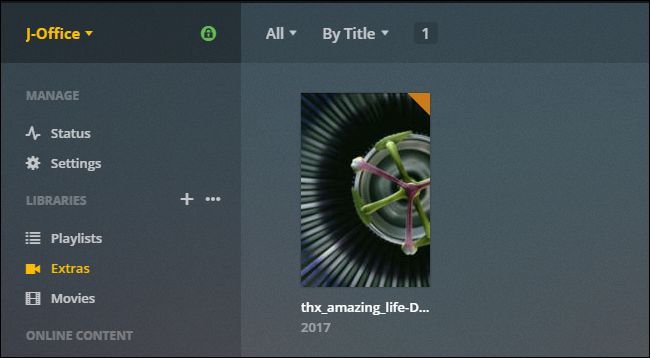
Confirm, by selecting your "Extras" library that the video is present.
Now that we have our trailers and pre-roll videos in place, it's time for the easy part: turning everything on.
Enable Trailers, Previews, and Pre-Rolls
The prep work of actually getting the trailers and/or configuring the plugin was the hard part, we promise! All we need to do now if flip a few toggles inside our Plex Media Server and then turn on the trailer function in our individual Plex clients.
Enabling Trailers on the Server
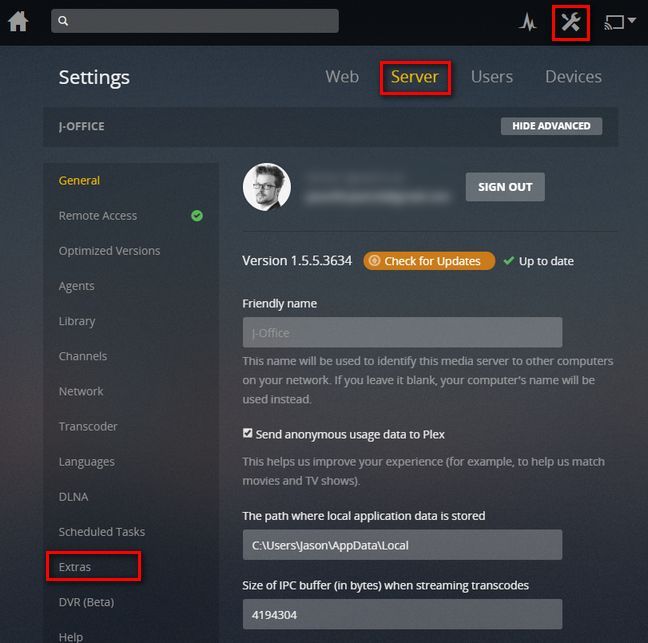
To turn on the trailer and pre-roll features, all you need to do is jump into your Plex control panel again, navigate to Settings > Server once more, and select "Extras" left hand navigation bar.
There you'll find the four options (if you don't see the bottom entry for "pre-roll video" click the "Show Advanced" button near the upper right of the screen control panel).
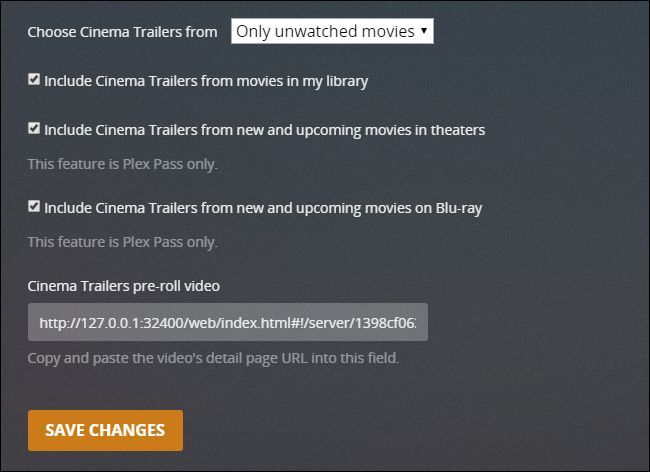
For the most part, the settings here are very self-explanatory. To control what trailers you see from your personal movie collection, you can check and uncheck "Include Cinema Trailers from movies in my library" and then toggle the "Choose Cinema Trailers" between "Only unwatched movies" and "All movies".
Plex Pass subscribers can toggle "Include Cinema Trailers from new and upcoming movies in theaters" and "movies on Blu-ray" on to enable those features. New and up-to-date trailers will be streamed each time you launch a movie.
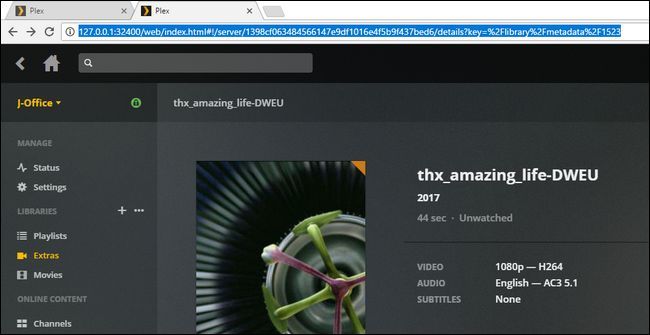
Finally, both standard and Plex Pass subscribers can select a video for the pre-roll. In order to do this you need the URL (from within the Plex Media control center panel) for the detailed view of the the particular video you wish to use. Simply locate that video and click on it to see the detailed view. Copy the URL of that detailed view as it appears in your browser's address bar, as seen below, and paste it into the "Cinema Trailers pre-roll video" box.
Here's what the Extras menu looks like with all the settings toggled on and the URL in place:
With the boxes checked and the pre-roll URL in place, click "Save Changes". That's it: we're done with everything server-side at this point.
Enabling Trailers on Your Plex Clients
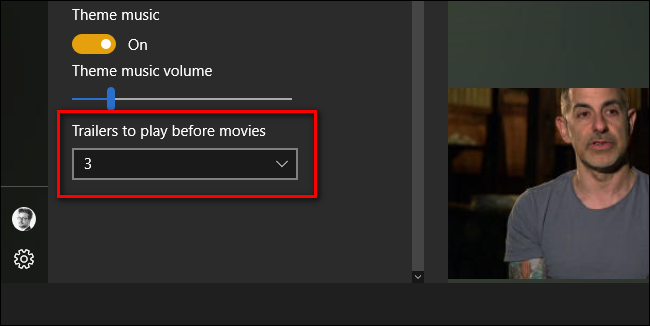
The absolute final step of the whole process is to tell your Plex clients to load the trailers (and how many you want loaded). While we were initially annoyed at this extra step, we actually appreciate it now: it gives you granular control over which of your Plex clients will load the trailers, which won't, and how many trailers they'll load. You may, for example, want the Plex client in your home theater to always play five trailers. You might not want Plex for Windows, installed on your laptop, to play any trailers at all though, because you don't want to deal with the buffering and waiting while you're using your laptop to watch movies on a business trip.
To enable the trailers on the client side, you just have to pop into the settings menu. While the location of the setting varies slightly (it's under Preferences > Playback > Extras in Plex Home Theater, for example, but Settings > Media in Plex for Windows), it'll always look more or less like the screenshot below when you find it:
Just select between 0-5, start a movie from your library, and boom:
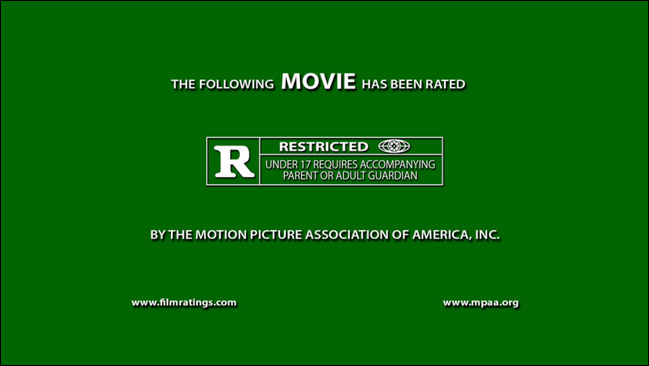
That familiar green ratings screen pops up, a trailer starts playing, and it feels like you're sitting in a cinema proper, anticipating the movie to come.


