Quick Links
Why manually dim the lights during movie time when your media server can do it for you? With a little tweaking, you can set Plex Media Server to automatically adjust your Hue smart bulbs with custom lighting schemes for movie time, intermission, and the end of the film.
We're pretty big media center fans here at How-To Geek, and we're passionate about good lighting, especially during movies---you are watching TV with a bias light, right? So when we found out that we could tie our Plex Media Server experience together with our Hue smart bulb system, we set the system up the very same day, and we think you should too. After all, if you want to capture that perfect movies-at-home-experience you need more than just super cool automatic trailers, you need good lighting too.
With Plex and Hue linked together, you can enjoy lighting integration that includes: dimming the lights (or shutting them off altogether) when your movie or TV show starts, dimmed lights when you pause the movie (so you can find your way to the bathroom or to get a snack), and a post-movie lights-up function to brighten the place back up. Even better yet, you can tweak the whole thing to only kick in if it is after dark (so your smart bulbs aren't flicking on and off in the middle of the day when people watch TV).
Sounds pretty great, yeah? If you're already using Hue bulbs in the same room as a Plex client, adding this feature is a no-brainer. Let's look at how to prepare, installing the plugin, and configuring it.
Step One: Prepare Your Network
There are three things you want to do in advance that will make the entire setup process so much easier: assigning a static IP to your Hue Hub, checking the name of your Plex client, and writing down what you want to happen with your lighting scheme while before, during, and after you start a movie.
Give Your Hue Hub a Static IP
Even if you don't routinely use static IP addresses on your home network, this is a time you have to. Later in the tutorial, we're going to tell the plugin where to find the Hue bridge---and if that Hue bridge gets a new address every time you reboot the router, you'll be stuck updating that address in the plugin settings. To avoid that (very easily avoided) headache, you need to assign a static address to the bridge.
How you assign a static IP address varies slightly from router to router, but before proceeding you need to give your Hue bridge a permanent address---you'll find the bridge listed in your router's assignment list as "Hue-Bridge". If you've never set a static IP address assignment on your router before, check the manual for additional assistance and assign an address outside your router's DHCP assignment pool to the bridge.
Check the Name of Your Plex Client
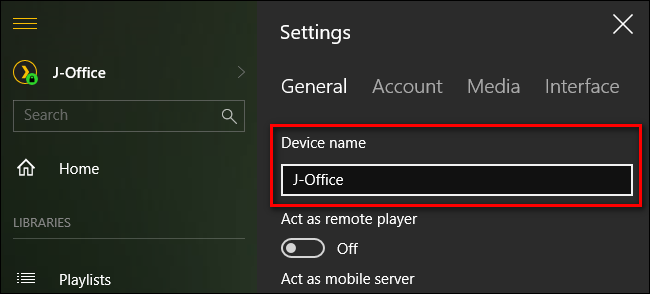
In addition to telling the plugin where to find the Hue bridge, we also need to tell it which Plex clients it should respond to. Take a moment to look in the settings menus of every Plex client you intend to pair with the Hue lights (e.g. if you have a Raspberry Pi running RasPlex in your living room and bedroom, and both rooms have Hue lights, you'll want to check both of those clients).
Unless you've changed the name within the client application itself, the name is usually the hostname of the device it is on (the Plex client on my home office computer is identified as J-Office, for example). Write the device name down, we'll need it in a moment.
Plan Your Lighting Scheme
What lights do you have in the media room and what would you like them to do? Do you want all the lights to dim? All of them to turn off? Some of them to turn off and some of them to dim? The bias light behind the TV to turn on and set itself to a nice crisp white color temperature?
What about when you pause or stop the media? Write down what you want to happen now, so when we get to the giant everything-in-one-menu configuration page for the plugin, you can...well, plug in all your choices in one swoop.
Step Two: Install the HelloHue Plugin
Prep work behind us, it's time to install the plugin. If you've never installed a Plex plugin before, don't worry---the process is pretty straightforward. First things first, visit the GitHub page for the HelloHue plugin and click the green download button to grab a copy.
Save the resulting .zip file to your computer and open it. Inside you’ll find a folder labeled “HelloHue.bundle-master”. Extract that folder to the plugins directory of your Plex Media Server. The location of the plugin directory varies by operating system:
-
Windows:
%LOCALAPPDATA%\Plex Media Server\Plug-ins\ -
macOS:
~/Library/Application Support/Plex Media Server/Plug-ins -
Linux:
$PLEX_HOME/Library/Application Support/Plex Media Server/Plug-ins
Once you have copied the bundle, rename it to “HelloHue.bundle” by removing the “-master” suffix. Then restart your Plex Media Server.
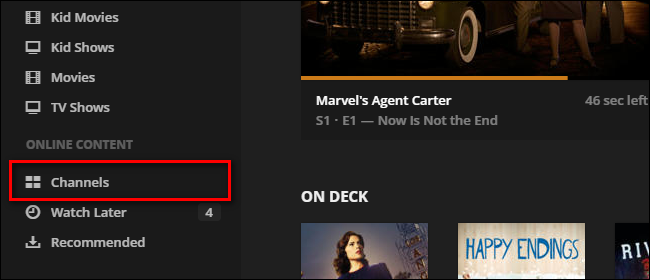
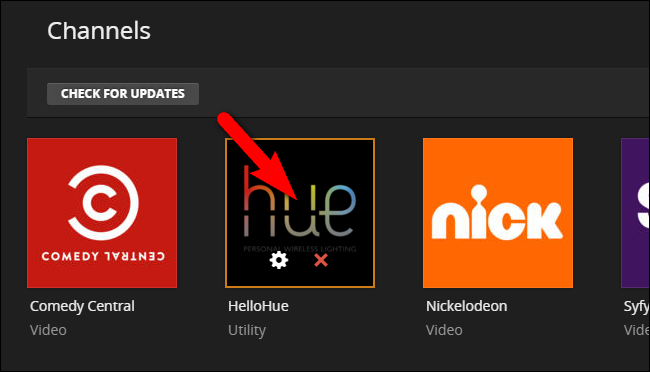
After the server has restarted, head over to Plex's web interface. Look in the left-hand sidebar for the "Channels" entry seen below and click on it.
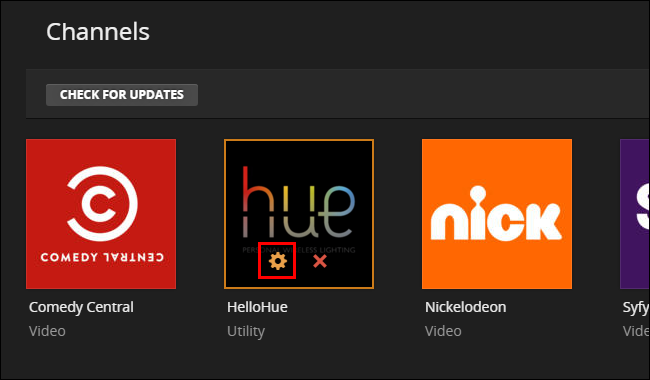
Even though the Hue control app isn't a channel in the traditional sense (like the other media entries you see here, Comedy Central and Nickelodeon), the Channel system is a handy thing for hobby programmers to hijack because it's got a nice interface we can use to adjust the plugin settings.
There are two ways to access the HelloHue plugin. You can click on the general plugin icon (to access the setup mode), or you can hover and click on the little gear icon, as seen below (to access the settings menu). Even though this step is not included in the GitHub documentation for the project, we discovered that it was necessary to jump into the Settings menu ahead of schedule to tell the plugin what the static IP address of the hub was before the setup process could proceed. Click on the gear icon now.
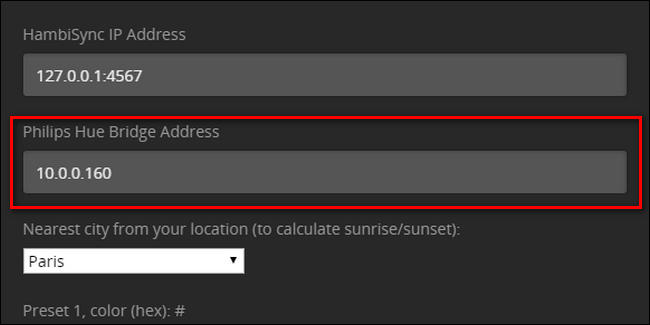
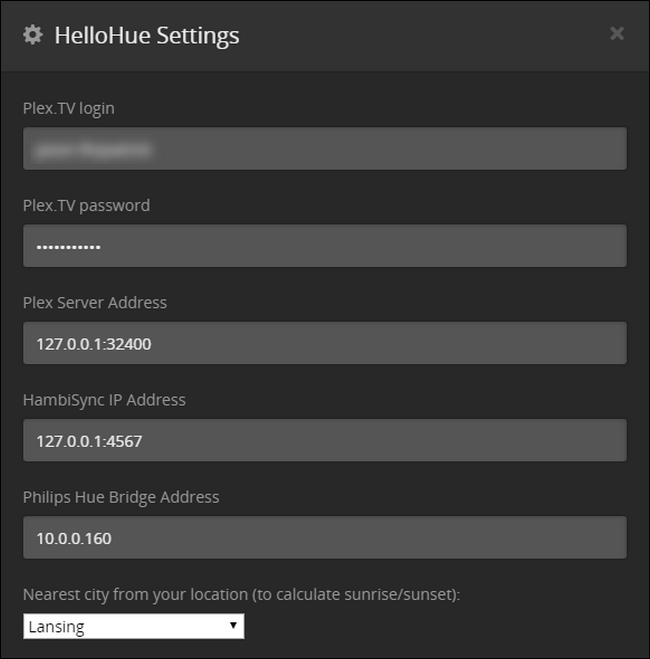
The Settings menu for HelloHue is very long, with tons of settings. Don't panic. We're going to make one tiny change now and then, when we come back to this menu, we'll walk you through the process step-by-step. All you need to do now is look for the fifth entry from the top of the list, labeled "Philips Hue Bridge Address", and enter the assigned static IP address. Our address is 10.0.0.160, but yours might be 192.168.0.101 or whatever you assigned it to in the first section of the tutorial.
Scroll way, way, down to the bottom and click "Save" to save your changes and return to the Channels screen. Back on the Channels screen, hover over the HelloHue icon and click anywhere but on the gear/"X" icon to open up the setup.
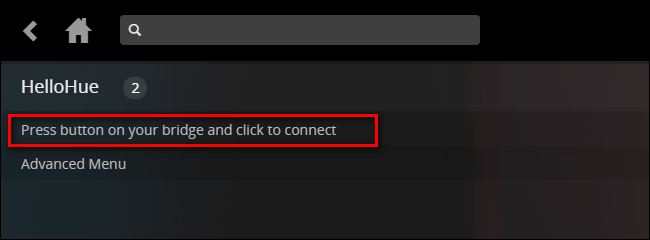
You'll see this simple menu. Do as it says; click the physical link button in the center of your Phillips Hue bridge. After pressing the physical button, then click the link that reads "Press button on your bridge and click connect".
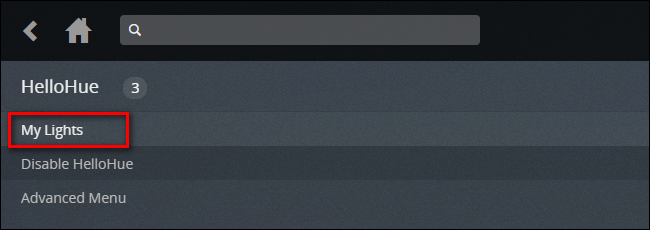
If done correctly you should, in a moment or two, see the HelloHue setup menu change to the following screen with "My Lights" at the top. If you do not see this entry, but you're confident you did press the button on the bridge and then clicked the link properly, select "Advanced Menu" and then "Restart HelloHue". This should, assuming your bridge is functioning as expected, resolve your issue. Even if the process appears to have failed, click on the house "Home" icon in your Plex Media Server to go back to the main screen and then open up the HelloHue channel again---the majority of the time, the error you see is meaningless and the plugin is actually loaded fine.
With "My Lights" visible, click on the link.
Inside, you'll see all the Hue lights connected to your Hue bridge. Now is a great time to do two things. First, note the names of the lights you wish to use in your media setup (like, in our example here, "Bedroom TV". Second, click on each of those lights to toggle them on and then off to confirm that HelloHue can control them.
Now that we've got the plugin installed and properly linked, its time to get down to fun part: configure our super-futuristic-automatic lighting.
Step Three: Configure the HelloHue Plugin
To configure the plugin, you'll need to visit that dauntingly long Settings menu again. Click on the gear icon again to jump back into the HelloHue Settings menu. Remember our preparation in the first part of the tutorial? This is where that preparation pays off, as we'll be able to rip through our setup in no time.
First things first, enter your Plex.TV login information and password at the top. Leave the "Plex Server Address" set up as the default, unless you have a pressing reason (and knowledge of an alternate IP address and port) you need to enter here. If you've never messed with your Plex server IP or port address, leave it alone. The "HambiSync IP Address" is specifically for a separate project related to the Phillips Ambilight ambient TV light system---feel free to check the very cool project out if you're curious. We already filled in our Bridge address, so we're good there. Finally, in this first chunk of the settings, pick a nearby city for the sunset/sunrise detection.
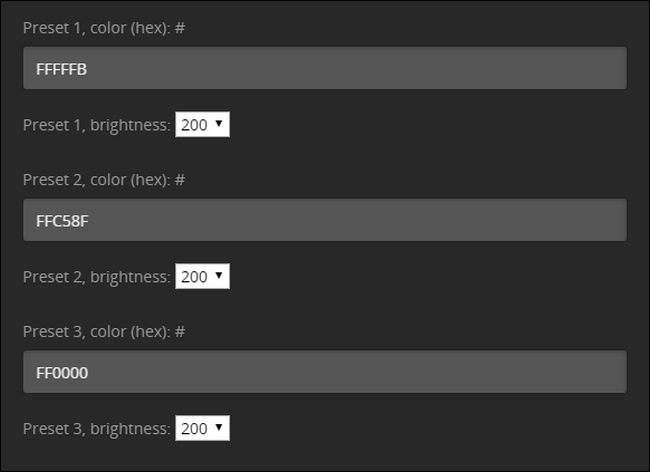
Next, you'll need to set up your color presets. The preset color values must be in hexadecimal format, not RGB format. While you're free to put in any value you want here (maybe you want the room to turn yellow-green when you pause the movie---hey, it's your party) we've taken the liberty of listing some common colors you may wish to use below.
- FFFFFB: Pure white daylight. Great for TV back lights as it matches the color temperature of the white on your HDTV.
- FFC58F: Very warm incandescent glow. Good for late night watching, minimizing blue-light exposure.
- FF0000: Pure red. Useful as a "running light" shade to display while media is paused and you're foraging for snacks.
You can create up to 5 presets. The default brightness level is 200 (and can be adjusted up to 255 and all the way down to 0). In the screenshot below, you can see that we've used the three sample colors above as our first 3 presets:
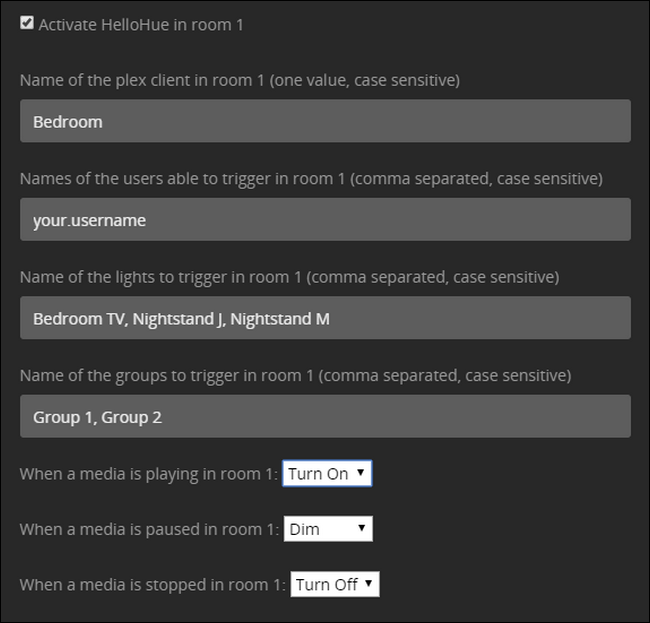
Next, you'll need to enable your first group. You can do so by scrolling down and checking the box "Activate HelloHue in room 1". Name the room, put in the usernames of the people who can trigger the plugin (for 99% of people this will simply be their username as they are the ones who setup and administer the Plex server and all the clients), followed by the name of the lights you want to trigger. (You can ignore the "groups" function as the functionality doesn't appear to be implemented yet). Then, all that's left to do is pick what you want to have happen when you play, pause, or stop the media---your options are turn on, dim, turn off, or trigger a preset.
One thing you may notice is that the on/off/dim/preset options are global, and apply to all the lights. If you want to turn off the lights in the room but turn on the light behind the TV to use as a bias light, you can't do that with a single room. The solution then is to simply divide the lights in your single physical room into two virtual rooms. Repeat the process we outlined above, but instead of lumping all the lights together in, say, "Living Room" split them up into, say, "Living Room TV Lights" and "Living Room General Lights". Then you can configure the two rooms to respond to the same client, but with different results. When you hit play in the living room, for example, you can configure it so the general lights turn off but the bias light behind the TV turns on and when you pause it, the TV light could turn off but the general reading lights could brighten to 50% brightness or the like.
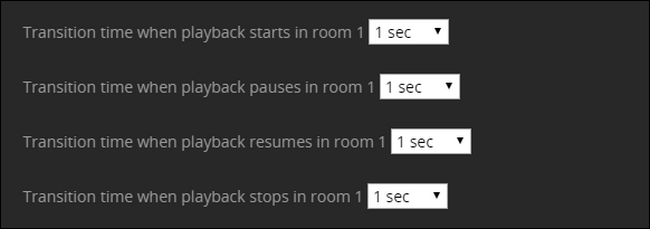
You can also tweak the transition time for each function. By default it is set to 400 milliseconds, but we found that the system seemed to function more reliably if we tweaked it to 1 second.
With most of these tweaks, you'll want to keep the number on the low side, but you might prefer to turn up the wait time on the transition after playback stops: a few seconds of dim lighting after the end of the movie seems appropriate.
There are three final settings you might consider playing with. First, you can set the lights to only trigger if it is dark out (this is calculated based on the sunset time for the city we entered in the first section).
Second, you can configure HelloHue to trigger only if the media is a certain length (e.g. 1 minute, 5 minutes, 10 minutes, or other increasing increments of 5 minutes); this feature is handy if you don't want it to trigger the dramatic movie mode for short clips (like when you show a friend a YouTube video you've clipped to your Plex Media Server).
Finally, you can set HelloHue to only trigger lights that are on when the movie starts. While we're sure there's a good reason for using this last toggle, we'll admit we're at a loss---the whole point of having super-futuristic smart lights is to use them as much as possible, so we, naturally, left this one unchecked.
Be sure to scroll all the way to the bottom of the menu to save your setting when you're done---and that's it! After a bit of mucking about you've now got on-demand mood lighting for your movie watching needs with the kind of lights down, intermission dimming, and lights up automation a real movie house would be proud of.

