Quick Links
PlayStation users have long wanted a way to plug in an external USB drive to their console and use it as local storage for games, apps, and the like. After years of waiting, Sony incorporated this feature in Software Update 4.50. Here's how to do it.
Before you get started, you should make sure to pick the right drive. If you have an old USB 2.0 drive lying around, I'd probably avoid that one as it will just be too slow. USB 3.0 drives will be the way to go, which should be prolific at this point. Just keep in mind that you'll be playing games from this drive, so the faster it is, the better.
With that in mind and drive in hand, go ahead and plug that bad boy in to your PlayStation. I'm using a PS4 Pro here, so my drive is plugged into the the USB port on the back of the unit, but it really doesn't matter which way you go with it.
As soon as you plug it in, the PlayStation should show a notification letting you know it found the drive and you can install things on this drive. Click the notification to get started.

If, for some reason, it doesn't show the notification, you can also jump into the Settings menu, scroll down to Devices, then select USB Storage Devices. Select your USB drive here. This should get you into the same menu as clicking the notification, had it actually been there.


The next menu will let you know that you can install application (read: game) data here, but save files, screenshots, etc. will still be saved to the device's local storage. Click "Next."

You'll see your drive's details here. Confirm everything is correct (this can be crucial if you have more than one USB drive connected), then click the "Format as Extended Storage" button.

A warning will pop up. Click "Format."

And one more warning. Sony really wants to make sure you know what's happening here. Select "Yes."

This process shouldn't take long, but it will depend on the size of the drive. Once it's finished, however, you'll get a notice letting you know it's ready to go and is now the default location for storing applications.

How to Change the Default Storage Location
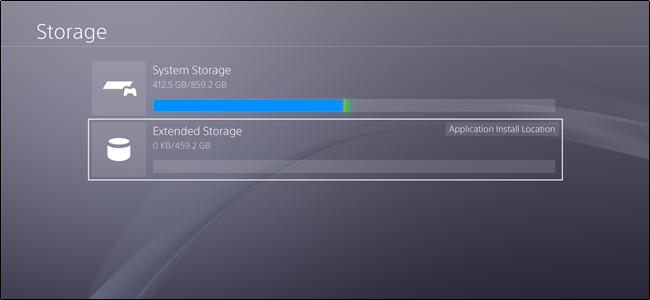
If you decide you want to keep installing applications to internal storage for a while, you can always switch the default location. To do that, jump into the Settings menu (it's the little suitcase-looking icon in the Action Bar), then select Storage.


Both drives should show up here, labeled as System Storage and Extended Storage, with the latter being your newly-added USB drive.

With either drive selected, click the Options button on the controller. This will open the side menu.

From here, select "Application Install Location," then choose where you'd like things to be installed by default.

And that's that.
While it's fantastic to finally have this as an option, it's still not a perfect system. I'd like to see this as more of a dynamic solution, where it uses system storage initially, then dynamically moves over to external storage when there isn't enough room internally, but maybe I'm just being too picky here. Overall, I'm glad this is finally possible.