Lightroom is almost essential for serious amateur and professional photographers. It’s a filing system for all your photos, a RAW developer, and much more. Lightroom is best when used to manage every step of your post-processing workflow, including the very first step: importing photos to your computer from your camera.
To start, connect your DSLR to your computer (or insert an SD card, if your computer has an SD card slot or adapter). If you do this while Lightroom is open, the Import dialog will pop up automatically.

If it doesn’t, or you open Lightroom after inserting the SD card, you have a couple of options. You can press the Import button in the lower left of the Library module...

...you can go to File > Import Photos and Videos…

...or you can use the keyboard shortcut Control+Shift+I (Command+Shift+I on a Mac). All the options get you to the same place: the Import dialog.
Let’s work through a simple import.

From the Source list on the left of the screen, select the Device you want to import photos from. If you’ve inserted an SD card or connected your camera, it should be selected automatically.

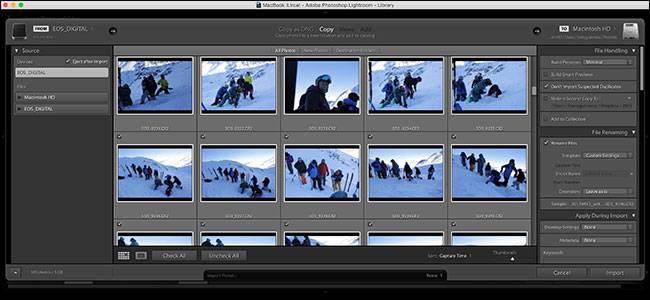
Next, select whether you want to "Copy" the files to your computer or "Copy as DNG". DNG is Adobe’s own RAW format. If you select the Copy as DNG option, your camera’s RAW files will be converted to DNG as you import them. In theory, since DNG is an open format, it’s better for future compatibility, but I don’t find it worth the extra time it takes to import images.
The other two options, Move and Add, are only available if you’re importing images from somewhere else on your computer, not from a camera.

Now, it’s time to select what photos you want to import. By default, they’re all selected, and this is the option I’d recommend. It’s easier to sort photos once they’re on your computer rather than during import. Use the checkboxes, the Check All, and Uncheck All buttons to select the photos you want to import.

You can also select or deselect multiple images at the same time by selecting an image and then Control+clicking (or Command+clicking on a Mac) on another image. You can select as many images as you want this way. Press the Spacebar to toggle them between being imported and not being imported.

To select a larger group of images, click on one image and then Shift+click on another to select all the images between them.

If you’ve already imported some of the images on the SD card you’re using, it’s worth checking the "Don’t Import Selected Duplicates" checkbox under File Handling. Lightroom will compare the images on the card to your catalog; if they’re already in there, it won’t import them.

The other options in File Handling aren’t as important, but here's what they do:
- The Build Previews dropdown determines the quality of the RAW previews Lightroom generates on import. I prefer to leave it to Minimal and let Lightroom create the previews as I need them.
- Smart Previews are basically a combination between a small RAW file and a preview. You can edit them as if they’re a RAW file, but they’re much smaller, which is useful for anyone who edits on a laptop while storing their main files on an external hard drive. Again, I prefer just to render them as needed; even though they’re smaller than RAW files, they’re still pretty big.
- The Make a Second Copy To option is worth using if you’ve got a backup device like a NAS or external hard drive. It lets you duplicate the files to your backup system as you import them. If you don’t have a backup set up, you can safely ignore it.
- Add to Collection will group your images together within your library.
Next, the File Renaming options let you rename the photos as you import them. Given that most cameras tend to be pretty unimaginative with their naming scheme, it makes sense to name them something a little more human readable.

Under the Template dropdown, you can choose what naming scheme you want to use or click Edit to create your own.

I’m a fan of the "Custom Name - Original File Number" scheme. With this option, you enter a custom name for the shoot—say, Harry Portrait Shoot—and Lightroom strips the sequence number from the original file and adds it on the end. This means you’ve got both a custom, human readable file name and the important bit of your camera’s file name. Fill in any custom information required and continue.
The Apply During Import options let you add Keywords and apply Develop and Metadata presets. Presets are a bit complex to get into in this article, but keywords are worth adding. Simply put in a few words that describe the photos as a group separated by commas—something like, “skiing, sports, Val Thorens” is perfect. It’s just enough information to make finding them again easier.

Finally, the Destination options let you select where the photos will be saved on your computer. This can be any location and doesn’t have to be in the same folder as the catalog file. With the Organize options, you can have Lightroom sort each set of photos into their own folder based on the date they were taken or just sort everything into one big folder.

I like to sort my photos photos into folder by year, and then within that year folder, every day gets its own subfolder. That’s the option I’ve got selected in the screenshot above, but you can choose whatever works for you.
When everything is done, click Import, and Lightroom will start pulling all the selected files off the memory card. If you’ve got the Eject After Import checkbox checked in the Source panel, the card will automatically be ejected once Lightroom is finished.

And with that done, all the photos will be in your Lightroom catalog, ready for you to sort and edit. If you do this for every shoot, you’ll never lose images again.