Quick Links
More and more laptops these days are coming with super high resolution screens, which means Windows needs to "scale" the interface to make things readable. If you don't like the default scale level, you can change it yourself. This is essentially a "zoom" of sorts---scaling icons and text so that the display is still running at native resolution, but all the on-screen content is larger without getting distorted.
However, many people have run into a problem where the scale level gets stuck or "locked" at a certain custom position. You can turn off custom scaling, sign out, sign back in, and set the scaling yourself...but once you reboot, it'll be right back where it started. This is often due to a third-party program interfering with Windows' settings, and it's maddening.
The thing is, there are actually multiple things that can cause this, which means there are multiple potential fixes...none of which are guaranteed to work. Having personally experienced this issue and spent days trying to find the answer, however, I've collected the most common solutions that seemed to work for people. Hopefully this will save you from having to go through the hundreds of posts and half-baked solutions out there in Internetland.
Option One: Change the Setting Manually
While you may not be able to change the setting in Windows' Display Settings, there is a workaround that may be a solution for you.
First, right-click anywhere on the desktop and choose "Display Settings."

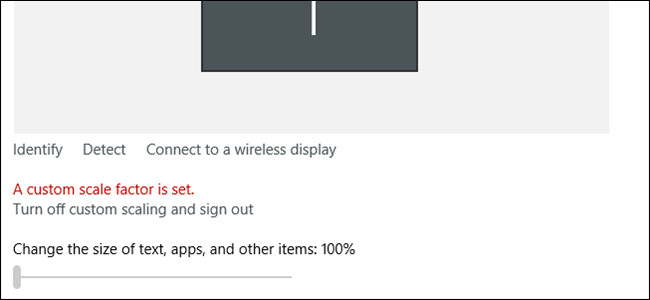
This is what it looks like when the Custom Scale Factor is set. Yours should look similar:

See that grayed out bar? Yeah, you can't do anything with that. If you want to modify the scale level, you have click the "Turn off custom scaling and sign out" button, then set it. And if your PC goes into hibernation for any reason (or you restart), you'll have to do it again.
It's also worth pointing out that the number shown basically means nothing. My screen was locked into 125% scaling when that screenshot was taken, yet this setting showed 175%. In other words: ignore what it says.
Now, scroll all the way down to the bottom of that page and choose "Advanced Display Settings."

On the next screen, scroll to the bottom again and click "Advanced Sizing of Text and Other Items."

This will take you away from the "new' Windows settings and into the Control Panel. What a mess. This menu is a little weird, but you're looking for the link in that body of text that reads "set a custom scaling level". Click it.

This will open yet another box that you can use to set your scale level. Yes, this setting exists in two different places, but one of them is more granular than the other. Welcome to Windows, y'all.

In the dropdown, pick your preferred scale level. Click "OK," then "Apply" on the next window. Everything should change.

Once you've applied the change, you'll need to log out and back in.

For some users, this was enough. For many, though, it wasn't the final solution. If it doesn't work for you, read on.
Option Two: For Laptops with Intel HD Graphics
If you're using a Windows laptop with Intel HD Graphics (which there's a good chance you are), Intel's drivers may be the culprit, and there is a potential solution for it.
First, right click on the desktop and choose "Graphics properties."

If you don't have that option, click your computer's system tray and find the Intel icon. It's a little blue one.

Click it and choose "Graphics Properties."

This will open the Intel HD Graphics Panel. Here, click on "Display."

You're only going to make one change here. At the bottom, click on "Maintain Aspect Ratio" then tick the "Override Application Settings" box. That last step is crucial.

This will basically tell the Intel driver to ignore all other settings and force your preferred scale level regardless.
At this point, you can close all the previously-opened windows and reboot. Your new settings should stick at this point. Hopefully.
Option Three: Check the Software that Came with Your Monitor
I'll admit, this solution is a bit less specific than the others, mostly because we haven't experienced it ourselves---but we have seen a lot of talk out there about it.
Much like the above-mentioned Intel utility, there's a chance your monitor may have its own display utility. LG, for example, has some software for their 4K monitors that adds extra window management features. But, unfortunately, this can mess with Windows' display scaling.
If you have a custom utility installed---one from your display's manufacturer---try uninstalling it. There's a good chance it's mucking up the system and overriding what Windows wants to do.
Once this tool has been uninstalled, reboot your PC. Hopefully everything is fixed now.
Option Four: Remove Any Third-Party Scaling Utility
Fun fact: Windows 10 isn't great at DPI scaling. When scaled up, some fonts looks blurry and just generally terrible. As a result, one developer created a tool that allowed users to switch to the Windows 8.1 method of scaling, which is strangely a lot better. The only quirk: if you use this tool, you have to set the scaling from within the tool, not within Windows' normal settings.
Confession time: this was the issue on my laptop. It turns out I had used said utility many moons ago and forgotten about it. Since this is a portable app that doesn't get a formal installation, I had forgotten it was even on the system---a not uncommon mistake, I'm sure.

This was a pretty popular utility when it was released, so if you ever recall using it (or anything like it), now's the time to fire it back up and switch it back to Windows 10's native scaling option.
Once you do that, you'll need to reboot, disable Custom Scaling by clicking the "Turn off custom scaling and sign out" link in Display Properties, then reboot again.

Alternatively, you can keep using the tool, but change your scaling level from within the tool. Just keep it around if you ever want to switch back to Windows' built-in scaling instead.
A quick Google search will show what a widepsread problem this is, so hopefully you've stumbled upon this post in the desperate search for an answer. One of the above listed should hopefully be the solution you've been looking for.