File transfer speeds can vary greatly from device to device. The same holds true for network file transfers and uploads. One of the best ways to test these speeds on your Mac is to create dummy files with the Terminal.
Let's say you’ve installed a fast new solid state drive in your computer, and want to see how fast they really are. Or maybe you’ve finally upgraded your entire setup to gigabit ethernet or wireless AC, and you want to know if it performs as well as it promises. Or maybe something is just transferring slower than you think it should, and you want to test its real-world speeds (rather than the theoretical speeds on the box).
A dummy file is simply a fake, empty file of any size. Dummy files have a distinct advantage over real files when testing hard drive or network speeds, because you can instantly create a file of any size. That way, you don't have to search your computer for equivalently sized files, and after you're done testing, you can just delete them.
How to Create Dummy Files on macOS
To create a dummy file, open the Terminal. If you don't have the Terminal pinned to your Dock, you can find it in Applications > Utilities or by conducting a Spotlight search using the keyboard shortcut Command+Space.

When you open the Terminal, it starts you out in your Home directory. When you create dummy files, it's a good idea to first change your directory to an easily accessible location, such as the Desktop, so they are automatically created there.
You can see what directories available by running the
ls
command, but we're going to use the Desktop for this example. To change directories to the desktop, run:
cd Desktop

Keep in mind that, whatever directory you choose, its name is case-sensitive---so pay attention to how the directory name is spelled if you choose to cd elsewhere.
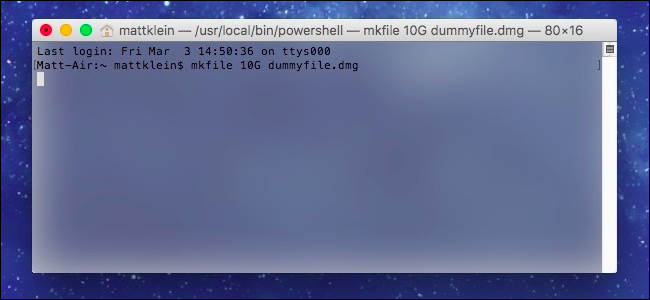
Now that you're in your Desktop directory, you can create dummy files right from that same terminal window. Your command will look like this:
mkfile <size> filename.ext
Just replace <size> with a number followed by a size unit. g represent gigabytes, so 4g would give you a 4GB file. You can also use m for megabytes, k for kilobytes, and b for bytes.
Replace filename.ext with any filename you want followed by any extension, whether it's .dmg, .txt, .pdf, or anything else.
For example, if I wanted to make a 10,000 MB text file named dummyfile, I'd run:
mkfile 10000m dummyfile.txt
The file will appear on your desktop.

To check the size of your dummy file, right-click it and select "Get Info".

According to the Size, our new dummy file is 10,485,760,000 bytes. If we check this number and convert to megabytes (megabytes = bytes ÷ 1,048,576), it's exactly 10,000 megabytes.
How to Test Transfer Speeds Using Dummy Files
Once you create a dummy file, you can use it to test transfer speeds, whether it's using a USB flash drive, sharing a file across your home network, or something else.
In this case, we're going to test how long it takes to transfer our 10,000 MB file to a USB 2.0 flash drive and to a USB 3.0 flash drive to compare the speeds. (We could test with smaller files, but we really want an idea of the speed disparity, so using a larger file is going to give a more pronounced difference than a smaller file.)

The only other thing you'll need is a stopwatch---the one on your phone should work fine.
With your dummy file on the desktop, click and drag it to the new drive (in our case, our flash drive) and start the stopwatch when you release the mouse button.

Wait for the file to finish copying onto the device, then tap the "Stop" button on the stopwatch as soon as it does. There's no need to be super precise, this is just to get a good idea of transfer times, not an exact down-to-the-millisecond number.
Then, repeat the process with the other device (in our case, the other flash drive), and compare the results.
As you can see, our USB 3.0 file transfer (left) is significantly faster than the USB 2.0 transfer (right).


If you want to turn these values into or MB/s, just divide the file's size by the number of seconds in your transfer time. In our case, our USB 3.0 drive can write files at around 41 megabytes per second (10000 MB ÷ 244 seconds). The USB 2.0 drive writes files around 13 megabytes per second (10000 MB ÷ 761 seconds).
This is a simple, non-scientific example, and shouldn't be mistaken for any kind of official benchmarking. But, it gives you a clear idea of how to test transfer speeds with dummy files.
You can use them to test the difference between your wired Ethernet network connection and wireless Wi-Fi connection, compare cloud services, or get a decent idea of your Internet connection's practical upload and download performance.