Quick Links
Mechanical keyboards have legendary longevity, but like any long-lived tool, that doesn't mean they don't require occasional replacement parts. Let's take a well-loved mechanical keyboard and give it a brand new set of keys.
Why Replace Your Keyboard Keys?
If you have a keyboard you love, why would you ever need to swap out the keys? There are two main reasons:
- Durability. As we discussed in our guide to mechanical keyboards, mechanical keyboards are much more durable than the cheaper, more common rubber dome keyboards. But that just means their switches are more durable---the plastic keycaps can still wear down significantly, which means you may need to replace them after a few years of use.
- Customization. Hardcore keyboard geeks love customizing their keyboards, and replacing your keycaps is a relatively inexpensive way to do so. Not only can you get keycaps with different "feel," but you can find them in numerous colors, fonts, and even buy custom keycaps with pictures on the face or in different 3D-printed shapes.
Remember, this guide only applies to mechanical keyboards---if you don't know what kind of keyboard you have, chances are it's a rubber dome keyboard, and this guide won't apply. (Though we highly recommend buying yourself a nice mechanical keyboard if you're interested.)

Thankfully, the manufacturers of mechanical keyboard switches understand that their switches will outlive the keys attached to them, much like a car outlives its first set of tires, and it's very easy to update an old keyboard with new keys.
In today's tutorial we're going to rehab a WASD brand CODE keyboard, which we originally purchased and reviewed way back in 2013. Since then, the keyboard has seen extensive daily use and is still going strong (albeit with some pretty worn down keys). It's a perfect candidate for a face lift, so let's look at what you need to know to shop for replacement keys and then how to swap out the old set with the new.
Selecting Replacement Keys for Your Mechanical Keyboard
The most difficult part of rehabbing a mechanical keyboard isn't the actual physical act of replacing the keys---it's ensuring you purchase the right replacement parts.
Although we discuss different parts of mechanical keyboards in our aforementioned guide, there are only two terms you need to keep in mind when shopping for replacement keys for your mechanical keyboard: stem and keycap.

The stem of a mechanical keyboard switch is the post the key is attached to, often shaped like a + sign or (in some rarer cases) a circle or rectangle. The "keycap" is the plastic shell that is attached to the stem---what most people think of as the actual keyboard key. In the photo above you can see a naked stem on a Cherry brand switch surrounded by switches with their keycaps still attached.
A little keyboard anatomy out of the way, let's look at your shopping checklist.
Stem Type: Your Compatibility Metric
First, you need to identify the brand of switches in your keyboard. You can do this by checking with the manufacturer, checking the documentation that came with your keyboard, searching for the model number of the keyboard online, or even removing a single keycap and examining the physical switch to look for a little label you can use for reference. (If you've never removed a keycap before, jump to the next section for pointers).

The vast majority of mechanical keyboards produced after 1985 use Cherry MX switches (above left), but it isn't a guarantee that your keyboard does (especially if you're rehabbing a really old keyboard).
Not only will you find totally incompatible key switches like the Alps switches with their rectangular stems, seen above center, but you'll also find non-Cherry switches that can potentially be compatible with Cherry keycaps. Torpe brand switches have a round stem, as seen above right, but some versions of the switch have a Cherry MX stem set in the center of the circular stem, allowing those versions of Torpe switches to accept Cherry keycaps.
Chances are if it's a recent purchase, however, there's a very strong chance that it either uses actual Cherry MX switches or the stems are at least compatible, which means keycap sets made for a Cherry MX keyboard will work with many other switches too. Still, check carefully!
Number of Keys: More Is Better
When purchasing a replacement set of keycaps, there are two important considerations: keyboard standard and number of keys. First and foremost, you need to determine what the layout standard of your keyboard is. American users and many people in English speaking countries will have ANSI keyboards, but in many other Western countries (and certainly throughout Europe), the ISO standard is the norm.
Unless you're outside the US (or you're inside the US and you bought an imported keyboard) there's a more than 99% chance you're using an ANSI board and you don't even have to worry about it; you can easily check, however, by simply taking a look at the lower left corner of your keyboard. On ISO boards, you'll find two keys where the larger shift key is found on an ANSI keyboard.

With that in mind, it's time to focus on how many keys your particular keyboard has. Sets for use with ANSI keyboards are typically 87-key (more compact, no number pad) and 104-key (the same layout, plus the number pad on the right hand side). The ISO versions then are, naturally, 88-key and 105-key, respectively.
In the photo below you can see the WASD CODE keyboard in its 87-key and 104-key variants. You'll also find minor variations like 108-key keyboards that include extra buttons for media control functions or the like.

Even though we're rehabbing a 87-key keyboard, we actually purchased a 108-key replacement set. The cost difference is negligible, and if we ever buy a different keyboard, our caps are more likely to be compatible. Plus, many keycap sets come in 108-key or 104-key sets and not 87-key---so even if you're rehabbing an 87-key keyboard, it helps to search for larger sizes too, provided they're the same layout.
Make sure they keycaps will match your keyboard, too---some keyboards have custom-sized keys, particularly on the bottom row (Ctrl, Alt, and Win) that may not match the keycap set you're buying. While key sizes are typically pretty standard, you can always bust out a ruler and measure your existing keycaps, then compare the fine print on the set you're planning to purchase.
Lettering: Print Method Matters
There are several methods used to print lettering on keycaps, ranging from painfully cheap to incredibly high quality. Given how long a mechanical keyboard lasts, and how much mileage you can get out of a good set of keycaps, it is absolutely worth paying more for quality printing methods.
Spoiler alert: we only recommend "double shot" printed keycaps. If you want to learn a bit about why, keep reading. Otherwise, feel free to skip down to the next section.

The cheapest form of key printing is known as "pad printing," wherein the letters are printed onto the surface of the keycaps using paint and then typically clear coated. This type of printing is the most susceptible to wear, and typically doesn't last very long. There is also an inverted form of pad printing, found on illuminated keycaps, wherein the key itself is painted but the lettering is not (so the light can shine through the transparent plastic underneath).
Laser etching is a more expensive form of key printing, in which the lettering is physically engraved into the key surface. Many manufacturers then fill in the laser etched area with paint and coat the key to create a smooth surface. This is far more durable than pad printing, but still not the most durable printing method.
More durable than pad printing and laser etching is dye sublimation. This is a process that appears similar to pad printing, but the dye actually soaks down into the plastic of the keycap and chemically bonds with it in such a way that it could only be worn away if wear the surface right down. While effective, it does have one shortcoming: you can only use this method when the keys are light and the dye is dark; there's no way to dye a black key with white lettering, for example.
Finally, the most durable (and the most expensive) printing method is known as "double shot" printing, on account of the double shot of plastic used in the injecting molding process. The keycaps are actually two physical pieces bonded together: a base cap with raised lettering (which gives the key its letter color) and a finish cap (which gives the key its general color and levels the key surface). Double shot injection molded keys may be the only keycaps that even stand a chance at outliving the keyboard they're attached to.
Keycap Material: Different Plastics, Different Results
Talking about double shot molding leads us right into a very related topic: the type of plastic your keycaps are made of. The vast majority of keycaps on the market today are either ABS or PBT plastic, and for good reason. The two plastics are very durable and have low shrinkage---although ABS, on account of having the lowest shrinkage, is preferred for double shot molding.
Despite their similarities there are two big differences you should be aware of. Light colored ABS plastic tends to yellow with age (when you see a very yellow old computer case it's almost always made from ABS plastic). PBT plastic, on the other hand, doesn't yellow---the keycaps on the venerable old IBM Model M mechanical keyboard were made from PBT plastic and you'll find 30 year old Model M's with keycaps still true to their original color. If you're planning on customizing your keyboard with white keycaps, look for PBT ones.
In addition to colorfastness, the two plastics have very distinct sound signatures. ABS keys tend to have a higher "clicky" sound and PBT keys tend to have a thumpy low sound. If you like the general sound of a mechanical keyboard clacking away but would like to tone it down a little, PBT keys are an easy way to do so.
Illumination: You Didn't Pay Extra For Dim Keys
If the keyboard you're rehabbing has illuminated keys, like ours does, then you most likely want to replace the existing keycaps with ones that allow for illuminated text. All those fancy LED lit switches cost extra, so make sure when you're shopping for replacements you purchase keycaps that can let the light shine through.
This is where doubleshot keycaps really shine---forgive the pun. Most illuminated keycaps are printed using the inverse pad printing method we highlighted above, which means they are very susceptible to wear and tear.

In the photo above you can see the interior of the WASD keycap we're replacing next to the interior of the Ducky-brand keycap we're replacing it with. You can clearly see how the surface of the WASD keycap was simply painted on top of the transparent keycap and how the Ducky keycap was molded from two distinct plastics sandwiched together. With the Ducky keys, we'll never have to worry about rubbing the letters clean off.
Customization: A Mechanical Keyboard Badge of Pride
Lastly, there's one fun thing to tack onto all our more serious tips. Replacing your keycaps doesn't need to simple "I have black keys with white text, therefore I must replace them with black keys with white text" affair---there's a lot of room for personalization.

Among mechanical keyboard enthusiasts, there's a certain affection for customizing your keyboard beyond simply replacing old keys with new ones. It's common, for example, to replace the Escape key with a highly stylized keycap, like this very cool keycap from the Hot Keys Project shown above.
Other common customizations include replacing the W, A, S, and D keys with a different color, replacing keys like the spacebar and Tab keys with a different color, and so on. For people who spend a significant amount of their professional and personal time sitting at a keyboard---like me!---keyboard customizations are a fun way to personalize a tool they spend a lot of time with.
Before you fall down the rabbit hole of obsessing about whether or not you want an Autobot or a Decepticon keycap for your Escape key, let's talk about one last thing: where to buy your keycaps.
Where to Buy Your Keycaps
With all that in mind, there's no one combination of features that'll work for everyone---only you can decide which keycaps are right for you. We can, however, recommend the supplier we used based on their great inventory and speed of service, MechanicalKeyboards.com. You can also find many keycap sets on Amazon, as well as other smaller sites like AliExpress and Banggood. Many keyboard companies also have small stores on their websites with original replacement and upgrade keycap sets for purchase. Sites like Max Keyboard and WASD Keyboards can even create custom sets for you.
Further, if you happen to be rehabbing an illuminated keyboard with Cherry MX switches like we are, we've been thrilled with the Ducky Double Shot Black Translucent keycap set we purchased from MechanicalKeyboards.
How to Remove the Old Keys: Proper Tools and a Gentle Touch
Removing the keys from your mechanical keyboard is not difficult, but it is very easy to screw up due to improper tools or haste. With that in mind, we must stress: buy a proper key puller. Occasionally, they may even come free with your keycaps, but if not, buy one separately. You'll find key pullers in two basic types: wire pullers and ring-type pullers, seen below.

While both work, we much prefer the wire pullers as we find they offer better flexibility when working with larger keys and they're faster to use---you can pull three standard letter keys with a wire puller without stopping to remove them, whereas you have to remove the key from the ring puller with every pull. A key puller costs $5-10; we'll be using the Mistel brand puller ($8) seen above on the left.
In addition to the key puller, we also recommend getting a slender and strong tool like a petite screwdriver, as it will greatly assist you in removing (and later placing) the larger keys with a spring bar.
Armed with your puller and replacement keys, it's time to get down to stripping your keyboard. Let's start with the easy keys, the single-stem letter keys. Open up the mouth of the puller and slide it around the keys, as seen in the photo below.

Using your non-dominant hand, hold the keyboard down firmly while slowly and firmly pulling upwards on the key puller with your dominant hand. The keys are attached to the stems very firmly, but they aren't adhered. You don't want to jerk upwards because you risk damaging electrical connections in the board by jerking on it (and potentially slamming the board back down on the table). Just give the keys a firm and steady pull.
When it comes to the larger keys, like the spacebar and shift keys, you want to be even more cautious and gentle with your movements, as these keys often have a spring bar beneath them to stability their broader shape. While you're unlikely to damage the actual spring bar, jerky movements might snap the plastic connection points for the spring bar on the keyboard base or send the little pieces that hold the spring bar to the keys flying.

In the photo above, you can see one of the spring bars at rest at left, snapped into keyboard base. At right, you can see the plastic support on the keycap itself that attaches to the curved ends of the spring bar. When removing the larger keys, it is best to gently pull upwards a little on each side of the key to loosen it and then to look under keycap to see where the spring is positioned. With a little bit of left/right wiggling you can usually get the spring to fall off the plastic supports on the keycap. If it's not possible to wiggle the piece free without assisting it, you can take a very small screw driver (or any slender but strong tool) and very gently nudge the curved end of the spring bar free. Police the little support pieces closely; they're very easy to lose.
Once you've removed all your keycaps and revealed the sparkling undercarriage of your keyboard, you can jump right putting the new keys on. Or not. In our case, a very big not.
Clean Your Keyboard: Because We're All Balls of Germs
Although we have a dedicated guide to cleaning your keyboard, I put off giving my keyboard a deep clean for a very long time. Here's the horror that lay beneath the old keycaps.

We won't rehash the whole cleaning guide here, but we will strongly encourage you to give your keyboard a solid once-over. Grab the vacuum, grab the Q-tips and some rubbing alcohol, and get all the crud out of the keyboard. While you're at it, slightly dampen a paper towel or microfiber cloth with that same rubbing alcohol and give the entire case of the keyboard a very solid rub down. Trust us. You'd be shocked at how well a matte black keyboard case hides dirt. Be sure to let it dry thoroughly before plugging it back in.
How to Install Your New Keycaps: Mind the Springs
The old keys are off, the Ghost of Desk Snacks Past has been banished, and you're ready to get to work slapping the new keys on. Just like with the key removal process, adding the keys on is simple for the single-stem keys like A, and tricky for for the broader keys like the spacebar. We'd recommend starting with the trickier keys so you have more room to see and maneuver while inserting them.
To start, place your new package of keys lined up with your now naked keyboard as it makes placing the keys much faster.

When it comes to installing the wider keys, it helps to first insert the support stems into the non-switch holes and line the key up with the support spring bar, as seen below.

Then, inserting the key is simply a matter of slipping one support stem onto the spring, using a small screw driver to gently flex the spring open to slip over the other end, and then carefully seating the actual stem into the center of keycap before gently but firmly pressing it down.
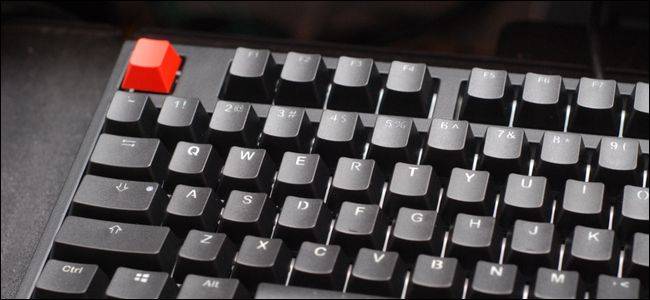
With the single-stem keys, it's even easier: just make sure you have oriented the key correctly and press firmly to seat it. Repeat until you've replaced every key and, optionally, garish with a stand-out Escape key, like our simple red one here.

With brand new keys your keyboard, it's now ready for all the prolific clackety-clack-clack loud typing you can throw at it.
Image Credits: WASD, keycapsdirect.