Quick Links
If you're running out of outlets to plug things into, installing a switch/outlet combo is a great way to squeeze in another receptacle without completely wiring in a new outlet or sacrificing existing outlets or switches.
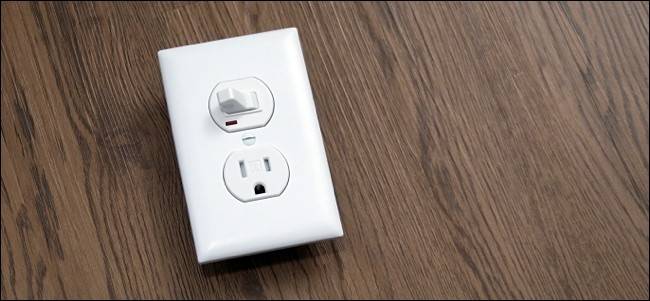
A switch/outlet combo like the one pictured above can be wired up in three ways. The switch can control your lights, the switch can control the outlet, or the switch can control both your lights and the outlet.
For example: say your countertop appliances are hogging all of the outlets in your kitchen. You could replace the light switch on the wall with a switch/outlet combo. You'd still have the switch to control the lights, but you now have an extra outlet that you can use for that fancy new blender you bought.
You can also wire it up so that the switch controls the outlet and the light it's connected to, which may be useful if you have a lamp plugged into the outlet.
Lastly, you could have the switch control just the outlet and nothing else. This isn't as common of a scenario around the house, but it could work great out in the garage or workshop if you want an independent receptacle that can easily be turned on and off at will. For example, my shop vac is tucked away under by workbench, so I have one of these switches to easily turn it on and off without reaching under the bench every time.
In short: there are quite a few ways to wire it up, and we'll show you how to do all of them below.
Warning: This is a project for a confident DIYer. There’s no shame in getting someone else to do the actual wiring for you if you lack the skill or knowledge to do so. If you read the beginning of this article and immediately visualized how to do it based on past experience wiring switches and outlets, you’re probably good. If you opened the article not sure how exactly we were going to pull this trick off, it’s time to call in that wiring-savvy friend or electrician. Also note that it may be against the law, code, or regulations to do this without a permit, or it might void your insurance or warranty. Check your local regulations before continuing.
What You'll Need

Before you dive deep into this project, you’ll need a few tools and supplies to get the job done.
The absolute must-have tools are a flat-head screwdriver and a Phillips-head screwdriver. Some optional—but very handy—tools include needle-nose pliers, combination pliers, a wire stripper (in case you need to cut wire or strip off wire insulation), a voltage tester, and a power drill.
Lastly, you’ll need a switch/outlet combo unit. They're not as ubiquitous as regular light switches and outlets, but you can still usually find them at most hardware stores. This one from Leviton ($9) will get the job done in most cases, but I'm using this heavy-duty one from Eaton, which is more appropriate for workshops and such. Don’t forget the new faceplate either.
Before You Begin

One very important thing before you start: You won't be able to use these switch/outlet combo units if power isn't coming into the light switch box. In other words, if the hot line that provides power to the light (or whatever the switch powers) goes into the light fixture first and then into the light switch box, you won't be able to use a switch/outlet combo. The power must be coming into the light switch box first, and then continue on to the light fixture. The former scenario is pretty rare in most houses, but always check to make sure.
If you aren't sure how your setup is wired, you'll have to go through the first step of this tutorial to look into your light switch box. Before doing so, go to your breaker box and cut off the power to the room where you’ll be changing out the light switch.

A great way to know if you turned off the correct breaker is to turn on the light switch before cutting the power, and if the light that’s controlled by the light switch turns off, then you know you’ve switched off the correct breaker.
Remove the Existing Light Switch
Start by taking your flat-head screwdriver and remove the two screws holding the faceplate on.

You can then pull the faceplate right off. At this point, use a voltage tester to see if the power is truly off to the light switch before you go any further.

Next, take your Phillips-head screwdriver or power drill and remove the two screws that hold the light switch onto the junction box. There will be one on top and one on the bottom.

Once those screws are removed, take your fingers and grab hold of the tabs on the top and bottom of the switch to pull it out of the junction box. This exposes more of the wires and makes it easier to work on.

Take a look at the wiring configuration of the light switch. If you see two different sets of wires coming into the box, then you're good to continue. If you only see one, then a switch/outlet combo is not compatible with your setup.
In our case, there are two black wires connected to the switch, as well as a bare copper wire, which is the ground wire. Further back in the box, you’ll also notice two white wires that are tied together with a wire nut. (If the colors in your wall are different, make note of which are which, to ensure you connect everything properly.)

As briefly explained above, the black wires are the power (or “hot”) wires and the white wires are the neutral (or “return”) wires. Electricity flows through the hot wire, entering the switch and then into the light fixture, and then returns back through the neutral wire. Turning off the switch simply disconnects the power wire from the light fixture, cutting off power from your lights.
Start by taking your screwdriver and removing the two black wires attached to the light switch. Don’t worry about which black wire goes where.

Lastly, remove the ground wire from the green screw.

Prepare Your Wires for the New Combo Switch
Now that the light switch is completely removed, we’ll need to prepare for the installation of the combo switch.
You'll need access to the white neutral wires. Normally when you replace a light switch, you would leave the neutral wires alone, but in this case, we’ll be connecting them to the new combo switch.
Remove the wire nut on the neutral wires by unscrewing it. Keep the two wires together because you'll need to create a pigtail, which involves connecting multiple wires together with a wire nut in order to turn two or more wires into a single connection that you can then connect to the switch's screw. We'll be connecting these two neutral wires to one screw on the new switch, so the pigtail is necessary.

You'll be left with one white wire connection and two black wire connections.

Once that's done, you'll need to take your needle-nose pliers and bend all the wires at the ends to make small hooks if they don't have them already. These hooks will wrap around the screws on the switch when you go to install it.

After that, it's time to find out which wire is which (if you don't already know).
Determine Which Wires Are the Hot (Power) Lines

When installing a switch/outlet combo unit, you'll want to know the difference between the two sets of wires coming into the light switch box. One will be the power line coming from the breaker box, and the other will be the wires connected from the light switch to the light fixture.
The first step is to screw a wire nut onto each wire (except for the ground wire, as it doesn’t need one) and spread out the wires as far apart as possible. You might need to use your needle-nose pliers to straighten out the wires first so that you can stick wire nuts onto them.

Once that’s done, turn the power back on to the outlet and carefully place the voltage tester near each wire. When the voltage tester lights up or makes a noise next to a wire (it will be one of the black wires), mark that wire in some way (I usually make a quick mark on the wire nut with a permanent marker). This is the hot wire coming from power.
After you have determined which wire is the hot power wire, be sure to turn the electricity back off at the breaker box.
Now it's time to install the switch/outlet combo, and depending on how you want it to work, there are several different ways to wire it up.
If You Want the Switch to Control Both the Light and the Outlet
If you want the switch to control the light it's currently connected to, but also control the included outlet---like if you're using a lamp in tandem with overhead lights---here's how to wire it up.
Connect the black wire coming from the light fixture (not the hot wire) to either one of the black screws on the switch---it doesn't matter in this case. Some switches will have slots that you can slide a straight wire into and tighten it down with the screw, which is definitely easier than wrapping the hooked wire around the screw.

Then connect the black hot wire coming from power to the brass screw.

Next, connect the white neutral wire (the pigtail connection) to the silver screw. If you're lucky, the switch will have two slots that allow you to safely connect two wires to a single screw, but if not, you'll need to use the pigtail. I got lucky with my switch. Also keep in mind that no matter how you have the switch wired up, the white neutral wires will always be connected to the silver screw.

You'll then connect the bare copper ground wire to the green screw. Again, the ground wire always gets connected to the green screw, no matter the wiring scenario.
Shove all the wires back into the box and screw in the switch to mount it in place. Install the faceplate and turn the power back on.
If You Want the Switch and Outlet Independent From One Another

Alternatively, you could have the switch only control the light fixture, and the outlet portion remaining constantly on no matter the state of the switch. This is perfect for that kitchen scenario mentioned above, where you just want to squeeze in an extra outlet without messing with anything else.
To make this happen, all you have to do is switch the places of the two black wires. So you'll connect the black hot wire coming from power to either black screw and then connect the black wire coming from the light fixture to the brass screw. The neutral wires and the ground wire will stay put.
Other Uses for a Switch/Outlet Combo
If you want to replace a traditional light switch with a switch/outlet combo, the top two scenarios are likely the only ones you'll use. However, there are other uses for a combo switch.
For instance, if you ever want to be able to cut power to a certain handful of outlets in a circuit (but not kill the entire circuit), you can replace a traditional outlet with a switch/outlet combo where you want the cutoff to start. For example, my living room outlets are connected to the same circuit as the lights (which is usually the case in most houses), so if I ever wanted to cut power to the outlets, but keep the lights on, I could install a switch/outlet combo at the first outlet in the circuit. So whenever I flipped the switch, all of the following outlets in the circuit (as well as the outlet on the switch) would turn off.

To do this, you'd replace the original outlet with this combo switch. The hot wire coming from power will connect to the brass screw, the black wire that continues on in the circuit will connect to either black screw, and both neutral wires will connect to the silver screw. If you wanted the outlet on the switch to remain on while all of the other outlets turned off, you would simply reverse the black wire connections.
This can be tricky, though, since you have to know where the wiring for the outlets and the lights meet up, so that the switch doesn't kill both the outlets and the lights. You may want to bring in an electrician to determine all that if you're not sure---depending on how your home's wiring is set up, this may not even be possible.

Alternatively, you can wire the switch up in such a way that only that single outlet will be controlled by the switch, but other outlets in the circuit will still stay powered on constantly. To do this, you have to join together the black wires, neutral wires, and ground wires so that you have one connection for each (using pigtails).

From there, connect the black wire to the brass screw. And just as before, the neutral wire connects to the silver screw and the ground wire to the green screw.
You can also split apart an extension cord and install a switch/outlet combo in between so that the extension cord still acts as normal, but it now has a switched outlet connected to it that you can plug anything into and turn it on and off with the switch, using the wiring method in the previous paragraph. Make sure that the extension cord is 14/3 (three separate wires that are 14 gauge), and that all of your connections, as well as the switch/outlet combo are put inside of an electrical box for protection and safety. This is probably something more geared toward a garage or workshop setup, since it would serve better purposes there. Plus, it's not the prettiest-looking contraption.
In the end, the world is your oyster with these switch/outlet combos, and they're some of the most versatile electrical products on the market. However, depending on how you want them wired up, it can be a bit tricky to do it correctly, so make sure to double-check your work and that everything is connected properly. If you're ever in doubt, just hire an electrician. They'll be sure to get it right.