Quick Links
You can always look up user accounts on a Windows system using the settings interface, but if you want to save a nice, printer-friendly file with that info, it's easiest to turn to the Command Prompt.
Windows provides a couple of ways to interact with user accounts at the Command Prompt. You already may be familiar with the first option: the
net user
command. Here, we're going to turn to a second option: the Windows Management Instrumentation Command-line (WMIC), which is really just an extended command line structure for performing various types of system management. You can do all kinds of things with the WMIC command, even cool hardware stuff like checking your motherboard model number. We're going to be using the
useraccount
command portion of WMIC because it provides more details and options than the
net user
command.
To start using the WMIC command, you'll need to open Command Prompt with administrative privileges. Press Windows+X on your keyboard, then select "Command Prompt (Admin)" from the Power Users menu.

Note: If you see PowerShell instead of Command Prompt on the Power Users menu, that's a switch that came about with the Creators Update for Windows 10. It's very easy to switch back to showing the Command Prompt on the Power Users menu if you want, or you can give PowerShell a try. You can do pretty much everything in PowerShell that you can do in Command Prompt, plus a lot of other useful things.
Get a Quick List of Just User Account Names
If all you need is a list of account names without any other details, type the following command at the prompt and then press Enter:
wmic useraccount get name

As you can see, you get a simple list with just the user account names. The first three names listed will always be the built-in administrator account, the default account used in the creation of new user accounts, and the guest account. After that, you'll see listed any local or Microsoft accounts you've created on the system.
If you need just a bit more information, you can use the following command to list the user account name and the user's full name if it's been entered into the system:
wmic useraccount get name,fullname

In this example, you can see that the "Michelle" and "Simon" accounts do not have full names associated, but my "wjgle" account does have my full name.
Get a List of User Accounts with More Details
If you'd like create a list of user accounts with a full set of account details, type the following command at the prompt and hit Enter:
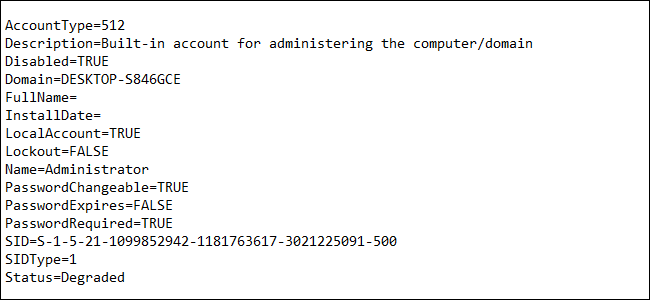
wmic useraccount list full

That image shows just one user account from the list with all its details. You can see the user account name and full name, as well as additional details like the following:
- AccountType. If you're on PC that is not part of a domain---which is almost certainly the case if you're on your home or small business PC---you'll always see an account type of 512. If the PC is part of a domain, you'll see other values here that represent what type of domain account it is.
- Description. This value shows a description of the account if one has been entered.
- Disabled. This indicates whether the user account is active or disabled. If this value is set to FALSE, then the account is active.
- Domain. This indicates the name of the domain the PC is part of. If the PC is not part of a domain, you'll see an assigned name here beginning with the computer type.
- InstallDate. On domains, this value will show the date the user account was created.
- LocalAccount. This value denotes whether the account exists on the local computer or on a domain server if the computer is joined to a domain.
- Lockout. This value shows whether the user account is currently locked out, as can happen if security options lock accounts after a number of unsuccessful password attempts.
- PasswordChangeable, PasswordExpires, and PasswordRequired. These represent security options for passwords that may have been set for the user account.
- SID. This value shows the security identifier (SID) for the account.
- SIDType. This is a numerical value that shows the type of SID used for the account. You may see entries such as 1 for a user account, 2 for a group account, and 3 for a domain account.
- Status. This is the current status of the user account. If the account is operational, you'll see an account status of "OK" or "Degraded," which just means the account usable by regular users for logging on to the system.
And by the way, you can use any of those detail names separated by commas to get a modified list, much like how we did just the name and full name in the last section. For example, if you wanted to see just the name, full name, and status of the accounts, you could use the command:
wmic useraccount get name,fullname,status

So, this is all well and good if you just want to view user account information on the fly, but it becomes much more useful when you redirect the results to a text file.
Redirect the Results of a Command to a File
It's great being able to view a list of user account details at the Command Prompt, but the real usefulness of these commands lie in the fact that you can pipe the results straight into a file that you can then save or print. To do this with any wmic command, you just have to add an /output switch along with a path for the file directly after the wmic command.
For example, if you wanted to take the earlier command for getting a user account list with full details and redirect the output to a file named useraccounts.txt in a folder at C:\logs, you would first make sure the c:\logs folder already exists and then use the following command:
wmic /output:C:\logs\useraccounts.txt useraccount list full
When you use this command, you won't see any results at all at the Command Prompt, but if you open the file you created, the list will be there.

And if you want to get even fancier, you could also direct the output to a comma-separated value (CSV) file that could then easily be imported into a spreadsheet app or database. The trick to this is that you'll also have to add a /format:csv switch to the end of the command. So, for example, if you wanted to redirect the output of the same command we used above to a CSV file, you'd use something like the following command:
wmic /output:C:\logs\useraccounts.txt useraccount list full /format:csv
Again, there's no output at the Command Prompt, but you can see the results by opening the file itself.

And if you import it into something like Microsoft Excel, you can have a nicely formatted table with little work.

Of course, there's a lot more you can do with the wmic useraccount command, including changing some of the user account details like whether an account is locked or unlocked. You can get more information on that by typing wmic /? at the Command Prompt. There's also a whole lot more you can do with the wmic command in general. For more information on that, check out the official WMIC page from Microsoft and the list of useful WMIC queries from the Microsoft Performance Team blog.