Smartphone cameras have come far, but they’re still no competition for a DSLR. The biggest problem isn’t actually the sensor, though---it’s the lens.
Most smartphones have something equivalent to a 35mm lens on a DSLR. If you take a photo in the same spot with a smartphone and a DSLR with a 35mm lens on, the pictures will look quite similar. The thing is that DSLRs can use dozens of different lenses.
The look most people want to recreate with their smartphone is that of a lens with a wide aperture, like an 85mm f/1.8. The new iPhone 7 can do this in-camera with Portrait Mode, but for everyone else, we need to turn to Photoshop.
The Effect in Real Life
Before diving into Photoshop, let’s look at the effect we’re going to recreate in real life. Below is a photo I took of my brother Freddie with a 85mm f/1.8 on a Canon 5DIII.

Freddie’s face and eyes are in focus, but the background is totally out of focus. Even his shoulders and the back of his hair is a little bit blurred. This is the kind of look we’re going for.
Step One: Select a Photo
This effect works best with a well exposed headshot. Other subjects are much trickier to work with, and no amount of time in Photoshop can save a bad, overexposed image.
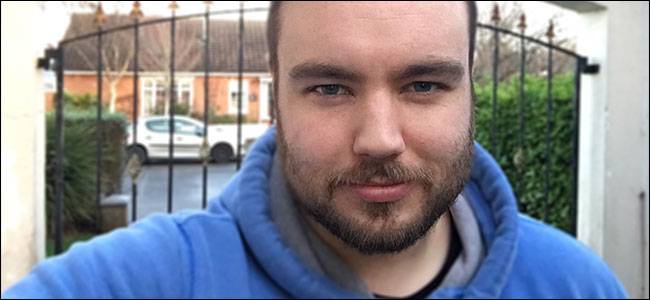
I’m using this simple selfie. It’s far from perfect, but it’s the kind of picture that this effect will work great on. The image of me is nice, but the background is just too busy.

Open the photo you want to use in Photoshop and let’s get started.
Step Two: Apply the Effect
Select the Background layer and go to Layer > Duplicate Layer, or press Control+J on your keyboard (Command+J on a Mac).
Next, go to Filter > Blur Gallery > Iris Blur. This is the Photoshop filter that emulates the effects of a wide aperture lens.

There’s a lot going on here, so let’s break it down:
- Click and drag on the inner circle to move the centre point of the blur around.
- Click and drag on the outer ring to change the amount of blur that’s being applied.
- Click and drag on the large control handles to adjust the transition area of the blur.
- Click and drag on the small control handles on the solid ring to adjust the rotation and size of the un-blurred area.
- Click and drag anywhere else on the solid ring to adjust the size of the un-blurred area.
- Click and drag on the diamond on the solid ring to adjust how square or rounded the shape of the un-blurred area is.
- Click anywhere outside the current area to add a new pin.

We want the effect to be centred on the subjects face, so start by moving the pin to roughly their nose.

Next, adjust the size of the un-blurred area so it covers just the subjects head. You’ll probably need to rotate it to get the best fit.

This is starting to look okay.
Now, we need to adjust the transition area so the falloff looks more natural. Move the large handles so they sit roughly on the subject’s chin, temples and hair. You’ll probably have to tweak some of the other variables, including the roundness, to get a good fit.
You can see my attempt below.

To finish, adjust the blur until the effect looks good. I’ve gone with a value of 10px, but you should go with what works for your image.

And here’s my finished effect.

You can see how much more I stand out against the background with this before and after GIF. By keeping the effect subtle, it looks natural:

A smartphone will never compete with a DSLR, but with Photoshop, we can do a reasonable job of faking it. The edited version is a much stronger image than the original.