Quick Links
Key Takeaways
Windows Search Indexer indexes files and folders on your PC so that they can be found quickly when you run a search in File Explorer or the Start Menu. It runs automatically in the background, but it can be manually restarted or paused in the Index Options window.
The SearchIndexer.exe process runs in the background on Windows 10 and Windows 11, and It may chew up a lot of RAM and CPU resources. Here's what the Microsoft Windows Search Indexer is doing and how to deal with it.
What Is Search Indexer (SearchIndexer.exe)?
Windows Search Indexer is the Windows service that handles indexing of your files for Windows Search, which fuels the file search engine built into Windows that powers everything from the Start Menu search box to Windows Explorer, and even the Libraries feature. The executable is SearchIndexer.exe, and is found in "C:\Windows\System32."

To get more information about Search Indexer, right-click the process name in Task Manager and select "Go to Details." You can view which user owns the executable, how much RAM and CPU it is using, and a brief description.

You can see the service for yourself by simply right-clicking on the executable name in the Details tab, and then choosing Go to Service(s) from the menu.

This will take you to the Services tab, where you can clearly see the Windows Search item selected in the list.

If you take a look at the file properties, you can clearly see that this particular executable is the Indexer component for Windows Search---though the name probably gave that away already.
If you want to view the executable directly, right-click the executable name in the "Details" and select "Properties."

Is Search Indexer a Virus or Malware?
No, Windows Search Indexer is a completely normal part of Windows. A virus (or other form of malware) could always masquerade as a normal Windows process --- like SearchIndexer.exe --- but it isn't likely. If you have doubts, run a scan using Microsoft Defender, Malwarebytes, or any other antivirus software you prefer.
How Do You Stop Search Indexer?
If you want to stop the Search Indexer from running, open up Services through Control Panel, or type "services" into the Start Menu search box. Open the top result and scroll through the list of services. Once you find "Windows Search," right-click it and click the "Stop" button.

How Do You Completely Disable Search Indexer?
Search Indexer can't be directly uninstalled on Windows 10 or Windows 11, but you can completely disable it if you want.
You probably shouldn't disable it, since it powers so much of the behind the scenes stuff in Windows 10 and Windows 11 And you definitely shouldn't forcibly delete the executable.
However, if you really want or need to disable it, open up Services like we did in the previous section, scroll down until you find "Windows Search," then click "Properties."

Change the option next to "Startup Type" to "Disabled" via the drop-down menu, then click "Apply."

How Can I Make SearchIndexer Use Less RAM or CPU?
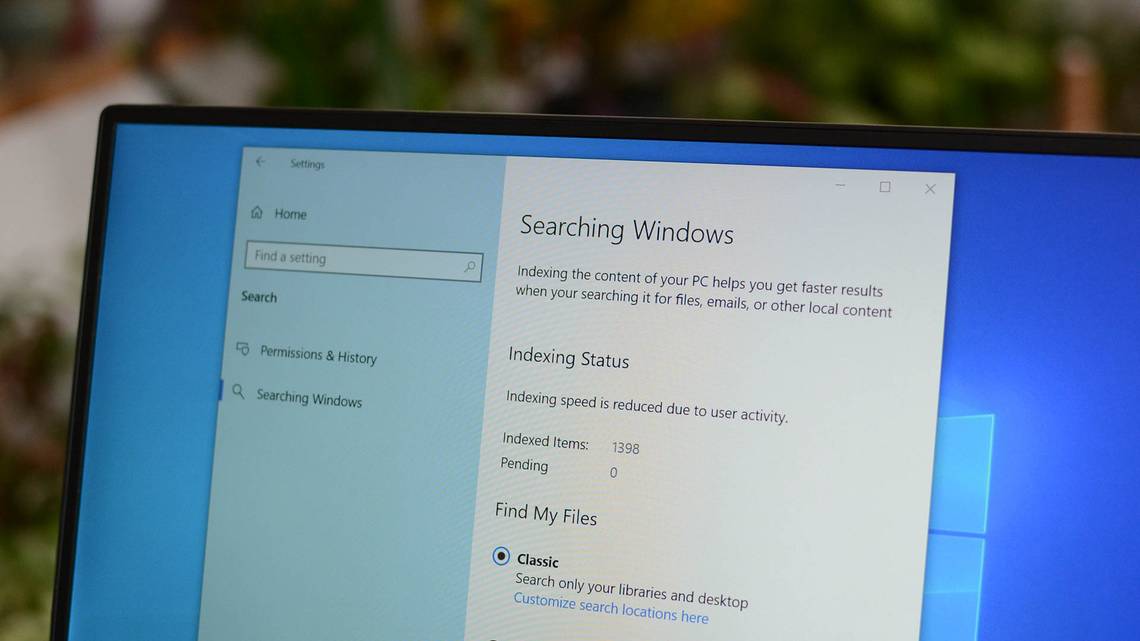
Your best option is to cut down on the amount of data that you're indexing---there's usually no reason to index every single file on your drive. Type "Indexing Options" into the Start Menu search, then click the top result. You may also open Indexing Options through the Settings app or Control Panel.
The first thing you should notice is the Pause button on this window, which can pause indexing for up to 15 minutes---useful if you're trying to do something and Windows Search happens to be in overdrive mode, though it really shouldn't since it only runs while your PC is idle.

If you find that Search Index is consistently dragging down your PC (and it shouldn't be), you can tweak where it indexes to improve performance. Click "Modify" to select the folders you want indexed.

Advanced Tip: Make Windows Search Index Only Filenames
If you click the Advanced button on the Indexing Options dialog, you'll be able to access another set of settings---what we're looking for here is the "File Types" tab on this dialog. Once you're there, scroll down to some common formats like DNG, DOCX, and other files, and you'll see that they are configured to search the file contents by default.

If you don't actually search within the files and only care about the file names, you can trim down the index by changing this setting to "Index Properties Only." This should the default setting on both Windows 10 and Windows 11, but if you're trying to squeeze every bit of performance out of your system, it never hurts to check.
Search Indexer Shouldn't Be Removed
You really shouldn't disable or remove Windows Search Indexer. At most, you'll want to trim down where it indexes, and how it indexes your files.
This article is part of our ongoing series explaining various processes found in Task Manager, like svchost.exe, dwm.exe, ctfmon.exe, mDNSResponder.exe, conhost.exe, Adobe_Updater.exe, and many others.