Landscapes are one of the classic art subjects. Since the days of the Roman Empire, artists have been painting them. Taking landscape photographs is just a natural extension of this ancient tradition. Let’s look at how to do it properly.
What Makes a Good Landscape Photo
A great landscape image normally has two things: a great location and great light. A technically perfect photo of a boring location in drab lighting isn’t going to stand out no matter what camera you shoot it with. But an awesome view with the sun bursting out from behind the clouds will be stunning, even shot from a smartphone. Nothing will photograph well if the light is bad.

The Technical Stuff
When you’re capturing a landscape, depth of field is king. You normally want everything from the foreground to the background to be tack sharp. This means you need to prioritize aperture in your exposures. A value of between f/11 and f/16 is going to give you the depth of field you need, although you can go up to f/22 or so if you want a slower shutter speed.

Put your camera in aperture priority or manual mode and set it to the aperture you want to use. Set your ISO to 100 and then either let your camera control the shutter speed (if you’re in aperture priority mode) or dial in a value that works for the image through trial and error (manual mode).
A tripod is one of the most important bits of kit for landscape photos. Unless you’re shooting in bright daylight, there’s a good chance that the shutter speed will be too long for you to get a sharp photo while holding your camera in your hands. It also gives you the option to play around with long exposures. Set your camera up on the tripod, frame the shot, and get ready to take the photo. I use the highly-acclaimed Vanguard Alta Pro ($150).

Just pressing the shutter button can move your camera enough to affect the shot. You should either use a remote trigger or the camera’s self timer to take the photo. I normally use the self-timer set to two seconds; it’s the simpler option.
Other Tips and Tricks
Jim Richardson, a National Geographic photographer, has a fantastic bit of advice that’s always at the forefront of my mind when I’m shooting landscapes: “If you want to be a better photographer, stand in front of more interesting stuff.” It’s much easier to take a stunning landscape photo if the landscape is stunning; if you’re standing in a boring field you’ve got your work cut out for you. To take great landscape images, go to great locations.

Here's another good bit of advice: “Nothing more than ten miles from a carpark is over-photographed.” Any famous landmark that you can drive to is going to have been shot from every angle at every time of the day by thousands of photographers, good and bad. Taking a unique photograph of El Capitan in Yosemite is next to impossible. Ansel Adams got there first. Even if a location is stunning, your landscape shots won't stand out if it’s over-photographed. Try to find locations that other photographers have overlooked. Your local area is a great place to start.
To get to the best locations, you often need to hike. A sturdy pair of boots and a decent backpack (I use one from f-stop) can make all the difference. Professional landscape photographers will regularly get up at 3 AM to hike to a location before sunrise, or even spend the night in a tent, but that’s generally overkill.

Landscape photos are made, not taken. While it’s easy to shoot a dozen great portraits in an hour or two, a single landscape image can take all day. You need to get to the location, set up your camera, take the shot, and get home. Don’t rush the process.
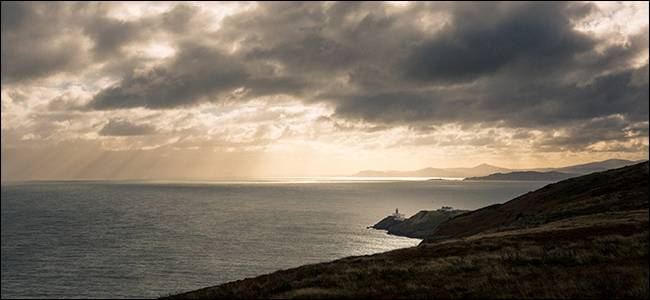
Although most landscape photos are taken with a wide angle lens, don’t be afraid to experiment. I normally use my 17-40mm wide angle, but the shot below was taken at around 120mm.

Take lots of test shots when you’re on location. Don’t worry about getting it right first time. Take a photo, see what you like and don’t like, then adjust your camera.
The “best” hours to take landscape images are the two hours before and two hours after dawn and dusk. These are the golden and blue hours. I also love shooting at night. You can shoot at other times of the day, but the sun’s light is normally harsher which makes for uglier photos.
Play around with longer shutter speeds. A shutter speed of between one and thirty seconds can blur water, trees, and other objects that move in the frame. When done right, it can make for a really serene image. The shot below was taken with a long shutter speed and you can see how the water breaking against the shore is just a smooth white blur. The test shots I have with faster shutter speeds are much less interesting.

To get long shutter speeds during the day, you need to use a neutral density filter. These are essentially sunglasses for your lens; they block some light from reaching the camera so you can take long exposures.
Although landscapes are normally about nature, don’t be afraid to have people or manmade objects in the frame. They can add a sense of scale or a bit of tension.

Landscapes are one of the most forgiving subjects to shoot. Break all the rules, totally go against my advice and see what you come away with. Having a tripod and all the time in the world is great, but you can capture some beautiful photos from the side of a road with 30 seconds and a smartphone. The shot above was taken with my iPhone 6S. If you’ve got your DSLR and don’t have a tripod to hand, just bump up the ISO and use an aperture of f/8 or f/11. Give it a try.