Taking photos at night is a lot harder than snapping shots during the day. The less light you have to play with, the more compromises you have to make, and the harder you have to work to get a great image.
Shooting at night covers a lot of different situations, from shooting portraits indoors by lamplight to capturing landscapes outdoors just by the light of the moon. The tips and techniques I’m going to mention today will work in a broad range of circumstances. You’ll need to use your own judgement to adapt them to exactly what you’re doing.
Why Night Photos Are Hard
Most night photos fail because shutter speed is much too slow when the photographer takes the shot. If it’s any longer than about 1/50th of a second and you’re shooting handheld, the image is going to be blurry; it’s just not possible to keep your hands perfectly steady enough. The image below was shot with a shutter speed of 1/13th of a second, and you can see the problem clearly.

Even when the shutter speed is fast enough that there’s no camera shake, it might be too slow to capture the subject. If you want to freeze something that’s moving, you need to be using shutter speeds well into the hundredths of seconds. Shooting sports at night is especially hard.
Missed focus can also be a problem. Most cameras struggle to autofocus at night, since the system they use relies on detecting contrast---which they can’t do in the dark. Even if the shot isn’t blurry from camera motion or subject motion, it might still be blurry because of missed focus.
So in short, bad night photos are generally blurry for one of three reasons. It stands to reason then, that good night photos…aren’t blurry. There in lies the challenge of night photography.
The Technical Stuff
As with most situations, you want your camera in aperture priority mode when shooting at night. Set the aperture to somewhere between f/1.8 and f/4. What exact value you choose depends on how wide the lens can go and how much depth of field you want. Wider apertures will let in more light, but they will also decrease the amount of the image that’s in focus; it’s a bit of a balancing act. Apertures tighter than about f/4 are normally unusable without a tripod.

Shutter speed is the most important setting at night. You need to get something between 1/50th of a second and about 1/200th of a second. Slower is better because it lets in more light, but you will need to go a little faster if your subject is moving. However, in aperture priority mode, you’re not controlling shutter speed directly. Instead, you’re controlling aperture and ISO. We’ve already set aperture to a nice wide value that will let in a lot of light, so the only thing left to manage is ISO. This is where the real compromise comes in.

Set your ISO to the lowest value that gives you the required shutter speed. Your ISO will probably be a lot higher than is ideal, but that's the compromise you'll have to make. I regularly shoot portraits at night with an ISO of 3200 or 6400, which is way higher than I’d ever consider using in any other circumstance. If your shutter speed is any faster than 1/200th of a second without a very good reason, your ISO is too high.
Other Tips and Tricks
When you’re shooting at night, circumstances change quickly. One moment you’re working with a street light, the next it’s almost pitch black. If you’re shooting somewhere that the light levels are constant, switch your camera to manual mode and dial in an aperture, shutter speed and ISO that work.

Your camera assumes you’re shooting during daylight when it meters a scene. Set your exposure compensation down a stop or two. Not only will this give you a faster shutter speed, but it will also make your photos look like better.

Getting colors right at night is tricky. A lot of shots have an unpleasant orange color cast that’s almost impossible to fix, even in Photoshop. If you’re not happy with how the colors look in your images, convert them to black and white. That’s what I did with most of mine.

If your lens has image stabilization, use it. It will let you use slightly slower shutter speeds while still using your camera handheld. Be careful though---it only stops blur from camera shake, not subject movement.
Shooting at night isn’t so much about shooting in darkness as working with artificial light sources. If you’re shooting in a city, use street lights, shop windows, car headlights, or any other source of illumination you can find.

If you’re shooting landscapes, life will be a lot easier. Use a tripod and a shutter speed that’s as long as you need. The shot below is actually an HDR image, but the main exposure was eight seconds long, at an aperture of f/5.6 and an ISO of 400.

On the subject of HDR images, if you’re shooting landscapes, shoot each scene with a range of shutter speeds. I shot the image above with shutter speeds of between four seconds and thirty seconds. In post, I combined multiple shots. Even if I hadn’t, having the extra shots gave me the flexibility to choose the best exposure.
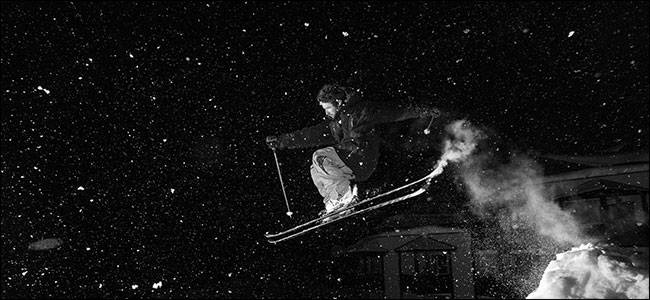
Your camera is going to struggle to autofocus in a hurry, so if your shot requires timing, focus manually beforehand. In the shot below, I’d already focused on the spot where Will was going to be.

If your camera is struggling to find focus, the best thing to do is try and autofocus on the area of the subject that has the most contrast. Once you’ve got a lock, switch to manual focus or use focus lock, and then reframe your shot.
Never use the on-camera flash built in to a lot of entry level DSLRs. It creates very ugly images. You’re always better cranking up the ISO and converting the images to black and white.
If, however, you’ve got access to off-camera flashes, don’t be afraid to use them. They’re just another light source for you to work with. The shot of Will above used three flashes. One beneath him, one off-camera to my left and one off-camera to my right.
I love shooting at night, whether it’s portraits or landscapes. You have to work a little harder to get usable shots, but the rewards are worth it. Most photographers don’t work at night and if you’re prepared to, your work will stand out.