Quick Links
You've seen it on plenty of PC help sites. "Uninstall fonts to speed up your computer!" Don't follow this advice--it's a myth. Uninstalling fonts is a troubleshooting tip for fixing a specific problem, not a general performance tip for speeding up your computer.
Sure, Installing Thousands of Fonts Is a Bad Idea
As with many myths, there's a kernel of truth here. You don't want to install too many fonts on your computer, as that can slow things down. Start installing thousands of extra fonts on a Windows, Mac, or Linux PC and you could see a noticeable slowdown.
Fonts won't just slow down your PC in general, though. Having too many fonts might slow the boot process down a bit as those fonts are loaded into memory, sure. But you'll notice too many fonts in other situations. For example, applications like word processors might take an unusually long time to start up. The "Font" menu in applications might take a long time to appear and be generally slow.
You'll likely start seeing that slowdown at more than 1000 fonts. The default fonts and even the handful of additional fonts you might install definitely won't slow anything down. On a new Windows 10 system, we see 78 fonts--the number is displayed at the bottom of the Fonts control panel. Uninstalling some of these fonts won't speed up your PC. Even if we saw hundreds of fonts, that would be fine.

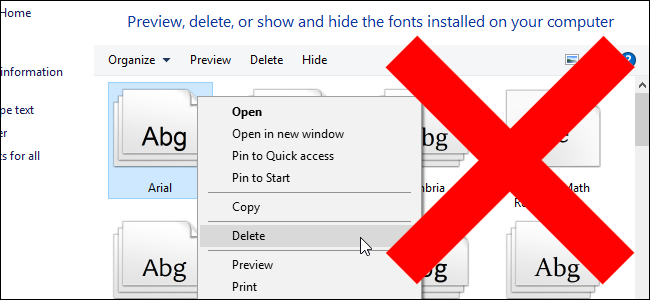
Don't Just Start Deleting Random Fonts!
Even if you have installed too many fonts and they're slowing down your computer, you don't need to delete fonts one by one. Ignore any advice that tells you to go to your Fonts folder and just start deleting fonts. Of course, if you've installed specific fonts and you remember which ones you installed, you can delete those one by one. But don't attempt to just haphazardly delete fonts.
If you're experiencing a slowdown due to too many fonts, you should just reset your Windows or Mac system back to its default state. This will delete any third-party fonts installed on your computer and restore the default system fonts. Again, you shouldn't have to do this in most situations, especially if your computer is working properly. Third-party programs might install their own fonts that they want to use, and restoring the default set will remove them.
However, this will restore any default system fonts you may have deleted if you followed this bad advice in the past, so it's a useful tip either way.
How to Restore Windows' Default Fonts
To reset your fonts back to the default state on Windows, use the Fonts control panel. This process works on Windows 7, 8, 8.1, and 10.
Open a Control Panel window and head to Appearance and Personalization > Fonts.

Click "Font Settings" at the left side of the window and then click the "Restore default font settings" button. Your fonts will be reset to the default ones Windows came with.

How to Restore Your Mac's Default Fonts
To restore your default fonts on a Mac, use the Font Book application. Press Command + Space to open a Spotlight search dialog, type "Font Book", and press Enter to open it.

Click the "File" menu in Font Book and select "Restore Standard Fonts". Your fonts will be reset to the default ones included in MacOS.
