Quick Links
The SkyBell HD is a video doorbell that lets you see who's at the door right from your smartphone and even talk to them without even opening your door. Here's how to install the unit and set it up.
The SkyBell HD is similar to the Ring Doorbell, with one difference: the SkyBell unit must be hooked up to your existing doorbell's wiring. The Ring Doorbell has the ability to do this, but it also has an internal battery that can power the whole unit itself. The SkyBell doesn't have this, but installation is still pretty easy if you don't have to reroute your doorbell wires.
Step One: Remove Your Existing Doorbell
In order to get to your doorbell's wiring, you'll need to first remove the doorbell button, which is usually mounted to the exterior wall of your house with two small screws that come right out with a screwdriver.
Once you have these screws out, you can pull out the doorbell button to expose more of the doorbell wires underneath. If you see two small wires, then the SkyBell is compatible. However, if your doorbell setup isn't like this, then the SkyBell won't be compatible. Don't worry, though, as 99% of doorbells use two small wires.

At this point, you can shut off the power to these wires by turning off the breaker that goes to the wires. However, in most cases, doorbell wiring is low voltage, and touching them won't shock you or anything like that. However, if you want to be absolutely safe and/or are paranoid, there's no harm in shutting off the breaker.
There will be two small wires connected to the back of the doorbell and they'll be connected by small screws. Loosen these screws and remove the two wires from the doorbell button. At this point, your doorbell wires are ready to go.
Step Two: Install the SkyBell HD Unit
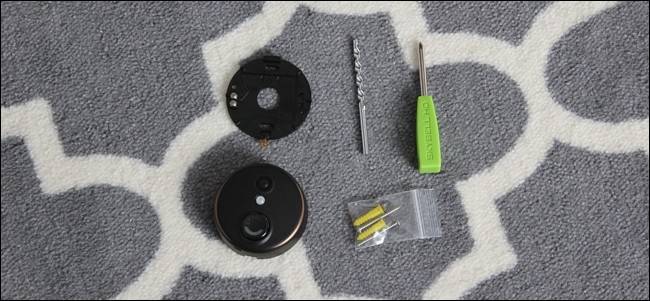
Grab the mounting plate that came with your SkyBell and hold it up to your exterior wall where you want the unit to be mounted, and mark with a pencil where the two mounting screws will be drilled.

If the exterior of your house is brick or masonry, you'll need to use the included drill bit to drill holes where you made marks, and then insert in the two yellow wall anchors before screwing on the mounting plate. If your exterior is wood, all you need to do is drill pilot holes using a drill bit that's a tad smaller than the included screws.

After that, screw in the mounting plate using the included screws. Be sure to feed the doorbell wires through the big hole in the center of the plate before mounting it.

Take the two doorbell wires and wrap each one around its own screw on the left side, and then tighten the screws down. Make sure that the two wires aren't touching each other. It also doesn't matter which wire goes to which screw, because the button will simply close the circuit between the two wires to make your doorbell chime go off.

Next, grab the SkyBell HD unit and begin placing it over the mounting plate. Start by placing the tab at the top of the unit inside the slot on the mounting plate.

After that, press down the rest of the unit onto the mounting plate. Then, use a screwdriver to drive in the screw on the bottom of the unit to lock it in place.

Once the SkyBell is mounted, it will automatically boot up and will alternate between red and green lights.

Step Three: Download and Set Up the SkyBell App
Go to the App Store on your iOS device or the Play Store on your Android device and download the SkyBell HD app (iOS, Android).

Once it's installed, open it up and tap on "Sign Up".

Enter in your email address, create a password, and type in your name. Then tap on "Sign up".

On the next screen, tap on "Add a new SkyBell".

Tap on "OK let's begin" at the bottom.

Make sure that your SkyBell unit is flashing green and red. If not follow the instructions on the screen. If everything looks good, tap on "Next" at the bottom.

After that, if you're on an iOS device, close out of the app temporarily and open up the Settings app and select "Wi-Fi". If you're on an Android device, you'll simply select your home's Wi-Fi network, which is detailed a couple of steps later on.

Tap on the SkyBell HD Wi-Fi SSID in the list to connect to it.

Once connected, go back into the SkyBell app. Select your home's Wi-Fi network and then tap on "Next" at the bottom.

On the next screen, enter in the password for your Wi-Fi network and tap on "Go" or "Next".

Your SkyBell HD will spend a few moments to configure and connect to your home's Wi-Fi network.

Once complete, tap on "Go to my SkyBell" at the bottom of the screen.

You'll be taken to the main screen of the app, where you can see a live view of the camera, as well as view recent activity of your doorbell. It might be blank at first, but once you get some activity going, the main screen will begin to populate. You can also tap on the gear icon in the top-right corner to access the settings.
