When you insert a picture into a document, Word always defaults to the Pictures Library folder for selecting your picture file. However, you can specify a different folder as the default picture location that displays when you insert pictures in Word.
If you have a common folder where you store all your images you insert into your Word documents, you can specify that folder as the default picture location in Word. For example, I keep all my screenshots for my articles in a folder called "HTG Images", so I'm going to set this as my default picture folder. This feature is similar to setting the default save location in Word.
NOTE: This only works in Word 2016.
To change the default picture location in Word, open an existing or a new document and click the "File" tab.

On the backstage screen, click "Options" in the list of items on the left.

On the Word Options dialog box, click "Advanced" in the list of items on the left.

Scroll down to the General section and click "File Locations".

On the File Locations dialog box, click "Images" under File types and then click "Modify".
Notice that the Location for Images is empty. When you do not specify a Location, the default Pictures Library folder is used as the Images location, and Word remembers the last folder you accessed when inserting a picture in the current Word session.

On the Modify Location dialog box, navigate to the folder you want to use as your default Images folder and click "OK".

The full path to the selected folder is inserted under Location for the Images file type. Click "OK".

You are returned to the Word Options dialog box. Click "OK" to close it.

Now, when you click "Pictures" on the Insert tab to insert a picture into your Word document...

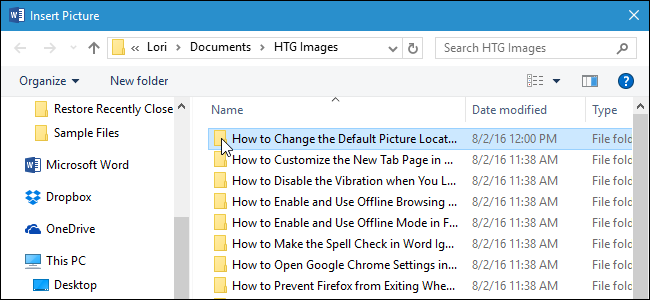
...the Insert Picture dialog box opens directly to the folder you specified as the default Images location.

There is a limitation you should know about when setting a custom default images folder. Word remembers the folder you last used when saving or opening documents in the current Word session. However, this is not true when you set a custom default images folder. Every time you insert a picture, the Insert Picture dialog box defaults to the folder you specified, not the last one you opened. To have Word remember the folder you last opened to insert a picture, you must remove the path from the Location column for the Images file type on the Modify Locations dialog box. However, you cannot simply delete the path. You must use the Registry Editor to remove the entry Word when you set this option.
Standard warning: The Registry Editor is a powerful tool and misusing it can render your system unstable or even inoperable. This is a pretty simple hack and as long as you stick to the instructions, you shouldn't have any problems. That said, if you've never worked with it before, consider reading about how to use the Registry Editor before you get started. And definitely back up the Registry (and your computer!) before making changes.
Open the Registry Editor by clicking on Start and typing
regedit
. Press Enter to open Registry Editor, or click on
regedit
under Best match.

NOTE: You may not see this dialog box, depending on your User Account Control settings.

In the tree structure on the left, navigate to the following key:
HKEY_CURRENT_USER\Software\Microsoft\Office\16.0\Word\Options
Find the PICTURE-PATH entry on the right. The value of the entry should be the path you specified on the File Locations dialog box. Press the "Delete" key to delete the entry. Make sure you only delete the PICTURE-PATH entry, not the entire Options key.

The Confirm Value Delete dialog box displays making sure you want to delete the entry. Click "Yes".

Close the Registry Editor by selecting "Exit" from the "File" menu, or by clicking the "X" button in the upper-right corner of the window.

If you're not comfortable editing the Registry yourself, we've created a downloadable registry hack you can use to delete the "PICTURE-PATH" key from the registry. Extract the .zip file, double-click the .reg file, and click through the prompts.
Delete the PICTURE-PATH Value registry hack
if you enjoy working with the Registry, it's worth taking the time to learn how to make your own Registry hacks.