Quick Links
Windows--especially Windows 10--has a bad habit of installing new updates for hardware drivers whether you want them or not. You could go big and simply prevent Windows from downloading updates altogether, or you might have luck blocking or hiding updates. But if you've got the Pro or Enterprise version of Windows, you can tailor your actions a little better by using Group Policy Editor to prevent the installation or updating of specific devices.
And of course, we have a caveat for you right off the bat: setting a policy to disable updates for a device prevents both automatic and manual updates of drivers for that device. So, if you want to update the driver yourself, you'll have to disable the policy you're about to configure, update the device, and then set the policy up again. That said, with a little preparation to minimize the hassle, we think you'll find it worth the effort.
There are actually two steps to this process. First, we're going to use Device Manager to find the hardware IDs for the device in question, and then we're going to use Group Policy Editor to block installation or updating of the device that matches those IDs. Before you get started, though, you should make sure that the device has the driver version you want installed and that everything's working properly.
Step One: Find the Hardware IDs for the Device in Device Manager
Your first step is finding the hardware IDs of the device for which you want to block updates. And for that, we'll use Device Manager. Hit Start, type "device manager," and then press Enter or click the "Device Manager" entry.

In Device Manager, find the device you want to block updates for. Right-click the device and choose "Properties" from the context menu.

On the device's properties window, click the "Details" tab.

From the "Property" drop-down menu, choose "Hardware Ids" to display the IDs associated with the device.

Now, all you have to to is grab those IDs so you can access them when you configure the policy in the next step. The easiest way is to copy them to a text file. Just click the top ID, shift-click the bottom ID to select them all, and hit Ctrl+C to copy the text. Fire up Notepad (or whatever you use to store text) and press Ctrl+V to paste the values. And if you're collecting IDs for multiple devices, put them in different sections and label them so you can tell which IDs go with which device. Save the text file so you can call it up in the future.
Step Two: Prevent Installation and Updating of the Device in Group Policy Editor
Now that you have the right hardware IDs in hand, you'll be using Group Policy Editor to make the changes. Note again that you'll need to be using a Windows Pro or Enterprise edition. The Windows Home edition does not have Group Policy Editor.
Be warned that Group Policy is a pretty powerful tool, so if you've never used it before, it's worth taking some time to learn what it can do. Also, if you're on a company network, do everyone a favor and check with your admin first. If your work computer is part of a domain, it's also likely that it's part of a domain group policy that will supersede the local group policy, anyway.
First, sign in with an administrative account and open the Group Policy Editor by hitting Start, typing "gpedit.msc", and then pressing Enter.

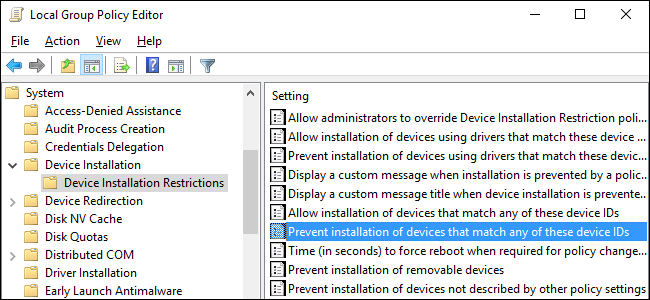
In the Group Policy window, in the left-hand pane, drill down to Computer Configuration > Administrative Templates > System > Device Installation > Device Installation Restrictions. On the right, find the "Prevent installation of devices that match any of these devices IDs" item and double-click it.

In the policy window, select the "Enabled" option and then click the "Show" button.

In the Show Contents window, you'll add the hardware IDs for the device. You'll need to add them one at a time, so just copy each ID from that text file you created earlier and paste it into the next available line in the "Value" column. When you're done adding all the hardware IDs, click OK. Note that if you're blocking updates for more than one device, you can just keep adding hardware IDs for all the devices to this window until you're done.

Back on the policy page, click OK to apply the policy change and then you can exit the Group Policy Editor. The only way to really test the new settings is by trying to install an updated driver or waiting for Windows Update to try. You should get an error message when any new driver installation is attempted.
Also, since the device is still registered, Windows Update may download new driver updates for the device. It just won't be able to install them, instead reporting an installation error in the Windows Update window. This won't get in the way of other updates being successfully installed and you can always hide that particular update if you'd rather not see it in Windows Update at all.
If you change your mind and want to allow updates to that device again, you can go back into Group Policy Editor and disable the policy. You'll have to do this even if you just want to allow a one-time manual update of the drivers.
There is a big caveat here, though. If you disable the policy (or set it to "Not Configured"), all the hardware IDs you added to the policy will be deleted. If you want to re-enable the policy again, you'll have to re-enter all the hardware IDs. This is especially important to note if you've got hardware IDs for multiple devices entered. If you want to re-enable updates for just one device, it's better to leave the policy on and remove those specific hardware IDs. That's why it's important to save that text file.
And that's it. It's not a perfect solution, but using Group Policy to disable updating specific devices at least gives you a little more control than having to disable updates altogether.