By default, OS X shows you small, simple Print and Save dialogs. You can click the arrow on the right to expand them for more options, or you can show the expanded dialogs by default with a simple command from the Terminal.
Let's show you what we mean. Here is the simplified version of the Save dialog, which doesn't offer many options. It lets you pick your filename, add tags, choose a location, and finally select a format.

Clicking the arrow button next to the "Export As" field, however, will expand the dialog so that you can navigate about your Mac's system drive, create a new folder, and show or hide the file's extension

Similarly, here is the simple Print dialog as shown from Safari. It offers options to change the number of copies, which pages to print, and the option to print the document as a PDF, but not much else.

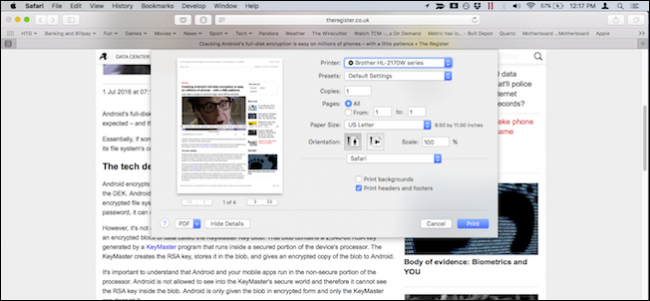
Here is the expanded Print dialog, which includes further paper size, orientation, and scaling options, among others.

Both the expanded versions of these dialogs have some very useful features, which some of you might want to take advantage of every time you print or save. Rather than having to always expand them, you can use a simple command line trick to make the expanded versions always appear by default (or until you change them back).
To make these changes, first open the Terminal, which can be found in Applications > Utilities.

With the Terminal open, type the following command (or just copy and paste it) to change the default view on the Print dialog and hit "Enter" when you're done.
defaults write -g PMPrintingExpandedStateForPrint -bool TRUE
In the Terminal, it will look something like this.

To make this command take effect, you have to restart your computer. So if you want to affect this change to the save dialog as well, you should plug in the following command before you restart to save time. Don't forget to hit "Enter" when you're done.
defaults write -g NSNavPanelExpandedStateForSaveMode -boolean TRUE
Again, in the Terminal it will look similar to the following.

Now, go ahead and restart.
If you want to reverse this change, you want to enter each of the previous commands only use the FALSE flag at the end instead of TRUE.
For example, to revert to the old Print dialog, enter the following.
defaults write -g PMPrintingExpandedStateForPrint -bool FALSE
To revert to the old Save dialog, use this command.
defaults write -g NSNavPanelExpandedStateForSaveMode -boolean FALSE
Again, you will need to restart in order to make these changes go into effect.
No doubt, using the Terminal really gives you a lot of power you don't normally have with the vanilla install of OS X. For example, you can add a message to your systems lock screen, and another neat trick you can employ is the ability to quit the Finder, which will let you quickly clear your desktop for added privacy. Now, you can add expanded Print and Save dialogs to your arsenal.