Preview, the image viewer that comes preloaded with every Mac, is one of the best and most feature-rich default image viewers available. So, it shouldn't be a big surprise that it can do color corrections as well.
It's hard to find an image viewer that everyone is happy with. On Windows, everyone has an opinion as to what's best, because the default option leaves much to be desired. Preview doesn't have that problem, being able to perform many tasks like combine and edit images into one PDF file as well as batch resizing, which is always a handy trick.
Quick color corrections are another task you can perform with Preview, which is a pretty big deal, especially if you don't want to use another program, or just have one or two images that you want to fix.
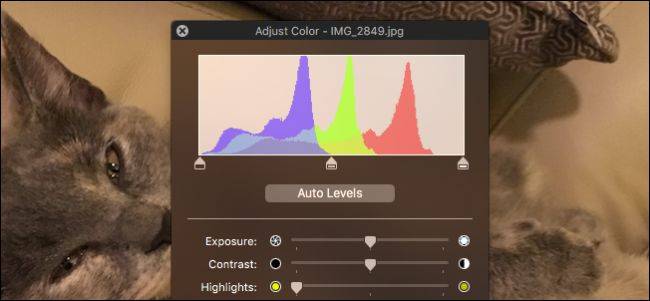
To use color correction on Preview, first open an image you want to tweak, click on the Tools menu, and select "Adjust Color" or press Command+Option+C on your keyboard.

Then, you can simply click "Auto Level" for an instant adjustment, or you can grab the triangle sliders at the bottom of the histogram for more fine-tuned refinements. The left pointer adjust dark tones, the middle one is for midtones, and right triangle fixes highlights.

Then there are basic adjustments nearly all images need using the Exposure, Contrast, Highlights, and Shadows controls. Of course, you may not need to make all these adjustments, but chances are you can make some small but significant fixes to the exposure and contrast.

If you select the eyedropper tool, you can auto-correct the color by selecting a neutral point in your photo such as a white or gray area. Alternatively, the Temperature and Tint sliders will let you make tinier tweaks.

To completely convert an image to black and white, move the Saturation slider all the way to the left, or play around further with the color by adjusting the Temperature, Tint, and Sepia controls.
Finally, give the Sharpness slider a whirl if you feel like your photo needs a little more crispness to its edges. Just bear in mind, you may introduce some unwanted artifacts into your image, so go easy on it. On the other hand, drag the slider all the way to left for a soft, dreamy look.

Don't be afraid to play around with things and see how easy it is to turn what you thought was a simply meh photo into something wonderful. Nothing is permanent until you save it, so there's no fear of making a mistake. If you want to undo everything, just click the "Reset All" button at the bottom of the color panel.
Now, the next time you've got a photo and you're just not happy with it, just open it in Preview and fix it in just a few minutes without any additional software or having to learn how to use some big, complicated image-editing application.