Quick Links
That boring, grey circle may give you a slight indication of who you're calling or texting, but wouldn't it be nice if all your iPhone contacts had photos to go with them? Here's how to manually add a picture to a contact.
If you’re friends with someone on Facebook, their contact information and photo is automatically added to their contact card on your phone. But if you don't connect to Facebook--or you have a contact who isn't on Facebook--you'll need to add that photo manually. When you do, it will display on the screen every time that person calls you, as well as next to their name when they text you on an iPhone 6 or above. (Of course, you can hide those contact photos too, if you so choose.) Here's how it all works.
How to Manually Add a Photo to a Contact Using the Contacts App
To add a photo to a contact directly within the Contacts app, tap the “Contacts” icon on your Home screen.

Find the contact you want to add the photo to, open it, and tap “Edit” in the upper-right corner of the screen.

On the editing screen for the contact, click “add photo” next to the contact’s name.

To add a photo to the contact, you can either take a photo, if you’re currently with that person, or you can choose a photo from your photo library. For our example, we’re going to add a photo we have in our photo library, so we tap “Choose Photo”.

Find the photo in your photo library you want to use and tap on it. A circle displays on the photo. Move the photo around under the circle until the circle surrounds the part of the photo you want to use on the contact. When you have the photo positioned where you want, tap “Choose”.

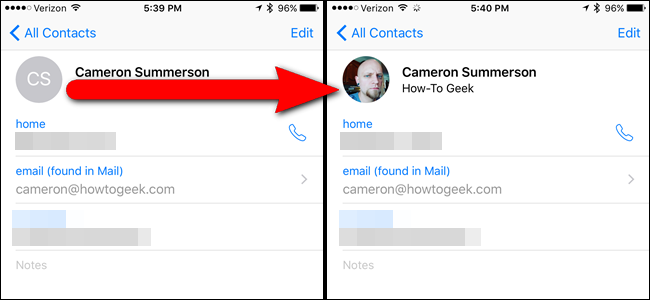
The photo displays on the circle next to the contact’s name. If the photo is not quite right, you can tap “edit” below the photo to change it. Otherwise, tap “Done”.

When you edit a contact’s photo, you can take another photo, choose a different photo from your photo library, edit the current photo, or delete the photo.

Once you’re done, the photo displays next to the name.

How to Manually Add a Photo to a Contact Using the Photos App
You can also add a photo manually to a contact using the Photos app. To do this, tap the “Photos” icon on the Home screen.

Find the photo you want to use for a specific contact and tap on it. The photo displays with options at the bottom of the screen. Tap the “Share” button in the lower-left corner.

On the Share screen, tap “Assign to Contact”.

Search for the contact to which you want to add the selected photo and tap on that contact.

Just like in the first method, you get a circle on the picture. Move the picture around until you get the photo positioned the way you want and tap “Choose”.

Now, when you view the contact, you’ll see the selected picture next to the contact’s name.

If you want to edit the photo, tap "Edit" in the upper-right corner of the screen, just as we described in the first section above.
Adding a photo manually using either method allows you to use any photo you want on a contact. It doesn’t have to be a photo of that person. Maybe you have a fun picture of the two of you that you want to see when they call or text you.