Say you're applying for a job, and the hiring company wants signed documents sent to them, or imagine you want to add an addition on to your house and the contractor wants to see photos. How do you that easily on a Mac?
You could just attach them all to an e-mail or text message, but that method is a bit ponderous and can be a somewhat annoying to the recipient. Alternatively, you could zip them all up and send them that way, but then the person on the other end has to unzip them, which can also trip up some users.
Converting photos to PDF on a Mac is really easy, and it makes things much more manageable if you're scanning in documents.
Scanners typically import photos in .JPG format. If you're just viewing them on your end, then it's fine to have them all lying about as separate files. If you want to share them with someone else however, then placing them in a PDF is almost ideal.
In this example, you need to send a friend scanned copies of the Declaration of Independence, Constitution, and Bill of Rights.
First, head to the Applications folder and open the Preview app (or search for it with Spotlight). Preview will direct you to open the images you want, so browse to the folder where they are kept and select them. Use the Command key to select multiple images. When you're done selecting images, click the "Open" button.

With your photos selected, you can rearrange them to the order you desire by clicking and dragging them around in the Preview sidebar.

Once you're happy with their order, select "File > Print".

Before we proceed with our documents, we want to take a quick moment to show you what to do if your images aren't oriented correctly. In the following example we see a photo that was take in portrait orientation. We need to change it to landscape so our recipient doesn't have to turn their head. Click the "Show Details" button at the bottom of the print dialog.

You have a whole bunch of options here, feel free to take your time to peruse them. The only one we're interested in at this time however, is the Orientation feature.
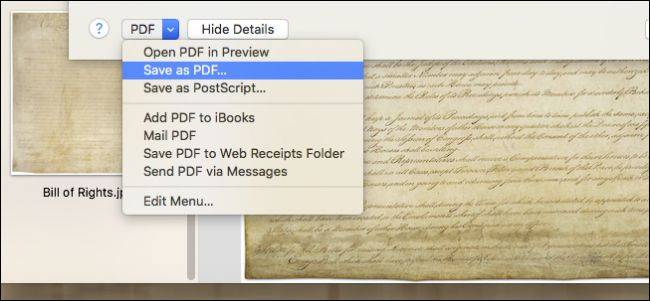
Once you're made sure everything is oriented correctly and in the proper order, in the bottom-left corner, click the little dropdown menu that says "PDF". You have a few options, if you want to go ahead and email it straightaway, you can choose "Mail PDF" but for now we'll just choose "Save as PDF...".

On the save dialog, you want to fill it in with any information you see fit, and make sure to decide where you want the PDF to save. We elected to save our to the Desktop.

If you're interested in adding a password to your PDF, then click "Security Options..." on the save dialog and you'll be given options not only to password protect the document upon opening, but also to copy content, as well as print it.
Once you're ready, you can click the "Save" button on the save dialog and your PDF will be created.
Okay, but what if you forget to add a couple of images, or you want to remove one? We can't very well send our friend those three documents and not also send them a copy of the remaining constitutional amendments!
No problem, just open your newly created PDF and drag any additional photos you want to add to it or select the photo(s) you want to remove, right-click, and select "Move to Trash" from the resulting menu (or use Shift + Delete).
Once you're happy with your changes, simply resave the PDF from the File menu, or use Command + S.