Taking notes can make the difference between remembering that brilliant idea you came up with in the shower, and letting it go down the drain. Apple's Notes app has come a long way from it's fake-pad-of-paper days, stuffed with features to assure your best brainstorms are always within reach.
Notes helps take a load off your brain by giving you a convenient way to jot down your most pressing thoughts, and if you own other Apple devices connected to the same iCloud account, they'll be instantly synced, meaning everywhere you go, so too are your notes.
Notes' big makeover came in iOS 9 and OS X 10.11 El Capitan, and has gotten even more new features since it first came out. We're using the most recent version of Notes found on iOS 9.3 and OS X 10.11.4. If you do not have either of these versions installed, then you won't be able to lock notes, which is a new key feature.
How to Use Notes on OS X
Notes is included with OS X, so there's nothing to download or install. If you don't have it pinned to your Dock already, then you can open it from the Applications folder or using Spotlight.
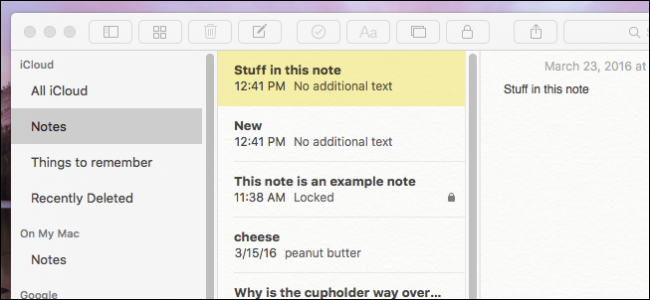
There are three panes to the Notes app: the folder pane, your list of notes, and the note's content, so when you click on a note, you see the full text of what you have written on the right.

Along the top of the Notes app is a toolbar allowing you to, from left to right: show or hide the folders, browse attachments, delete a note, write a new note, create a checklist, apply a textual style, add a photo or video, add or remove a password lock, and share and search notes.

To create a note, click the new note button or use the keyboard shortcut Command+N.

The first line of your note will show as the title, while each successive line will be the note's content.

Notes also includes the ability to attach photos or videos. This can prove very useful when trying to remember what inspired you.

When you want to attach a photo or video to a note, simply drag it onto the note. For example, if you were using the Notes app to create a grocery list, you could remind yourself to buy cat food and make it especially persuasive with an attached picture of your hungry kitty.

When you are done with a note--say you've managed to bring your brilliant, genius idea to fruition--you can delete it. Either select the note and click the trash can icon, or simply hit the "Delete" key. If you make a mistake and want to resurrect a note, you can go into the "Recently Deleted" folder and drag it back to the Notes folder.

Speaking of folders, you can easily create more. So if you're a stickler for organization, you can file all your notes into neat categories. To create a new folder, simply click the "+" in the bottom-left corner of the folders pane, or use the keyboard shortcut Shift+Command+N.

In order to move notes folders, they must be created on your Mac or iPhone or iPad. You can move notes folders for example, from your "On My Mac" folder to "iCloud" and vice-versa, but you can't move notes folders (such as in the previous example) from your Mac or iCloud folder to your Google notes folder.
Also, you can't move the default folders such as "Notes" folder or "Recently Deleted" folders, just custom notes folders that you create.
How to Browse Your Attachments
Let's take a moment to talk about attachments. Over time, you may add quite a few attachments to your notes and you may sometimes forget which attachment is associated with a particular note. Luckily, if you click the "Browse attachments" button, you can see all your attachments, by varying category in one convenient location.

Want to see the note to which a picture, document, or website is attached? No problem, simply right-click on it and select "Go to Note".

You can also access the Attachments Browser by using the keyboard combination Command+1.
How to Make a Note Private
To lock a note, your first need to select a note you want to lock, then click the lock icon in the toolbar.

You're going to create a password for all your locked notes, so you will need to enter a password, verify it, and then if you want, a hint to help you remember your password. Remember, this password will extend to any notes you lock from hereon so it might be a good idea to create a hint, just in case.

You will only have to perform this initial password creation once. From then on, each time you want to lock a new or existing unlocked note, you will simply select it, click the lock icon, and enter your lock password.

If you lock a note, keep in mind its title can still be seen; only its contents will be protected.

If you want to close all your notes at once, click the lock icon again and select "Close all Locked Notes". This will ensure that you don't accidentally leave any open.
How to Use Notes on iOS
Let's next talk about Notes on the iPhone and iPad, which sports many of the same features, including a cool annotation feature that literally lets you create handwritten notes.
The Notes app on your iPhone or iPad isn't likely to throw you for a loop. It has pretty much the same functionality as the Notes app on OS X.
We begin with the Folders view, which has the requisite "All iCloud", "Notes", and "Recently Deleted" folders as well as our synced "Things to remember" folder we created earlier.
If you want to make changes, you can tap the "New Folder" button in the lower-right corner. Tapping "Edit" will allow you to delete multiple folders, or you can simply swipe left over an individual folder to delete it. Note, you cannot make and changes to the default three folders.

We'll tap on the Notes folder to se all our notes, synced between our Mac and all our iOS devices via iCloud. Any device that is logged into your iCloud account will sync your notes, unless you turn Notes syncing off. At the bottom of the app, there's a button to create a new note, or access the attachments browser, just as we discussed in the first section.

Tap the "Edit" button and selection bubbles will appear alongside each note. You can then move or delete notes en masse.

Alternatively, swipe left to move or delete individual notes.

Open a note and notice the toolbar at the bottom. From left to right you have buttons to delete, make a checklist, attach a photo or video, annotate a note, and create a new note.

If you tap the camera icon, you can attach a photo or video from your library or you can take a new one.

Let's check out the annotation tool. You'll have a choice of several tools, which will let you actually write notes using pen, pencil or marker, as well as measure, erase, or choose a different color.

Just like on OS X, you can make notes private, too.
How to Make a Note Private
To lock a note on your iPhone or iPad, first select your note and then tap the "Share" icon and you will see the "Lock Note" button.

When you tap that button, you will be prompted to enter a password.

Once you enter a password, you simply need to tap the lock icon in the toolbar.

Once locked, you can either enter your password or use your TouchID fingerprint to unlock it.

This will work across both platforms, so if you lock a note on your Mac, you can unlock them on your iPhone and vice-versa.
No doubt, if you often find yourself coming up with great ideas, but often forget them before you can write them down, then the Notes app will be of great value, especially since your notes will be synced across both iOS and OS X platforms. This gives you double assurance that no matter which device you're using, your notes will always be in front of you.