Quick Links
Android's notification system is arguably one of its strongest features, but it can also be annoying if you accidentally dismiss those notifications. Fortunately, there's a simple way to view all the notifications that have hit your phone.
How to Find Dismissed Applications on Jelly Bean and Above
While the feature we're going to look at here has been around for a while---since Jelly Bean, in fact---it's shocking how unknown it still is. It's good that it's still part of the operating system after all these years, because it's truly a helpful setting to have access to.
There isn't a simple way to get directly to this setting though the menu, so it's actually accessed through a shortcut widget. In other words, you'll have to add this as a shortcut on your home screen in order to use it. If you're cool with that, let's do this thing.
NOTE: This setting isn't available on Samsung phones. If you'd like to access your notification history on a Galaxy device, we recommend using the Notification Saver app, which does the same thing.
First, long-press on your home screen, and then choose "Widgets." This setting could be found elsewhere depending on which phone (or launcher) you're using, but at this point it should be fairly ubiquitous.

Scroll down until you find the Settings option. Pull that out to the home screen.


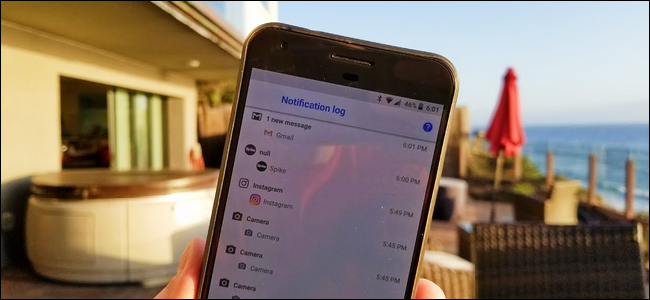
A new menu immediately opens, with a slew of options for you to choose from---this is what the Settings widget links to. Find the "Notification Log" option and give it a tap.

Boom, that's really all there is to it. From this point forward, you only need to tap this little icon to jump straight into a list of all your notifications, both current and dismissed. Keep in mind, however, that this won't actually take you to said notification when you tap it. Instead, it opens all the intricate details of the notification---mostly bug tracking stuff for developers.


Un-dismiss Notifications on Android 8.0 (Oreo) with Unnotification
If you have a device running Android 8.0 (Oreo), you can also use an app called Unnotification, which is designed to un-dismiss notifications instantly if you accidentally dismiss them.
It's a free download in the Play Store and is incredibly simple to set up and use, so go ahead and give it an install.
Setting Up and Using Unnotification
The first time you fire up the app, you'll need to grant it Notification Access, which makes perfect sense---if it can't see your notifications, it can't bring them back from the dead. Tap the OK button, and then toggle "Unnotification" to the on position.


A warning will pop up---just tap "Allow" to turn the service on.

With that done, Unnotification is ready to do its thing. To give it a try, dismiss a notification. A new notification appears in its place, asking if you'd like to undo that dismissal---that's what Unnotification does in a nutshell.

To bring your dismissed notification back, just tap this newly-generated notification. Poof---it's like magic.
And if you choose not to bring back the notification, Unnotification will get rid of itself after five seconds. Super cool.
There's also an optional Quick Settings tile that allows you to bring back the last dismissed notification anytime you want---even after that five second window has passed. You'll need to add the tile to your Quick Settings panel, of course.

Tweaking Unnotification
Unnotification's options are very simple, offering just a few tweaks to how the app works as well as a way to blacklist any apps that you don't want Unnotification to work with.
To add a blacklisted app, just click the + button and choose the app. From then on, Unnotification won't offer to bring back a notification for any app on the black list.


In the Settings menu (press the cog icon in the upper right corner to get here), you have a handful of options. You can set the amount of time before Unnotification disappears, use the Quick Settings tile only, enable the undo action, and choose which actions show up on Unnotification notifications.

That's quite a mouthful, so here's the breakdown:
- Undo Notification Timeout: Set how long it takes for the Unnotification notification to disappear. The default is five seconds.
- Use Quick Settings Tile Only: This will disable the undo notification and only use the Quick Settings tile to bring back dismissed notifications.
- Enable Undo Notification Action: With this enabled, tapping the Unnotification notification will undo the last notification. With it disabled, it will do nothing.
- Choose Undo Notification Actions: By default, you can choose to Ignore an app (this adds it to be blacklist automatically---you can remove it in the app's main interface) or view the Notification Log (the very one highlighted earlier in this post). There's also the option to add an Undo button, or you can disable either of the two default actions. Your call.

That's pretty much all there is to it. The only other thing worth noting here is that Unnotification doesn't actually "bring back" the undismissed notification---it actually generates a new one. As such, any notification that you choose to bring back will say it was generated by Unnotification. But you can still tap on it to interact just like if it was generation by the original application.

It's not a perfect solution, but it really does work pretty well.